Table of Contents >> Show >> Hide
- What Are Storage Settings in Windows 10?
- Why You Might Need to Open Storage Settings
- How to Open Storage Settings in Windows 10
- What You Will See After Opening Storage Settings
- How to Use Storage Settings Once You Open It
- Best Ways to Use Storage Settings Without Regret
- Common Problems When Opening Storage Settings
- Quick Example: The Most Practical Way to Open It
- When Should You Use Storage Settings Instead of Disk Cleanup?
- Real-World Experiences With Storage Settings in Windows 10
- Final Thoughts
Note: Windows 10 still works, but Microsoft support ended on October 14, 2025. The steps below still apply to most Windows 10 systems, though some labels may look slightly different depending on your version and updates.
If your Windows 10 PC is acting like it just ate a giant buffet of mystery files, the Storage settings page is where the detective work begins. This built-in area of Windows lets you see what is taking up space, clean temporary files, turn on Storage Sense, and manage how your PC handles disk space over time. In other words, it is the digital equivalent of opening the closet door and finally admitting, “Okay, something in here has gotten out of hand.”
This complete guide walks you through exactly how to open Storage settings in Windows 10, what you will find once you get there, and how to use the most helpful tools without accidentally deleting something important. Whether you are working with a roomy desktop or a laptop hanging on for dear life with 32GB or 64GB of storage, this guide will help you get oriented fast.
What Are Storage Settings in Windows 10?
Storage settings is the part of Windows 10 that shows how your drive space is being used. It breaks your storage into categories such as apps, temporary files, system files, pictures, videos, documents, and more. It also gives you access to features like Storage Sense, which can automatically remove unnecessary files and help keep free space from disappearing like socks in a dryer.
This page is useful for more than just cleanup. It can help you understand why your C: drive is almost full, why Windows updates keep complaining about free space, or why your laptop insists it is out of room even though you “only installed a few things.” Spoiler: Windows counts more than your selfies and spreadsheet collection.
Why You Might Need to Open Storage Settings
Most people go hunting for Storage settings when something annoying happens. Common reasons include:
- Your C: drive is nearly full.
- Windows updates are refusing to install.
- Your PC feels slower than usual.
- You want to remove temporary files safely.
- You want Windows to clean junk automatically with Storage Sense.
- You need to check what is using the most disk space.
- You want to change where new content is saved.
If any of that sounds familiar, congratulations: you and Storage settings are about to become close friends.
How to Open Storage Settings in Windows 10
There is more than one way to get there. That is good news, because Windows loves giving you several doors to the same room.
Method 1: Open Storage Settings Through the Start Menu
- Click the Start button.
- Select Settings.
- Click System.
- Select Storage from the left-hand menu.
This is the classic path and the one most official guides point to. If you like clicking through menus the old-fashioned way, this method is reliable and easy to remember.
Method 2: Use the Keyboard Shortcut
- Press Windows + I to open the Settings app.
- Click System.
- Choose Storage.
This is usually the fastest manual method. If your mouse is being moody or your touchpad has entered its dramatic phase, this shortcut is a lifesaver.
Method 3: Search for Storage Settings
- Click the search box on the taskbar, or press the Windows key.
- Type Storage settings.
- Click the result that appears.
This is the easiest route for most users. It is quick, direct, and ideal if you do not feel like remembering where Microsoft hid the option this week. You can also search for Storage Sense and open related settings from there.
Method 4: Use the Run Command
- Press Windows + R.
- Type ms-settings:storagesense.
- Press Enter.
This method jumps straight to the Storage area using a Windows Settings URI command. It feels a little nerdy, which is excellent. Nerdy shortcuts are often the best shortcuts.
Method 5: Open It from a Storage Warning
When Windows detects low disk space, it may show a warning or display a red capacity bar for your system drive. In some cases, clicking the notification or the storage prompt leads you directly to Storage settings. This is less of a planned visit and more of a “Windows dragged me here because I clearly was not going willingly” situation.
What You Will See After Opening Storage Settings
Once you open the page, Windows 10 usually shows your main drive first, often the C: drive. Here is what to expect:
- Drive usage overview: A quick breakdown of how much space is used and how much is free.
- Storage categories: Sections such as Apps & features, Temporary files, System & reserved, Documents, Pictures, Videos, and more.
- Storage Sense: A toggle that lets Windows automatically clean up certain files.
- Advanced storage options: Tools for viewing storage used on other drives or changing where new content is saved.
This page is helpful because it does not just say, “You are out of space, good luck.” It actually shows where the problem is likely hiding.
How to Use Storage Settings Once You Open It
Check What Is Taking Up Space
Click your main drive or look through the storage categories to see where the biggest chunks of space are going. For example, if Apps & features is huge, you may have games or old software hogging space. If Temporary files is the problem, Windows may be hoarding update leftovers, cached files, and recycled items like a digital raccoon.
Open Temporary Files
The Temporary files section is one of the most useful areas on the page. It can show things like:
- Windows update cleanup
- Delivery Optimization files
- Recycle Bin contents
- Temporary internet files
- Thumbnails
- Previous Windows installation files
Read the categories before deleting anything, especially if you see items like Downloads or previous Windows versions. That is where “freeing space” can suddenly become “where did my files go?”
Turn On Storage Sense
Storage Sense is the built-in cleanup assistant in Windows 10. You can enable it with a toggle, then choose how often it runs and what it removes. Depending on your version of Windows 10, you may see options such as:
- Delete temporary files that apps are not using
- Empty the Recycle Bin after a set number of days
- Clean files in the Downloads folder after a set period
- Make older OneDrive files online-only to save local space
If you like automation, Storage Sense is great. If you like controlling every single byte personally, you can leave it off and manage cleanup yourself.
Check Other Drives
If your PC has more than one drive, open the option for Storage used on other drives. This is handy if you store files on D: or another disk and want to see which drive is actually full. A lot of people blame Windows when the real problem is a second drive quietly screaming for help.
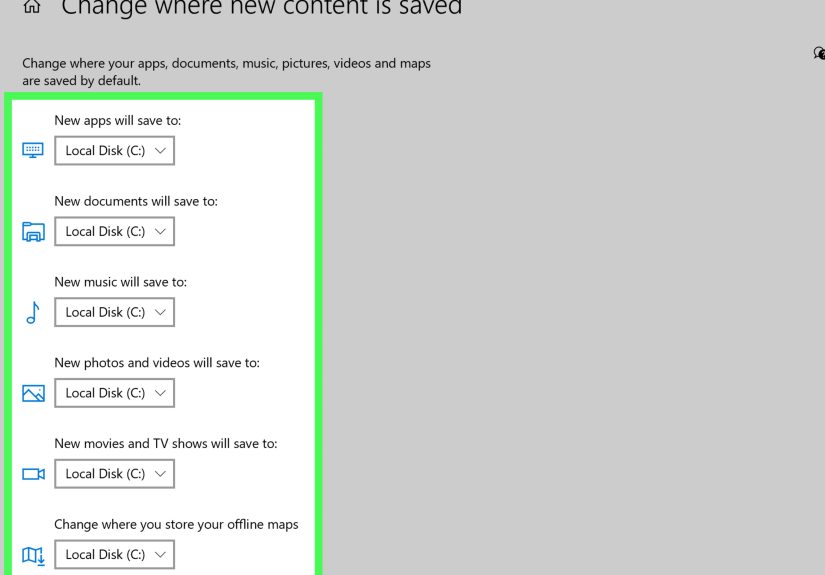
Change Where New Content Is Saved
Under more advanced options, Windows 10 may offer Change where new content is saved. This lets you set default save locations for new apps, documents, music, photos, and videos. It can be especially useful if your main drive is small and you want newer files to land on a secondary drive instead.
Best Ways to Use Storage Settings Without Regret
Do Not Delete Everything Blindly
Just because Windows offers a checkbox does not mean you should click it at top speed like you are defusing a bomb. Review each category carefully, especially:
- Downloads: This may contain files you still need.
- Recycle Bin: Good to empty, but only if you are sure.
- Previous Windows installation: Fine to remove if you are not planning to roll back.
Use Storage Sense for Maintenance, Not Panic
Storage Sense works best as a regular maintenance tool. It is not a miracle cure for a drive that has been stuffed to the ceiling for three years. Think of it as brushing your teeth, not emergency dental surgery.
Look at System & Reserved Before You Panic
If your drive usage looks bigger than expected, check the System & reserved area. Windows may reserve part of your storage for updates, caches, and system needs. That means the math on your drive may not feel intuitive, but it is not necessarily a sign that your laptop is haunted.
Common Problems When Opening Storage Settings
The Storage Page Will Not Open
If clicking Storage settings does nothing, try these basic fixes:
- Restart the Settings app.
- Restart your computer.
- Install pending Windows updates if available.
- Try opening the page through Windows Search or the Run command.
If the page freezes repeatedly, you may be dealing with a deeper Windows issue, but in many cases a reboot or updated system gets things moving again.
Storage Categories Look Wrong
Sometimes Windows needs a little time to analyze your drive. If the categories seem incomplete or the numbers do not look right immediately, wait a minute and refresh the page. Storage settings is useful, but it is not always lightning fast.
Storage Sense Is Missing or Limited
Some options vary by Windows 10 version, device setup, policies, and whether you use OneDrive. On business-managed computers, an administrator may also control some Storage Sense behavior through policy settings.
Quick Example: The Most Practical Way to Open It
If you want the simplest method for everyday use, do this:
- Press the Windows key.
- Type Storage settings.
- Press Enter.
That is the fastest route for most people. No menu maze. No clicking through three layers of Settings. No emotional journey.
When Should You Use Storage Settings Instead of Disk Cleanup?
Windows 10 still includes Disk Cleanup, and it can still be useful. But Storage settings is the more modern control center. It gives you a broader view of space usage, easier access to Temporary files, and built-in automation through Storage Sense. If you want a clean, visual overview, start with Storage settings. If you need an older familiar tool for specific cleanup tasks, Disk Cleanup can still help.
Real-World Experiences With Storage Settings in Windows 10
In real life, people usually do not open Storage settings because they are curious. They open it because something has gone wrong. A laptop starts throwing low-space warnings. A Windows update refuses to install. A family desktop suddenly becomes painfully slow. Or someone notices that a 128GB SSD now has less free space than a carry-on bag after a holiday shopping spree.
One common experience is the surprise factor. Users often assume big storage problems come from giant videos or games, but Storage settings reveals that temporary files, previous Windows installations, cached data, and old downloads can quietly pile up over time. It is surprisingly common to open the page and realize the issue is not one huge file at all. It is a hundred tiny decisions spread across months, like downloading installers you forgot about, leaving the Recycle Bin full, and never clearing out update leftovers.
Another real-world pattern is how helpful the category view can be. Someone might think their photos are the problem, only to find that apps and features are taking the biggest bite out of the drive. Another user may discover that the Downloads folder is packed with duplicate PDFs, ZIP files, and setup packages they only needed once. That kind of visibility changes cleanup from guesswork into strategy.
Storage Sense also tends to win people over slowly. At first, many users ignore it because it sounds like one more background feature with a slightly robotic name. Then they enable it, let it empty the Recycle Bin, remove temporary files, and tidy up stale content automatically, and suddenly it becomes one of those quiet tools they wish they had turned on much earlier. It is not flashy. It does not have a mascot. It just does the boring stuff before the boring stuff becomes a problem.
There are also cautionary experiences. Some users turn on every option without reading carefully, then realize Windows cleaned out items from Downloads that they actually wanted to keep. That is why the smartest approach is to review the settings first, especially if your Downloads folder is basically your second desktop. Automation is wonderful right up until it automates something you meant to save.
On smaller laptops and budget devices, Storage settings can be the difference between a usable PC and a frustrating one. When storage is tight, even a few gigabytes matter. Clearing temporary files, checking reserved storage, moving new content to another drive, and understanding what is using space can extend the life of a Windows 10 machine in a very practical way. It is not glamorous, but it is effective.
The biggest takeaway from real use is simple: Storage settings works best when you visit it before disaster hits. Open it once in a while, check your space, review categories, and let Storage Sense handle the routine mess. Your future self will be grateful, and your C: drive may stop sending passive-aggressive warnings.
Final Thoughts
Opening Storage settings in Windows 10 is easy once you know the shortcuts, and it is one of the most useful places in the operating system when you need to understand or manage disk space. You can reach it through the Start menu, the Settings app, Windows Search, or the Run command. Once inside, you can see what is taking up room, remove temporary files, turn on Storage Sense, and manage storage more intelligently.
If you only remember one thing, make it this: type Storage settings into Windows Search and go from there. It is fast, practical, and far less stressful than waiting until your computer starts gasping for free space.