Table of Contents >> Show >> Hide
- What Is Stucco, and Why Does It Crack?
- Before You Patch: Know What Kind of Damage You Have
- Tools and Materials You May Need
- How to Patch Stucco Step by Step
- Step 1: Choose the Right Weather
- Step 2: Clean the Damaged Area
- Step 3: Open Cracks Slightly When Needed
- Step 4: Check for Moisture Problems
- Step 5: Apply Bonding Agent If Needed
- Step 6: Mix or Stir the Patch Material
- Step 7: Press the Patch Into the Damage
- Step 8: Build the Patch Flush With the Wall
- Step 9: Match the Stucco Texture
- Step 10: Let the Patch Cure Properly
- Step 11: Prime and Paint the Repair
- How to Patch Different Stucco Problems
- Common Stucco Patching Mistakes to Avoid
- When to Call a Professional
- How Much Does Stucco Patching Cost?
- Maintenance Tips After Patching Stucco
- Real-World Experience: What Patching Stucco Teaches You
- Conclusion
Stucco is one of those exterior finishes that looks calm, solid, and timelessright up until a crack, chip, or mystery crater appears and starts judging you from the side of the house. The good news? Small stucco repairs are often very doable for a careful homeowner. The less-good news? Stucco is a little picky. It likes clean surfaces, proper bonding, thin layers, decent weather, and a texture match that does not scream, “I fixed this during a commercial break.”
This guide explains how to patch stucco the right way, from identifying the damage to applying patch material, matching texture, curing the repair, and painting it so the wall looks whole again. Whether you are dealing with a hairline crack, a small hole, a corner chip, or a shallow damaged area, the goal is the same: stop water from getting in, rebuild the surface, and blend the patch into the surrounding wall as naturally as possible.
What Is Stucco, and Why Does It Crack?
Traditional stucco is a cement-based plaster made with Portland cement, sand, lime, and water. It is applied over masonry, concrete, or a lath-and-weather-barrier system on framed walls. Once it cures, it forms a hard, textured exterior skin that can last for decades with routine maintenance.
However, stucco is rigid. Houses move a little. Temperatures rise and fall. Moisture comes and goes. Lawn equipment gets ambitious. Eventually, small cracks or chips may appear. Most minor stucco damage comes from normal expansion and contraction, impact, poor drainage, old paint failure, settlement, or moisture trapped behind the wall. A simple patch can solve cosmetic and shallow surface damage, but recurring cracks, bulging stucco, dark stains, soft areas, or large sections pulling away from the wall may point to a deeper problem.
Before You Patch: Know What Kind of Damage You Have
Not every stucco problem should be handled the same way. Before grabbing a trowel like a weekend warrior with a caffeine problem, inspect the wall carefully.
Hairline Cracks
Hairline cracks are very thin surface cracks. If they are less than about 1/16 inch wide and not spreading, they may be handled with a high-quality elastomeric masonry coating or flexible stucco crack repair product. These cracks are common and usually cosmetic, but they still matter because water is sneaky and has never once respected your home improvement schedule.
Small Cracks
Cracks wider than hairline cracks need more preparation. Often, the crack should be widened slightly into a clean groove so the repair material can grip. A narrow crack with dusty edges does not give patch material much to hold onto.
Small Holes and Chips
Small holes, corner chips, and shallow damaged patches are good candidates for premixed stucco patch or a stucco repair compound. These repairs are usually built up in thin layers, not slapped on in one heroic blob.
Large Loose Areas
If the stucco sounds hollow when tapped, crumbles easily, bulges outward, or has a large damaged section, you may need to remove loose material, inspect the lath and weather barrier, and possibly call a professional. Stucco is not just decoration; it is part of the exterior wall system. If water has reached the layers behind it, the patch on the outside may only be makeup on a structural bad mood.
Tools and Materials You May Need
For a basic stucco patch, gather the following:
- Safety glasses and work gloves
- Dust mask or respirator
- Wire brush
- Hammer and cold chisel
- 5-in-1 painter’s tool or scraper
- Putty knife, margin trowel, or masonry trowel
- Rubber float, sponge, whisk broom, or texture brush
- Premixed stucco patch or stucco repair compound
- Exterior masonry caulk for very small cracks, if appropriate
- Acrylic bonding agent, if recommended for your patch material
- Bucket and clean water
- Painter’s tape and drop cloth
- Exterior masonry primer and paint, if painting after repair
Always read the label on the product you buy. Some stucco patches are acrylic-based and ready to use. Others are cementitious mixes that require water, specific mixing times, and curing. The label is not decorative literature; it is the tiny instruction manual that keeps your patch from becoming driveway gravel.
How to Patch Stucco Step by Step
Step 1: Choose the Right Weather
Stucco repair likes mild, dry weather. Avoid patching in heavy rain, freezing temperatures, extreme heat, direct blazing sun, or high wind. Many repair products should not be applied when temperatures are too low or too high, and rain can damage fresh patch material before it sets. If possible, work on a dry day with temperatures roughly between 50°F and 90°F.
If the wall is hot from direct sun, wait until it cools. If the surface is damp from rain or sprinklers, give it time to dry unless your chosen product specifically instructs otherwise. Stucco patching is a little like baking: the ingredients matter, but so does the environment.
Step 2: Clean the Damaged Area
Use a wire brush, scraper, or 5-in-1 tool to remove loose stucco, peeling paint, dirt, dust, and crumbling material. The patch needs to bond to solid stucco, not to old paint flakes and wishful thinking.
Brush the area thoroughly. For dirty or chalky walls, clean the surface with water and allow it to dry. If there is mildew, use an appropriate masonry-safe cleaner and rinse well. Do not trap grime under the patch. It weakens the bond and can make the repair fail prematurely.
Step 3: Open Cracks Slightly When Needed
For cracks that are too narrow to accept patch material, widen the crack carefully with a chisel, painter’s tool, or crack opener. The goal is not to destroy the wall like you are auditioning for a demolition show. You simply want a clean groove that allows the repair material to fill the crack and grip the edges.
For many stucco cracks, a groove around 1/4 inch wide gives the patch material better contact. Undercut or squared edges often hold better than a shallow V-shaped smear. Remove dust after widening the crack.
Step 4: Check for Moisture Problems
Before patching, look for the reason the stucco failed. Is a sprinkler hitting the wall every morning? Are gutters overflowing? Is soil touching the bottom edge of the stucco? Is a window flashing leak causing stains below the sill? Patching without fixing water problems is like mopping while the faucet is still running. Technically active, emotionally unrewarding.
If you see staining, swollen sheathing, moldy smells, rotted trim, or soft wall areas, pause the cosmetic repair and investigate further. Stucco patch can seal a small crack, but it cannot repair hidden water damage behind the wall.
Step 5: Apply Bonding Agent If Needed
Some stucco repair products bond well on their own. Others perform better with an acrylic bonding agent brushed onto the prepared surface. Follow the product directions. If a bonding agent is recommended, apply it evenly and wait until it becomes tacky before placing the patch material.
Do not assume more bonding agent is better. A thick puddle can interfere with the patch. A thin, even coat is usually the goal.
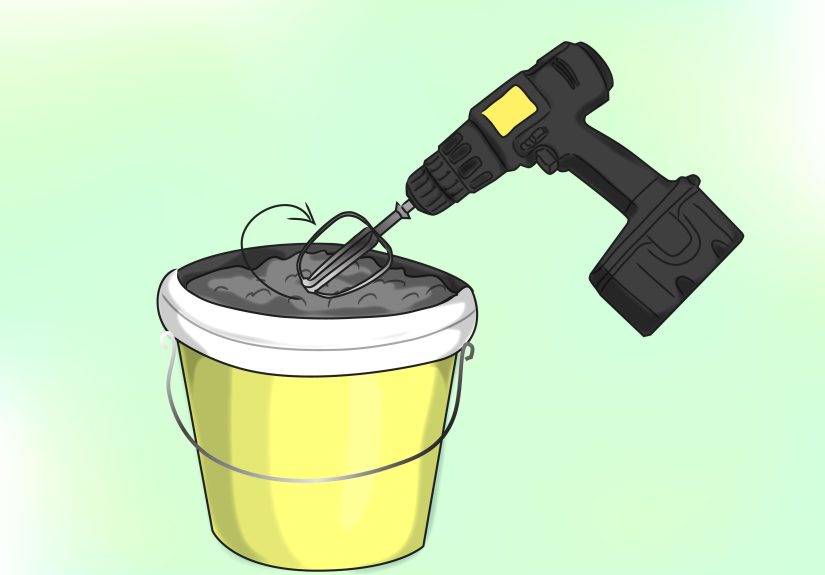
Step 6: Mix or Stir the Patch Material
If you are using premixed stucco patch, stir it thoroughly with a margin trowel or putty knife. If you are using a dry mix, add clean water according to the label and mix only as much as you can apply within the working time. Many patch products begin setting quickly, and once the material stiffens, adding extra water can weaken it.
The ideal consistency depends on the product, but for many patches, you want a thick, workable paste that holds on a trowel without sliding off like oatmeal with commitment issues.
Step 7: Press the Patch Into the Damage
Use a putty knife, margin trowel, or rubber float to press the patch material firmly into the crack, hole, or chipped area. Work it into the edges so there are no voids behind the repair. Air pockets can weaken the patch and allow water to collect.
For deeper holes, apply the material in thin layers rather than one thick application. Many stucco patch products recommend lifts of about 1/4 inch at a time. Let each layer set as directed before adding the next. This helps reduce shrinkage cracks and gives the repair a stronger bond.
Step 8: Build the Patch Flush With the Wall
Continue layering until the patch is slightly proud of the surrounding surface, then flatten it carefully with a trowel. Do not overwork the patch after it begins to set. Cement-based materials especially can become weak or sandy if repeatedly disturbed while curing.
Feather the edges so the patch transitions into the existing wall. A sharp square edge around the repair makes it more visible after painting. The smoother the transition, the better the final result.
Step 9: Match the Stucco Texture
This is the part where patience earns its paycheck. Stucco can be smooth, sand-finished, lace-textured, dash-finished, cat-face, Spanish-style, or somewhere in the grand universe between “subtle texture” and “aggressive cottage cheese.” Matching it perfectly may take practice.
Use the same tool pattern as the surrounding wall. A sponge can create a soft sand texture. A whisk broom can flick or stipple material. A rubber float can blend rough patches. A trowel can create smoother or lace-like movement. For heavy texture, apply a small amount of patch material and dab, swirl, drag, or knock it down until it resembles the existing finish.
Practice on a scrap piece of cardboard or plywood first. Texture matching is much easier when you are not learning directly on the front of your house, especially if the patch is right beside the porch light where every delivery driver can admire your experiment.
Step 10: Let the Patch Cure Properly
Let the patch cure according to the product instructions. Acrylic patches may dry faster than cement-based repairs, but drying and curing are not always the same thing. Cementitious stucco repairs may require moisture curing, depending on the mix, weather, and manufacturer recommendations.
Protect fresh stucco from rain, freezing temperatures, sprinklers, direct hard sun, and curious pets. Do not paint too soon. Fresh cement-based stucco can hold moisture and may need extended cure time before coating. Painting before the repair is ready can trap moisture and lead to peeling or discoloration.
Step 11: Prime and Paint the Repair
Once the patch has fully cured and dried, prime it with an exterior masonry primer if recommended. Then paint with a high-quality exterior masonry, stucco, or elastomeric coating. For the best appearance, paint the entire wall section rather than only the patch. Spot painting often leaves a visible “repair island,” even when the color is technically correct.
Stucco fades over time, so an old wall and a fresh patch rarely match perfectly without paint. If your home has unpainted stucco, color matching can be difficult. In that case, test patching in a less visible area or ask a stucco professional about custom color and texture blending.
How to Patch Different Stucco Problems
How to Fix Hairline Cracks in Stucco
Clean the crack and surrounding wall. If the crack is extremely thin and stable, apply a flexible masonry crack filler, elastomeric coating, or high-quality paint system designed to bridge hairline cracks. Avoid forcing thick cement patch into a crack too small to accept it. That usually creates a raised line that looks worse than the original crack.
How to Patch a Small Hole in Stucco
Remove loose material, clean the hole, and square up crumbling edges. If the hole is deep, build the repair in layers. Press patch material firmly into the cavity, allow it to set, then add more until flush. Texture the surface while the final layer is still workable.
How to Repair a Stucco Corner Chip
Corners are vulnerable because they take hits from ladders, trash cans, garden tools, and the occasional person who insists they can carry patio furniture alone. Remove loose stucco, rebuild the corner gradually, and use a straightedge or trowel to restore the line. Texture each face separately so the corner does not become a rounded lump.
How to Handle Larger Stucco Patches
For larger damaged areas, remove all loose stucco until you reach sound material. If metal lath, paper, flashing, or sheathing is damaged, the repair becomes more involved. The wall may need new weather barrier, new lath, proper fastening, a scratch coat, brown coat, and finish coat. This is where many homeowners call a stucco contractor, and that is not defeatit is wisdom wearing work boots.
Common Stucco Patching Mistakes to Avoid
Patching Over Loose Material
If the existing stucco is loose, the patch will be loose too. Always remove unsound material first.
Using Interior Spackle Outside
Interior wall filler is not designed for exterior stucco. Use products made for masonry, stucco, or exterior concrete repair.
Applying One Thick Layer
Thick patch material can shrink, crack, sag, or cure unevenly. Thin layers give a cleaner and stronger result.
Ignoring Water Sources
If water caused the damage, the patch will fail unless the water problem is corrected. Check sprinklers, gutters, downspouts, roof edges, window trim, and ground clearance.
Painting Too Soon
Fresh patch material needs time. Paint too early and you may trap moisture, causing bubbling, peeling, or color problems.
Expecting Invisible Texture on the First Try
Texture matching takes practice. Even pros test techniques. Give yourself permission to practice before touching the actual wall.
When to Call a Professional
DIY stucco patching is best for small, accessible repairs. Call a professional if the damaged area is large, high above ground, soft, bulging, stained, repeatedly cracking, or located around windows, doors, rooflines, chimneys, decks, or wall bases. Those areas are common leak points and may require flashing or drainage repairs.
You should also call a pro if your home has synthetic stucco, often called EIFS. EIFS is a different wall system and must be repaired with compatible materials and methods. Using traditional cement stucco patch on the wrong system can create moisture and performance problems.
How Much Does Stucco Patching Cost?
Small DIY stucco patching is affordable. A tube of stucco crack repair or a small tub of premixed patch may cost far less than hiring a contractor, especially for one or two minor cracks. However, professional stucco repair can become expensive when the damage is high, widespread, water-related, or requires scaffolding, lath replacement, flashing work, or repainting an entire wall.
For small patches, the biggest DIY cost is usually time. The second biggest cost is pride, especially if the first texture attempt looks like a pancake landed on your wall. Fortunately, careful prep, thin layers, and patient blending go a long way.
Maintenance Tips After Patching Stucco
After your stucco patch is complete, inspect the area every few months. Look for new cracking, separation at the edges, peeling paint, or staining. Keep sprinklers from hitting stucco. Clean gutters. Maintain caulk around windows and trim. Keep soil, mulch, and plants away from the bottom of stucco walls so moisture does not wick upward.
Wash stucco gently once or twice a year with a garden hose and mild cleaner. Avoid aggressive pressure washing, which can drive water into cracks or damage the finish. Stucco is tough, but it is not a concrete superhero cape.
Real-World Experience: What Patching Stucco Teaches You
The first thing most people learn when patching stucco is that preparation takes longer than the actual patch. You may spend 30 minutes brushing, scraping, widening a crack, checking the edges, and cleaning dustthen only five minutes applying the compound. That can feel backward until you realize the patch is only as strong as the surface underneath it.
One practical experience that comes up again and again is texture matching. A homeowner may patch the crack perfectly, let it cure beautifully, and then step back to discover the repair shines like a neon sign because the texture is too smooth. The trick is to stop thinking like a painter and start thinking like a sculptor. Stucco is not just a flat surface with color; it is a relief pattern. The wall has bumps, shadows, drag marks, sand grains, and little imperfections that create the final look.
A useful technique is to take a close-up photo of the surrounding stucco before patching. Zoom in. Study the pattern. Is it sandy? Swirled? Knocked down? Randomly dabbed? Then practice that motion on scrap material. Many successful patches come from using simple tools creatively: a damp sponge for sand finish, a chip brush for stippling, a trowel edge for dragged texture, or a rubber float for soft blending.
Another lesson is that color matching is harder than expected. Even if the patch product says it dries off-white or sand-colored, your wall has been aging in sun, rain, dust, and weather for years. Fresh stucco patch almost always looks different. Painting the whole wall plane or at least a natural break pointcorner to corner, trim to trimusually gives the cleanest result. Spot painting a patch in the middle of a wall often creates a rectangle of “hello, I am new here.”
Weather also matters more than beginners expect. Patching stucco in hot sun can make the material dry too fast, which may lead to weak bonding or visible cracks. Working right before rain can ruin the surface. Cold weather can slow or damage curing. The best experience is usually a mild morning with shade on the wall, plenty of time, and no rain in the forecast.
One of the most important homeowner lessons is to respect moisture. If the same area keeps cracking or crumbling, do not keep patching it forever. Look above, below, and around the damage. A gutter might be overflowing. A sprinkler head might be misting the wall every day. A window sill might be leaking. Stucco problems often start somewhere else, then politely announce themselves on the surface.
Finally, stucco patching teaches humility in a good way. The repair may not be perfect on the first attempt, and that is fine. Small imperfections often disappear after primer and paint, especially on textured walls. The key is to build a solid repair, keep water out, and blend the surface well enough that the wall looks cared for rather than neglected. A good stucco patch does not need to win an art museum award. It just needs to protect the house and stop attracting your eye every time you walk up the driveway.
Conclusion
Learning how to patch stucco is a practical skill that can save money, protect your home, and keep your exterior looking sharp. The process is straightforward: inspect the damage, clean the surface, widen cracks when needed, apply the correct patch material in thin layers, match the texture, let it cure, and paint properly. The real secret is patience. Rushing the prep, globbing on too much material, or painting too early can turn a small repair into a very visible reminder.
For small cracks, chips, and holes, a DIY stucco patch is often a manageable weekend project. For large, wet, hollow, or recurring damage, bring in a professional who can inspect the wall system behind the finish. Stucco may look like one simple layer, but it works best when the surface, drainage, flashing, and coating all do their jobs together.