Table of Contents >> Show >> Hide
- What Is a Lane Cedar Chest?
- Why Add a Raised Bondo Stencil to a Lane Cedar Chest?
- Is It Okay to Paint or Modify a Lane Cedar Chest?
- Important Safety Note About Lane Cedar Chest Locks
- How to Identify and Date a Lane Cedar Chest
- What Is Bondo, and Why Use It for a Raised Stencil?
- Materials You May Need
- Step-by-Step: Creating a Raised Bondo Stencil on a Lane Cedar Chest
- 1. Clean the Chest Thoroughly
- 2. Remove or Disable Unsafe Lock Hardware
- 3. Sand the Exterior
- 4. Plan the Stencil Placement
- 5. Mix a Small Batch of Bondo
- 6. Apply Bondo Through the Stencil
- 7. Lift the Stencil Carefully
- 8. Let It Cure, Then Sand Lightly
- 9. Prime the Chest
- 10. Paint and Highlight the Raised Design
- Design Ideas for a Lane Cedar Chest With Raised Bondo Stencil
- How to Care for the Cedar Interior
- Does a Raised Bondo Stencil Affect Value?
- Common Mistakes to Avoid
- Personal Experience: What It Feels Like to Refinish a Lane Cedar Chest With a Raised Bondo Stencil
- Conclusion
A Lane cedar chest with raised Bondo stencil is what happens when vintage American furniture meets a little DIY dramaand frankly, the result can be fabulous. Lane cedar chests already have history baked into their dovetailed bones: warm cedar interiors, sturdy construction, and that nostalgic “grandma kept the good blankets in here” energy. Add a raised stencil made with Bondo or wood filler, and suddenly the piece steps out of the attic and into the spotlight like it has been waiting for its HGTV close-up since 1956.
But before we grab a stencil, a putty knife, and the confidence of someone who has watched three restoration videos and now owns a respirator, let’s talk about what makes this project special. A Lane cedar chest is not just a storage box. It is a hope chest, blanket chest, coffee table candidate, entryway bench, heirloom container, and occasionally the mysterious wooden object relatives argue about during estate cleanouts. When refinished with a raised Bondo stencil, it becomes a customized statement piece that blends vintage charm with modern texture.
This guide explains what a Lane cedar chest is, why raised stencil furniture is so popular, how Bondo works on wood, what to consider before painting or altering a vintage chest, and how to create a tasteful design that looks intentionalnot like a craft-store aisle sneezed on your furniture.
What Is a Lane Cedar Chest?
Lane cedar chests were produced by the Lane Company, a furniture manufacturer with roots in Altavista, Virginia. The company began in 1912 as the Standard Red Cedar Chest Company and grew into one of America’s best-known furniture names. Lane became famous for cedar hope chests, which were marketed for storing linens, clothing, blankets, keepsakes, and household treasures.
The appeal was practical and sentimental. Aromatic cedar helped protect stored textiles in a tightly closed chest, while the chest itself became a symbol of home, family, and future plans. Many Lane chests were given to young women as hope chests, wedding gifts, graduation gifts, or family heirlooms. Today, they are often found in estate sales, antique malls, thrift stores, online marketplaces, and basements where they have been patiently waiting under a stack of Christmas decorations.
Why Add a Raised Bondo Stencil to a Lane Cedar Chest?
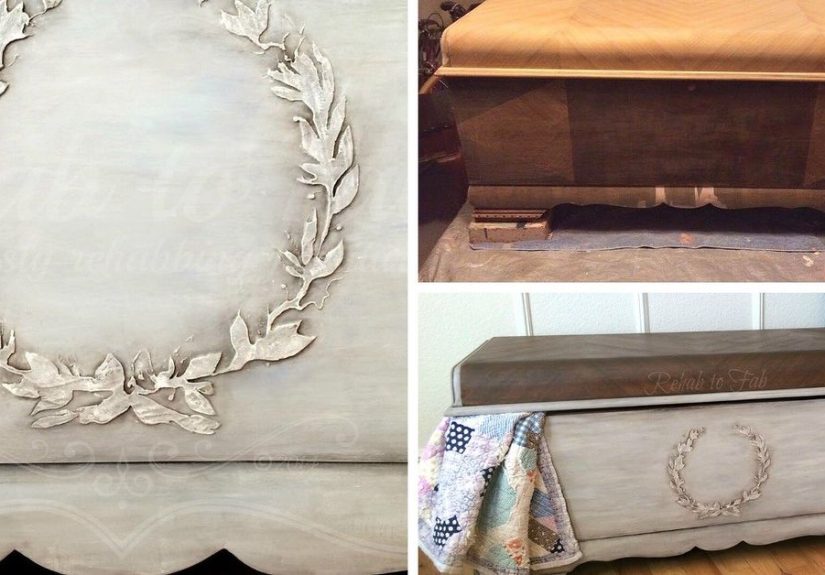
A raised Bondo stencil adds dimensional texture to the exterior of a furniture piece. Instead of simply painting a flat pattern, you apply a filler compound through a stencil so the design dries slightly raised from the surface. Once painted, glazed, waxed, or lightly distressed, the pattern can resemble carved wood, plaster ornament, embossed metal, or old-world furniture detailing.
On a Lane cedar chest, this technique can be especially effective because many chests have large flat panels. Those panels are basically blank canvases wearing wood grain. A raised stencil can transform a plain front into something elegant, romantic, rustic, French country, cottagecore, farmhouse, boho, or modern vintagedepending on the stencil and finish.
Popular Raised Stencil Styles
Some designs work better than others on a cedar chest. Large floral medallions, damask patterns, scrollwork, botanical borders, geometric Art Deco motifs, and soft lace-inspired patterns all pair beautifully with Lane’s classic shapes. The key is proportion. A tiny stencil on a wide chest can look lost, like a postage stamp on a garage door. A design that is too busy can fight the shape of the chest. Aim for balance: one centered motif, a repeating border, or a symmetrical design across the front panel.
Is It Okay to Paint or Modify a Lane Cedar Chest?
This is where furniture lovers start whispering dramatically. Some Lane cedar chests are valuable because of age, condition, style, rarity, or original finish. Others are common, damaged, veneer-chipped, scratched, water-marked, or already painted. Before adding Bondo, paint, or stenciling, inspect the piece carefully.
If the chest has a rare Art Deco design, exceptional veneer, original labels, unusual hardware, or excellent untouched finish, consider preserving it rather than heavily altering it. If the chest has broken veneer, stains, missing trim, or a finish that looks like it survived a raccoon dinner party, a raised Bondo stencil makeover may be a smart second life.
A good rule: restore when the original beauty is strong; refinish when the piece is tired but structurally sound; redesign when damage, missing details, or previous bad paint jobs make originality less important.
Important Safety Note About Lane Cedar Chest Locks
Before starting any Lane cedar chest makeover, check the lock. Many Lane and Virginia Maid cedar chests made before 1987 had automatic latches that could lock when the lid closed. These older locks created a serious entrapment hazard, especially for children. If your chest has an original automatic lock, remove or disable it so the lid cannot latch shut by itself.
This safety step is not optional. It matters more than paint color, stencil placement, or whether the final finish is “distressed linen white” or “moody charcoal with antique wax.” A beautiful chest should also be a safe chest. If the lock clicks shut automatically, remove the latch hardware from the lid or replace the mechanism with a safe modern alternative that does not trap anyone inside.
How to Identify and Date a Lane Cedar Chest
Most Lane cedar chests have a serial number stamped somewhere inside, underneath, or on the back. Many Lane serial numbers can be read backward to determine the production date. For example, a number like 658101 may indicate October 18, 1956 when read from right to left. Some seven-digit numbers include a plant code, so dating is not always perfectly simple, but the serial number is still the best place to start.
Look also for brand marks inside the lid, paper labels, brass or metal hardware, drawer construction if the chest has compartments, and the general style of the legs and trim. Mid-century Lane cedar chests often have clean lines, tapered legs, and simple silhouettes. Earlier examples may include carved details, waterfall fronts, decorative veneers, or more traditional shapes.
What Is Bondo, and Why Use It for a Raised Stencil?
Bondo is a well-known filler product used for repairs, shaping, and surface rebuilding. For furniture projects, people often use Bondo Wood Filler or similar two-part fillers because they dry hard, sand smooth, and can be painted. When used through a stencil, Bondo can create a durable raised pattern that bonds to the prepared wood surface.
Compared with lightweight spackle or joint compound, Bondo is tougher and better suited to areas that may get bumped, touched, or cleaned. A cedar chest front, top edge, or side panel can experience real life: laundry baskets, shoes, pets, children, moving boxes, and one uncle who believes every piece of furniture is a chair. A harder filler can help the raised design survive normal use.
When Bondo Works Best
Bondo is best for painted finishes. Even stainable wood fillers may absorb stain differently than surrounding wood, so a raised Bondo stencil is usually not the best choice if you plan to keep a natural wood finish. It shines when the entire exterior will be primed and painted. The raised design becomes part of the surface, then paint unifies everything into one polished look.
Materials You May Need
- Lane cedar chest
- Cleaner or degreaser
- Sandpaper in medium and fine grits
- Painter’s tape or stencil adhesive
- Large furniture stencil
- Bondo Wood Filler or suitable two-part wood filler
- Plastic spreader or putty knife
- Disposable mixing surface
- Gloves, eye protection, and a respirator
- Primer, preferably stain-blocking if needed
- Furniture paint
- Topcoat, wax, or sealer
- Optional glaze or dark wax for highlighting texture
Step-by-Step: Creating a Raised Bondo Stencil on a Lane Cedar Chest
1. Clean the Chest Thoroughly
Old furniture collects dust, furniture polish, wax, mystery grease, and sometimes the faint scent of 1970s basement. Clean the exterior well before sanding or applying filler. If the surface is oily or waxy, the Bondo may not bond properly. Let the chest dry completely.
2. Remove or Disable Unsafe Lock Hardware
Check the lock before you get distracted by pretty paint samples. If the latch can trap someone inside, remove the latch mechanism. You can fill unused screw holes with wood filler or Bondo before painting.
3. Sand the Exterior
Lightly sand the surface where the stencil will go. You do not always need to strip the entire piece to bare wood, but the surface should be dull, clean, and slightly scuffed. This gives primer and filler something to grip. Remove all sanding dust before moving forward.
4. Plan the Stencil Placement
Do a dry run before mixing Bondo. Tape the stencil in place and step back. Look at the chest from across the room. Is the design centered? Does it align with the panel? Does it avoid hardware holes, trim, or curved edges? This is the moment to adjust. Once Bondo is mixed, the clock starts ticking, and panic is not a design strategy.
5. Mix a Small Batch of Bondo
Two-part fillers cure quickly, so mix only what you can apply in a few minutes. Wear gloves and follow the product directions. Mix on a disposable, nonporous surface until the color is consistent. Do not mix a giant batch unless you enjoy racing against chemistry.
6. Apply Bondo Through the Stencil
Hold the stencil flat against the furniture. Use a putty knife or spreader to pull a thin, even layer of Bondo across the stencil openings. Avoid heavy buildup. A raised stencil should have dimension, not the profile of a breakfast pancake. Scrape away excess while the stencil is still in place.
7. Lift the Stencil Carefully
Remove the stencil while the filler is still workable. Lift straight up if possible to avoid smearing the design. If a small edge lifts or breaks, do not panic. Minor imperfections often sand out, and vintage-style furniture is allowed to have personality. That is the polite word for tiny mistakes.
8. Let It Cure, Then Sand Lightly
Once the Bondo has cured, sand the raised design gently. The goal is to remove sharp ridges and rough peaks without flattening the pattern. Use a light hand. If you attack the design like you are refinishing a bowling alley, you may lose the detail.
9. Prime the Chest
Primer helps create an even base and improves paint adhesion. It also helps prevent bleed-through from old wood, stain, or filler variations. This is especially useful when painting a Lane cedar chest in light colors such as white, cream, pale gray, or soft sage.
10. Paint and Highlight the Raised Design
Paint the chest in thin coats. After the paint dries, you can highlight the raised stencil with glaze, wax, dry brushing, or gentle distressing. Dark wax settles into edges and makes the design look aged. Dry brushing with a lighter color catches the raised areas and makes them pop. Choose one effect, not all of them at once, unless your design goal is “haunted wedding cake.”
Design Ideas for a Lane Cedar Chest With Raised Bondo Stencil
French Country White
Use a large floral or damask stencil on the front panel, paint the chest warm white, and finish with soft brown glaze. This style looks beautiful at the foot of a bed or in a cozy guest room.
Moody Vintage Black
Apply a raised stencil to the center front, paint the exterior matte black or charcoal, and use subtle bronze or gold dry brushing over the raised detail. Keep the hardware dark or antique brass for a sophisticated look.
Soft Cottage Blue
A pale blue or muted teal finish works well with botanical stencils. Light distressing around the edges can make the chest feel relaxed and lived-in without looking overly shabby.
Modern Boho Texture
Choose a geometric stencil, paint the chest in warm beige, clay, olive, or ivory, and keep the finish clean. This approach pairs well with rattan, linen, woven baskets, and neutral interiors.
How to Care for the Cedar Interior
Do not paint or seal the aromatic cedar interior if you want it to keep doing its traditional job. A finish can seal in the cedar scent and reduce its usefulness. If the interior has lost its aroma, a light sanding with fine-grit sandpaper can refresh the surface and release the cedar smell again. Vacuum the dust afterward and let the chest air out before storing fabric.
For delicate textiles, place a clean cotton sheet or towel between the cedar and the items. Cedar oils can sometimes transfer to fabric, especially if the wood is freshened or newly sanded. Store only clean, dry textiles inside the chest. Cedar is helpful, but it is not magic. It cannot rescue a sweater that already has moth larvae throwing a dinner party in the seams.
Does a Raised Bondo Stencil Affect Value?
Yes, it can. A painted and stenciled Lane cedar chest may appeal more to home decorators than to collectors. If the chest was common or damaged, a high-quality makeover can increase its practical resale appeal. If the chest was rare, pristine, or historically significant, altering it may reduce collector value.
For most everyday Lane chests found in thrift stores or estate sales, condition is the deciding factor. A carefully repaired, safely modified, and beautifully painted piece can be more desirable than a scratched, unsafe, musty chest that no one wants to use. The best makeovers respect the furniture’s structure while giving it a fresh purpose.
Common Mistakes to Avoid
Using Too Much Bondo
Raised stencil work should be thin and controlled. Too much filler leads to messy edges, longer sanding, and clunky designs. Apply less than you think you need.
Skipping Surface Prep
Bondo and paint need a clean, scuffed surface. If you apply them over wax, polish, or dirt, the finish may fail. Preparation is not glamorous, but neither is peeling paint.
Choosing a Tiny Stencil
A small stencil can look awkward on a large cedar chest. Choose a design that fits the scale of the panel and the style of the furniture.
Ignoring the Lock
Never ignore an old automatic latch. Safety comes before styling. Remove or disable hazardous lock hardware before selling, gifting, or using the chest.
Personal Experience: What It Feels Like to Refinish a Lane Cedar Chest With a Raised Bondo Stencil
Working on a Lane cedar chest with a raised Bondo stencil feels like having a conversation with an old piece of furniture. At first, the chest may not look like much. It might have scratches across the lid, a water ring from a plant that definitely should have had a saucer, and hardware that has lost its shine. But then you open it, smell the cedar, and suddenly the piece has a little dignity again. It is not just storage. It has held blankets, letters, baby clothes, family photos, maybe even a wedding veil or two. That history makes the makeover feel different from painting a random flat-pack cabinet.
The most satisfying part is choosing the stencil. A Lane chest usually has enough flat space to handle a bold design, so you can be brave. I like laying several stencil options across the front and stepping back. The wrong stencil looks fussy immediately. The right one looks like it has been waiting there all along. A wide floral medallion can soften a boxy chest. A border stencil can make the piece feel more tailored. A geometric design can push it toward mid-century modern instead of farmhouse.
Mixing Bondo is the part that teaches humility. It cures fast, and it does not care whether your phone rings, the dog barks, or you suddenly realize your stencil is half an inch off center. The best approach is to mix small batches, breathe, and work in sections. The first pull of the putty knife across the stencil always feels slightly terrifying. Then you lift the stencil and see the raised design sitting on the wood, and there it is: instant furniture jewelry.
Sanding the stencil after it cures is where patience earns its paycheck. You want to smooth the high points without erasing the detail. I use a light touch and check the surface with my fingertips more than my eyes. Fingers catch roughness that eyes miss. If a tiny spot chips, I do not treat it like disaster. On a vintage chest, small irregularities often make the final paint finish more believable. Perfectly perfect can look fake; thoughtfully imperfect looks collected.
Painting brings the whole project together. A raised stencil can look a bit odd before paint, almost like frosting on wood. Once primer and paint go on, the design becomes integrated. Add glaze or dry brushing, and the texture finally wakes up. The raised details catch light in a way flat paint never can. That is when a plain cedar chest starts looking like a custom boutique piece.
The biggest lesson from this type of project is restraint. A Lane cedar chest already has history, function, and charm. The raised Bondo stencil should enhance it, not bury it under too many effects. Keep the inside clean and cedar-scented. Keep the exterior durable. Make the lock safe. Choose hardware that suits the new look. When done well, the finished chest feels like it belongs in a real homenot a museum, not a landfill, and definitely not forgotten under holiday wreaths in the basement.
Conclusion
A Lane cedar chest with raised Bondo stencil is a creative way to blend vintage furniture restoration with modern decorative texture. The chest brings the heritage: American craftsmanship, aromatic cedar, useful storage, and sentimental value. The raised stencil brings the personality: dimension, pattern, and a custom finish that can match today’s interiors.
The best results come from thoughtful choices. Identify the chest, check its condition, handle the lock safety issue, preserve the cedar interior, prepare the surface properly, and apply the Bondo stencil with a light hand. Whether you choose soft cottage white, dramatic black, muted blue, or warm neutral paint, the goal is the same: give a hardworking vintage chest a new life without erasing what made it special in the first place.
Done right, this project turns a familiar storage piece into a functional heirloom with texture, charm, and just enough “Wait, did you make that?” energy to make all the sanding worthwhile.