Table of Contents >> Show >> Hide
- Why Self-Leveling Underlayment Goes Wrong
- 18 Tips for Working with Self-Leveling Underlayment
- 1. Read the Product Data Sheet Like It Owes You Money
- 2. Make Sure the Floor Is Structurally Sound First
- 3. Clean the Substrate More Aggressively Than Feels Necessary
- 4. Seal Every Gap, Crack, and Escape Route
- 5. Create a Perimeter Gap Instead of Pouring Wall to Wall
- 6. Prime the Floor Correctly and Respect the Dry Time
- 7. Test Porosity and Moisture Before You Commit
- 8. Calculate Material Needs With Real Depth, Not Wishful Thinking
- 9. Stage Tools, Water, Bags, and Buckets Before Mixing
- 10. Use Cool, Clean Water and Measure It Exactly
- 11. Mix Thoroughly, But Do Not Whip Air Into It
- 12. Work as a Team When the Product Has Short Flow Time
- 13. Pour Continuously and Maintain a Wet Edge
- 14. Guide the Material; Do Not Wrestle It
- 15. Control the Room Temperature, Sun, and Air Movement
- 16. Know When to Use Multiple Lifts
- 17. Protect the Fresh Pour and Respect Cure Windows
- 18. Match the Underlayment to the Finish Floor and Special Conditions
- Common Mistakes to Avoid
- Final Thoughts
- Real-World Experience: What Installers Learn the Hard Way
Self-leveling underlayment sounds like one of those miracle products that should come with angelic background music. Pour it out, walk away, and return to a floor as flat as a calm lake, right? Not exactly. It is a fantastic product, but it is not magic, and it definitely is not a substitute for good prep, smart mixing, and jobsite timing.
When used correctly, self-leveling underlayment can rescue uneven concrete, smooth rough subfloors, and create a reliable base for tile, vinyl, wood, carpet, and other floor finishes. When used carelessly, it can turn into a lumpy, cracked, pinholed reminder that gravity is not your project manager. The good news is that most mistakes are preventable. The better news is that once you understand the rhythm of prep, prime, mix, pour, and protect, the process becomes much more predictable.
This guide breaks down 18 practical tips for working with self-leveling underlayment, with real-world logic behind each one. Whether you are a DIYer tackling a basement floor or a contractor trying to avoid a callback, these tips will help you get a flatter, stronger, and more professional result.
Why Self-Leveling Underlayment Goes Wrong
The biggest misconception is right there in the name. Self-leveling underlayment does flow, but it still needs help. It needs a sound substrate, the correct primer, the right amount of water, and a crew that moves fast enough to keep a wet edge. It also needs the room itself to cooperate. Drafts, direct sun, hot temperatures, or a thirsty slab can turn a smooth pour into a problem child.
Think of it this way: the pour is the easy part. The success is decided before the bag is even opened.
18 Tips for Working with Self-Leveling Underlayment
1. Read the Product Data Sheet Like It Owes You Money
Not all self-leveling underlayments are the same. One product may allow a thicker single lift, another may require a particular primer, and another may be suitable over wood only with reinforcement or a specialty formula. Before you do anything, read the technical data sheet for the exact product you bought. Not the brand in general. Not the bag that looks similar. The exact product. That is where you will find approved substrates, minimum and maximum thickness, mixing ratio, pot life, flow time, and floor-covering wait times.
2. Make Sure the Floor Is Structurally Sound First
Self-leveling underlayment is designed to flatten and smooth a surface, not repair a failing floor assembly. If the subfloor is loose, bouncy, rotted, or deflecting too much, leveling compound will not fix the root problem. It may hide it for a while, but cracks and bond failure usually come back to say hello later. Fix movement, damaged sheathing, weak framing, and loose fasteners before you start. Flat is great, but flat and structurally solid is better.
3. Clean the Substrate More Aggressively Than Feels Necessary
Dust, paint, adhesive residue, wax, grease, curing compounds, and random mystery grime are enemies of bond. Self-leveling underlayment wants direct contact with a properly prepared substrate. Sweep, vacuum, scrape, and mechanically abrade when needed. A floor that “looks pretty clean” is not the same thing as a floor that is truly ready. If your vacuum session feels dramatic, you are probably getting close.
4. Seal Every Gap, Crack, and Escape Route
Self-leveling underlayment is a liquid before it becomes a floor. That means it will happily pour into gaps around walls, plumbing penetrations, vent openings, subfloor seams, and tiny cracks you did not know existed five minutes ago. Seal openings before priming. Use patching material, sealant, tape, or foam as appropriate, and build termination dams where the pour needs to stop. A leaking pour is messy, expensive, and weirdly talented at finding the one place you forgot to block.
5. Create a Perimeter Gap Instead of Pouring Wall to Wall
Many installations benefit from a perimeter isolation strip, often made with sill seal foam or a similar compressible material. This gives the underlayment room to move slightly and helps prevent bonding hard against walls or framing. It also helps contain the pour. On wood installations, this step is especially important because wood moves more than people wish it did. The goal is a controlled, clean edge rather than a surprise concrete necklace around the room.
6. Prime the Floor Correctly and Respect the Dry Time
Primer is not optional decoration. It controls porosity, improves bond, and helps prevent bubbles, pinholes, doming, and rapid water loss into the substrate. Highly porous surfaces may need more than one coat. Some primers must dry to a clear film before the pour begins, and some require re-priming if the open window is missed. Skipping primer is one of the fastest ways to turn a straightforward floor prep job into a science experiment.
7. Test Porosity and Moisture Before You Commit
A very absorbent slab can suck moisture out of the mix too quickly, while excess moisture coming up through the slab can compromise adhesives and floor coverings later. If the floor is suspiciously thirsty, the primer strategy matters even more. If moisture vapor is too high, treat that issue before leveling. Self-leveling underlayment is not a magic moisture barrier. It is an underlayment, not a negotiation tactic with groundwater.
8. Calculate Material Needs With Real Depth, Not Wishful Thinking
One of the most common mistakes is underbuying. Measure the low spots, determine the average depth, and calculate coverage using the manufacturer’s rate for that thickness. Then add a little waste margin. If a product covers roughly 20 to 25 square feet per bag at 1/4 inch, a 200-square-foot room may need closer to 9 or 10 bags than the optimistic 7 someone guessed in the driveway. Running out in the middle of a pour is how cold joints become part of your life story.
9. Stage Tools, Water, Bags, and Buckets Before Mixing
Once the mixing starts, the clock starts too. Do not spend your product’s working time hunting for a gauge rake, cleaning a bucket, or asking where the drill went. Set out measured water, unopened bags, mixing barrels or buckets, paddle, drill, smoother, gauge rake, spiked shoes if needed, and a plan for who does what. Good self-leveling work looks calm because the chaos was handled before the pour began.
10. Use Cool, Clean Water and Measure It Exactly
Water ratio matters more than people want it to. Too much water can weaken the underlayment, cause segregation, leave a chalky film, increase shrinkage, and reduce performance. Too little water can ruin flow and make the material harder to spread. Many manufacturers specify cool potable water, and some even recommend chilling water to about 70 degrees Fahrenheit when needed. Measure every batch the same way. Eyeballing it is a bold strategy with terrible flooring outcomes.
11. Mix Thoroughly, But Do Not Whip Air Into It
Most products call for a heavy-duty drill and a proper mixing paddle, often with a short, exact mixing time. The goal is a lump-free, homogeneous mix, not a frothy underlayment cappuccino. Overmixing can introduce air, while undermixing leaves dry powder and inconsistent flow. Use the manufacturer’s drill speed guidance, scrape the bucket if needed, and keep each batch consistent from start to finish.
12. Work as a Team When the Product Has Short Flow Time
Some self-leveling underlayments have only about 10 to 25 minutes of useful flow time, depending on the product and temperature. That means solo work on a bigger room can become stressful fast. For anything larger than a tiny patch, a two-person or three-person setup is smarter: one mixing, one pouring, one spreading. Continuous workflow helps avoid cold joints and surface ridges. This is not the moment for a leisurely coffee break unless your design concept is “abstract topography.”
13. Pour Continuously and Maintain a Wet Edge
Self-leveling underlayment blends best when fresh material meets fresh material. Pour in a sequence that lets each batch flow into the last one while it is still wet. That often means starting at the far end of the room and working toward the exit. Do not scatter random puddles around the room and hope they all become friends later. A continuous pour pattern gives you the best shot at a smooth surface.
14. Guide the Material; Do Not Wrestle It
Most manufacturers recommend tools like a gauge rake, spreader, smoother, or tined rake to help move the material to the right depth. The key word is help. You are guiding it, not finishing it like regular concrete. Overworking the surface can trap air, create ridges, and interfere with flow. Some installers also use spiked rollers or spiked shoes where appropriate, but always follow the product guidance. The best finish often comes from controlled movement and then leaving the material alone.
15. Control the Room Temperature, Sun, and Air Movement
Ambient conditions matter a lot. Hot rooms shorten flow time. Cold rooms slow cure. Direct sunlight can create uneven drying, and drafts from open windows, fans, or HVAC can dry the surface too fast and increase cracking risk. Keep the space within the product’s temperature range, protect it from direct sun, and avoid aggressive air movement during early cure. If the room feels like a wind tunnel, the floor will complain.
16. Know When to Use Multiple Lifts
Some products can go thick in one pour, while others are limited to thinner applications. If you have deeper birdbaths or isolated low spots, it may be smarter to prefill those areas or use multiple lifts instead of trying one heroic mega-pour. For additional lifts, many systems require the first layer to become walkable and then be reprimed before the next pour. That extra step can improve consistency and reduce surprises.
17. Protect the Fresh Pour and Respect Cure Windows
Just because the floor looks hard does not mean it is ready for everything. Light foot traffic may be fine after a few hours on some products, but heavy carts, ladders, and other abuse can damage the surface. Drying time for floor coverings also varies widely by product, thickness, temperature, and humidity. Tile might be ready sooner than resilient flooring or wood. Follow the waiting period, confirm adhesive requirements, and do not rush the floor covering just because the schedule is grumpy.
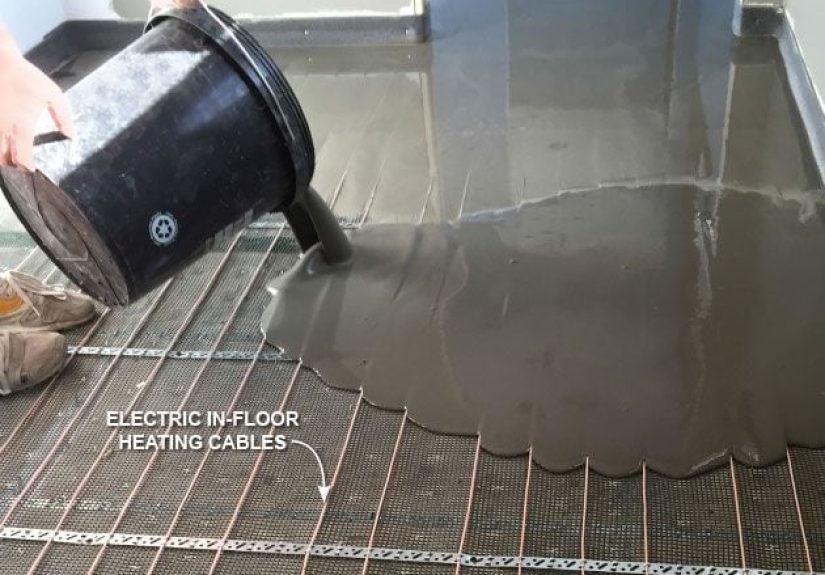
18. Match the Underlayment to the Finish Floor and Special Conditions
Think past the pour. The final floor covering matters. Vinyl, wood, tile, carpet, and specialty coatings may each have their own flatness, moisture, and adhesive requirements. Heated floors also need extra attention; some manufacturers require radiant systems to be turned off before, during, and after installation. On wood subfloors, some products call for metal lath while others are engineered to go without it. The best self-leveling underlayment job is not just smooth on pour day. It is compatible with everything that comes next.
Common Mistakes to Avoid
The biggest blunders are predictable: skipping primer, adding extra water, mixing too slowly, running out of material, pouring in a hot or drafty room, and assuming self-leveling underlayment will fix structural movement. Another classic mistake is ignoring the manufacturer’s instructions because a video online made it look easy. Videos are helpful. Product data sheets are binding. The floor does not care what the internet said if the bag says otherwise.
Final Thoughts
Working with self-leveling underlayment is less about brute force and more about discipline. Good prep, correct priming, accurate water measurement, and fast, organized pouring make a bigger difference than fancy tools or hopeful optimism. When you treat the product like a system instead of a shortcut, it usually rewards you with a smooth, flat surface that makes the finished floor look dramatically better.
In other words, self-leveling underlayment can absolutely make you look like a flooring genius. It just prefers that you act like one first.
Real-World Experience: What Installers Learn the Hard Way
On real jobs, the lessons around self-leveling underlayment tend to repeat themselves with suspicious consistency. The first is that the room always looks smaller before the pour than it does during the pour. A 100-square-foot bathroom sounds manageable until the clock is running, one bucket is empty, another is half mixed, and someone suddenly remembers the toilet flange was never dammed off. That is why experienced installers become borderline obsessive about staging. They do not do it to be dramatic. They do it because they have already lived through the alternative.
Another common experience is discovering that low spots are rarely as simple as they looked with a six-foot level. A slab may appear to have one depression, but once you start mapping it carefully, you find shallow dish-shaped areas, subtle crowns, and edges that taper out farther than expected. This is why good installers take time to mark high and low areas before the pour. It saves material, prevents panic, and reduces the temptation to overpour one area and hope the rest sorts itself out. Hope, as it turns out, is not an approved leveling tool.
Many people also learn that mixing consistency matters even more than pouring technique. A floor can survive a slightly clumsy spread better than it can survive three batches that all have different water content. When one bucket is looser than the next, the flow changes, the finish changes, and the final surface can show it. Installers who get reliable results are usually the ones who measure every bucket exactly the same way, even when they are tired and covered in primer.
There is also a real difference between working in a controlled interior room and working in a space that is too hot, too breezy, or too unpredictable. Basements, sunrooms, and renovation sites with open doors tend to expose every weakness in the process. Material sets faster than expected, edges dry too early, and finishing becomes rougher. The experienced response is not to force the product harder. It is to slow the environment down by controlling air movement, temperature, and sunlight before the pour begins.
Finally, seasoned installers know that the best self-leveling jobs do not usually look heroic in the moment. They look boring. Buckets are lined up. Water is premeasured. The floor is sealed. The primer is dry. The crew knows who mixes, who pours, and who spreads. That boring setup is exactly what creates the satisfying result: a smooth, hard, flat surface that makes the next flooring step easier. In flooring, boring is often the highest compliment. It means the plan worked, the product behaved, and nobody had to invent new vocabulary halfway through the pour.