Table of Contents >> Show >> Hide
- Why Coffee Cans Are Perfect for DIY Makeovers
- What You Need for a Quick Coffee Can Makeover
- Step 1: Clean and Prepare the Coffee Can
- Step 2: Choose Your Makeover Style
- Step 3: Paint the Coffee Can
- Step 4: Wrap It with Paper, Fabric, or Contact Paper
- Step 5: Add Decorative Details
- Step 6: Turn the Coffee Can into Something Useful
- Quick Coffee Can Makeover Ideas for Every Room
- How to Make the Project Look More Expensive
- Common Coffee Can Makeover Mistakes to Avoid
- Beginner-Friendly Coffee Can Makeover: A Simple 30-Minute Version
- Experience Notes: What I Learned from Quick & Easy Coffee Can Makeovers
- Conclusion
Somewhere in almost every kitchen cabinet lives an empty coffee can with big potential. It may not look glamorous at first. It may even still smell like last Tuesday’s dark roast. But with a little paint, paper, twine, fabric, or imagination, that plain container can become a charming storage bin, a farmhouse-style planter, a desk organizer, a gift basket, or a decorative piece that looks like it came from a boutique instead of the recycling pile.
A quick and easy coffee can makeover is one of those DIY projects that checks every box: affordable, beginner-friendly, practical, creative, and surprisingly satisfying. You do not need a garage full of tools or an art degree. You just need a clean coffee can, a few basic craft supplies, and the willingness to believe that trash can, in fact, become treasure with a tiny bit of glue and confidence.
In this guide, you will learn how to turn an empty coffee can into stylish home decor using simple makeover techniques. We will cover cleaning, prepping, painting, wrapping, decorating, sealing, and repurposing your can for everyday use. Whether your style is modern, rustic, colorful, vintage, minimalist, coastal, cottagecore, or “I found this ribbon in a drawer and I’m going with it,” there is a coffee can makeover idea here for you.
Why Coffee Cans Are Perfect for DIY Makeovers
Coffee cans are sturdy, versatile, and usually a great size for storage. Unlike flimsy packaging that collapses the moment you look at it too aggressively, coffee cans can hold craft supplies, utensils, paintbrushes, garden tools, markers, faux flowers, bathroom items, small toys, and even seasonal decorations. Many have plastic lids, which makes them useful for hidden storage too.
Upcycling a coffee can also supports a more sustainable home. Instead of buying yet another organizer, you reuse something you already have. That means less waste, fewer impulse purchases, and more personality in your space. A handmade container also has a story. Store-bought bins are useful, but they rarely make you say, “I made this while drinking iced coffee and avoiding laundry.” That is the magic of DIY.
What You Need for a Quick Coffee Can Makeover
The best part about this project is that the supply list is flexible. You can keep it simple with paint and ribbon, or dress it up with scrapbook paper, fabric, rope, stencils, labels, or decorative knobs.
Basic Supplies
- Empty coffee can
- Warm soapy water
- Paper towels or clean cloth
- Sandpaper or sanding block
- Primer or craft paint
- Acrylic paint, spray paint, chalk paint, or enamel paint
- Foam brush or paintbrush
- Mod Podge or craft glue
- Scrapbook paper, wrapping paper, fabric, burlap, or contact paper
- Ribbon, twine, rope, lace, stickers, labels, or stencils
- Clear sealer for extra durability
You do not need every item on the list. Think of it as a DIY buffet. Choose what fits your style, your budget, and whatever is currently hiding in your junk drawer.
Step 1: Clean and Prepare the Coffee Can
Before you start decorating, clean the coffee can thoroughly. Remove the label if it has one, wash the inside and outside with warm soapy water, rinse well, and let it dry completely. If the can has a strong coffee smell, leave it open overnight or wipe the inside with a little baking soda and water. Coffee is wonderful in a mug, less wonderful as a permanent scent inside your craft organizer.
Next, check the rim. If there are any sharp edges, avoid using the can until they are smoothed or covered. A smooth-edge can opener helps prevent rough rims, but if the can already has a sharp area, carefully sand it and cover the edge with strong tape, fabric trim, or rope. Safety first, style second, hot glue third.
For painted projects, lightly sand the outside of the can. This helps paint grip the surface better, especially if the can is glossy or metallic. Wipe away dust before moving to the next step.
Step 2: Choose Your Makeover Style
A coffee can makeover works best when you decide where the finished piece will live. A kitchen canister may need a clean farmhouse look. A craft-room organizer can be bright and playful. A bathroom container may look best with soft neutrals, rope, or a spa-inspired finish. A planter can go rustic, modern, or cheerful depending on the plant and room.
Popular Coffee Can Makeover Styles
- Farmhouse: white paint, black label, jute twine, and simple lettering.
- Modern: matte black, white, beige, or metallic paint with clean lines.
- Boho: macramé cord, fringe, earthy colors, and textured fabric.
- Vintage: floral paper, lace trim, distressed paint, and antique-style labels.
- Kids’ room: bright colors, stickers, character-free patterns, and playful labels.
- Garden style: sage green paint, herb labels, twine, and drainage holes if used for plants.
When in doubt, match the can to your room instead of trying to invent a whole new design universe. If your kitchen already has warm wood, white walls, and black hardware, a white coffee can with a black label and twine wrap will look intentional. If your craft table looks like a rainbow had a meeting with a glitter factory, go bold.
Step 3: Paint the Coffee Can
Paint is the fastest way to make a coffee can look brand new. For a smooth finish, apply a primer first, especially if the original can has bright printing or a slick surface. Primer helps cover graphics and gives the paint something to hold onto.
If using spray paint, work outside or in a well-ventilated area. Protect the surface around you with cardboard or a drop cloth. Shake the can according to the product directions, spray lightly, and use several thin coats instead of one heavy coat. Heavy coats can drip, bubble, or create that “I sneezed while painting” texture. Thin layers look cleaner and dry more evenly.
Acrylic craft paint is another easy option. Use a foam brush for smooth coverage and let each coat dry before adding the next. Chalk paint creates a soft matte finish and works beautifully for farmhouse, vintage, or distressed designs. For a more polished look, finish with a clear sealer once the paint is fully dry.
Step 4: Wrap It with Paper, Fabric, or Contact Paper
If painting is not your thing, wrapping the can is even easier. Measure the height and circumference of the coffee can, then cut scrapbook paper, wallpaper, fabric, burlap, or peel-and-stick contact paper to size. Apply Mod Podge or craft glue to the can, smooth the material around it, and press out bubbles as you go.
Scrapbook paper gives you endless patterns: florals, stripes, gingham, botanicals, marble, wood grain, or holiday prints. Fabric adds texture and can make the can look soft and high-end. Burlap gives instant rustic charm. Contact paper is great for beginners because it sticks quickly and often wipes clean.
For a polished finish, hide the seam at the back and add ribbon, rope, or trim around the top and bottom edges. This step makes the project look less like “paper glued to a can” and more like “handmade artisan container that definitely deserves compliments.”
Step 5: Add Decorative Details
Details turn a basic makeover into a custom piece. Add a chalkboard label to create a reusable storage container. Use alphabet stickers for a pantry-style look. Tie jute twine around the middle for a cozy farmhouse effect. Glue rope around the entire can for a coastal or boho vibe. Add lace for vintage charm, metallic tape for a modern edge, or wooden beads for a handmade boutique look.
Easy Decoration Ideas
- Stencil the word “coffee,” “tools,” “brushes,” “herbs,” or “pens.”
- Add a faux leather label for a modern handmade look.
- Glue wooden craft sticks around the can and stain them for a mini barrel effect.
- Wrap cotton rope from bottom to top for a textured storage basket.
- Add adhesive gems or metallic dots for a playful desk accessory.
- Use pressed-flower-style stickers for a cottage-inspired design.
The trick is to stop before the can becomes visually exhausted. One or two details are usually enough. DIY confidence is wonderful, but not every project needs lace, rope, glitter, buttons, and a motivational quote fighting for attention on the same surface.
Step 6: Turn the Coffee Can into Something Useful
Once your coffee can makeover is complete, the fun part is deciding how to use it. A decorated can should not just sit around looking pretty, although honestly, that is also allowed. Here are practical ways to put it to work.
Desk Organizer
Use the can to hold pens, pencils, scissors, rulers, paintbrushes, or markers. Add dividers inside with cardboard tubes if you want separate sections. This is perfect for home offices, homework stations, craft rooms, and kitchen command centers.
Planter or Herb Pot
A coffee can makes a cute planter for herbs, succulents, or faux greenery. If using real plants, add drainage holes to the bottom and place the can on a saucer. You can also keep the plant in a nursery pot and simply use the decorated coffee can as a cachepot. That way, water does not sit directly against the metal.
Kitchen Utensil Holder
A tall coffee can can hold wooden spoons, spatulas, whisks, or reusable straws. Choose a washable finish, and avoid placing unsealed paper designs too close to the sink or stove.
Bathroom Storage
Use smaller coffee cans for cotton balls, hair ties, makeup brushes, combs, or bath salts. A rope-wrapped can looks especially nice in a bathroom because it adds texture without clutter.
Gift Container
Decorate a coffee can and fill it with cookies, tea bags, cocoa packets, craft supplies, gardening gloves, or small gifts. Add a handmade tag and you have a thoughtful gift package that is reusable, budget-friendly, and much more charming than a plain gift bag.
Quick Coffee Can Makeover Ideas for Every Room
One reason coffee can crafts are so popular is that they are adaptable. A single empty can can become useful almost anywhere in the house.
For the Kitchen
Make a matching set of cans for tea bags, coffee pods, sugar packets, snack bars, or cookie cutters. Use neutral paint and printed labels for a clean pantry look. If the can will hold food directly, use only a clean, food-safe interior and avoid damaged or rusty cans. For most makeovers, it is safer and simpler to use the can for wrapped items or non-food storage.
For the Craft Room
Cover several cans with matching paper and label them for glue sticks, markers, paintbrushes, ribbon scraps, beads, buttons, and scissors. Attach the cans to a board for wall storage or group them on a lazy Susan for a rotating craft station.
For the Garden
Paint coffee cans in soft green, terracotta, white, or sunny yellow and use them for herbs, seed packets, plant markers, or small hand tools. A row of labeled herb cans on a windowsill can make even a tiny kitchen feel like it has a garden department.
For Seasonal Decor
Use holiday paper, ribbon, or paint colors to create seasonal containers. A red-and-white can can hold candy canes in December. A pastel can can become an Easter treat holder. A black matte can with gold stars can work for New Year’s Eve. A pumpkin-orange can with raffia can become fall table decor. One can, many personalities.
How to Make the Project Look More Expensive
Small finishing choices can make a coffee can makeover look polished instead of rushed. First, keep the color palette limited. Two or three colors usually look more elegant than six. Second, use texture carefully. Rope, burlap, linen, matte paint, and wood accents can make a simple container feel warm and intentional. Third, use clean labels. A nice label can instantly turn a reused can into something that looks designed.
Another tip is to create sets. One coffee can is cute; three matching coffee cans look like a collection. Use the same paint color and different labels, or use the same paper pattern in different sizes. Grouping makes the project feel planned, even if the whole idea started because you forgot to take out the recycling.
Common Coffee Can Makeover Mistakes to Avoid
The most common mistake is skipping surface prep. Paint may stick at first, but it can chip or peel later if the can was oily, dusty, glossy, or not fully dry. Another mistake is using too much glue. Thin, even layers work better than thick blobs, especially with paper. Too much glue can wrinkle the paper and create bubbles.
Also, do not rush drying time. DIY projects often go wrong when we touch, wrap, seal, or decorate before the paint has cured enough. It is tempting to keep going because the project is exciting, but patience creates a better finish. Think of drying time as the project taking a tiny nap.
Finally, consider how the can will be used. A paper-covered can may be perfect for pens but not ideal near water. A painted can may work well for utensils, but it should be sealed if handled often. A planter needs drainage or a removable inner pot. Design is important, but function keeps the makeover useful after the photos are taken.
Beginner-Friendly Coffee Can Makeover: A Simple 30-Minute Version
If you want the easiest possible version, try this: clean the coffee can, sand it lightly, paint it with two coats of white or matte black paint, let it dry, then wrap jute twine around the top and bottom. Add a small label to the front. That is it. The finished piece can hold pens, faux flowers, utensils, or small tools, and it looks stylish without requiring complicated techniques.
For an even faster version, use peel-and-stick wallpaper or contact paper. Cut it to size, wrap it around the can, smooth it down, and add a ribbon. This method is great for renters, busy parents, students, or anyone who enjoys crafting but does not enjoy waiting for paint to dry.
Experience Notes: What I Learned from Quick & Easy Coffee Can Makeovers
After trying several coffee can makeover styles, the biggest lesson is that simple designs usually win. The first instinct is to use every cute supply in the craft box because the can is small and the possibilities feel endless. But the projects that look the best tend to have one strong idea: a clean painted finish, a beautiful paper wrap, a rope texture, or a neat label. When too many decorations are added, the can starts looking less like home decor and more like it lost a fight with the craft aisle.
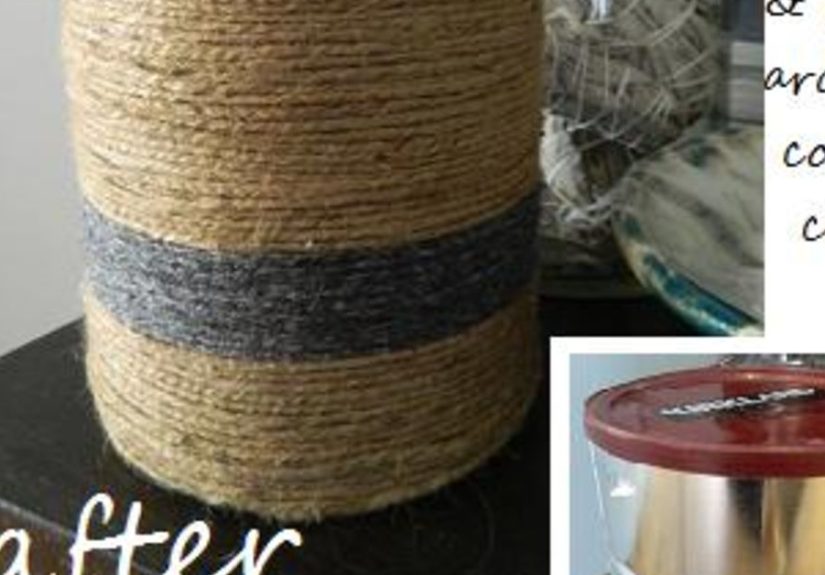
One of the easiest and most satisfying makeovers is the rope-wrapped coffee can. It hides every bit of branding, covers small dents, and gives the container a warm, basket-like texture. The trick is to start at the bottom, use a small amount of hot glue as you go, and keep the rope tight. This style works beautifully for bathrooms, entryway tables, shelves, and desks. It can hold makeup brushes, keys, pens, faux stems, or even remote controls. It is also forgiving, which is a polite way of saying it hides beginner mistakes like a champ.
Painted cans are also excellent, but they taught me the importance of prep. A shiny coffee can does not always welcome paint with open arms. Light sanding makes a real difference. So does using thin coats. When paint is applied too thickly, it can drip or stay tacky longer than expected. The best finish comes from patience: sand, wipe clean, prime if needed, apply a thin coat, let it dry, and repeat. It sounds slower, but it saves time because you do not have to fix bubbles, streaks, or fingerprints later.
Paper-wrapped cans are the fastest option and probably the most fun for seasonal decor. Scrapbook paper can instantly create a theme: lemons for summer, plaid for fall, snowflakes for winter, florals for spring. The main challenge is measuring correctly. A slightly crooked cut can become obvious once wrapped around the can. Leaving a small overlap at the back helps, and covering the top and bottom edges with ribbon makes the whole project look finished.
Another useful discovery is that coffee cans make fantastic gift containers. Fill one with homemade cookies, seed packets, art supplies, tea bags, or small self-care items, then decorate the outside to match the gift. It feels personal without being expensive. Plus, the recipient can reuse the container, which makes the packaging part of the present.
The best thing about this project is the low pressure. If a design does not turn out perfectly, it is not a disaster. It is an empty coffee can, not a marble countertop. You can repaint it, rewrap it, cover it with rope, or call it “rustic” and move on with confidence. That is what makes a quick and easy coffee can makeover such a great DIY project: it is creative, useful, affordable, and friendly to beginners. It proves that style does not always come from buying something new. Sometimes it comes from looking at an empty can and thinking, “You, my friend, are about to get a glow-up.”
Conclusion
A quick and easy coffee can makeover is one of the simplest ways to practice upcycling while adding useful decor to your home. With basic supplies like paint, paper, fabric, twine, glue, and labels, an empty coffee can can become a desk organizer, planter, kitchen holder, bathroom container, craft storage bin, or reusable gift package. The key is to clean the can well, smooth any sharp edges, choose a style that fits your space, and finish the design with practical details.
This project is budget-friendly, beginner-friendly, and endlessly customizable. It is also a reminder that home decor does not have to be expensive to be beautiful. Sometimes the best makeover starts in the recycling bin and ends on your shelf looking surprisingly proud of itself.