Table of Contents >> Show >> Hide
- Why sealing your home works so well
- 1. Seal around utility lines, pipes, and cable penetrations
- 2. Seal exterior doors, thresholds, and garage door edges
- 3. Seal windows, screens, trim, and loose exterior joints
- 4. Seal foundation gaps and low-level openings near the ground
- 5. Seal attic vents, soffits, crawl space vents, and roofline gaps
- Quick pest-proofing checklist for this weekend
- When to call a pro
- Conclusion
- Real-World Experiences Homeowners Commonly Have After Sealing Entry Points
If pests had a real estate app, your house would be marked highly desirable: climate-controlled, snack-adjacent, and full of tiny “private entrances” you forgot existed. The good news is that most ants, roaches, spiders, mice, and other unwelcome roommates do not need a dramatic front-door opening. They just need a gap, a crack, or one lazy strip of old weatherstripping waving them inside like an airport marshal.
That is why pest prevention starts long before traps, sprays, and frantic late-night Googling. The smartest move is sealing entry points before pests move in. This strategy, often called exclusion, is one of the most effective ways to pest-proof a home because it cuts off access at the source. Instead of reacting after you hear scratching in the wall or spot a line of ants on the counter, you make your house harder to enter in the first place.
If you are wondering where to start, focus on the spots pests love most: the little openings around pipes, the daylight under doors, loose window trim, low-level foundation gaps, and vents near the roofline or crawl space. These areas are the VIP lane for critters. Seal them now, and you can save yourself a lot of money, cleanup, and emotional damage later.
Why sealing your home works so well
The biggest mistake homeowners make is assuming pest control begins with chemicals. In reality, many infestations start because the structure itself is offering easy access. A tiny hole near a plumbing line can invite mice. A worn garage-door seal can usher in crickets, roaches, and spiders. A loose attic vent can become an open invitation for rodents and other animals searching for warmth and shelter.
As a practical rule, any opening around 1/4 inch deserves your attention. That may not sound like much, but to a mouse it is basically a welcome mat. For insects, it is a luxury entrance with no waiting line. Once inside, pests look for the same things humans do: food, water, and a comfortable place to stay. Sealing alone will not solve every problem, but it dramatically lowers the odds that pests get indoors and settle down like they signed a lease.
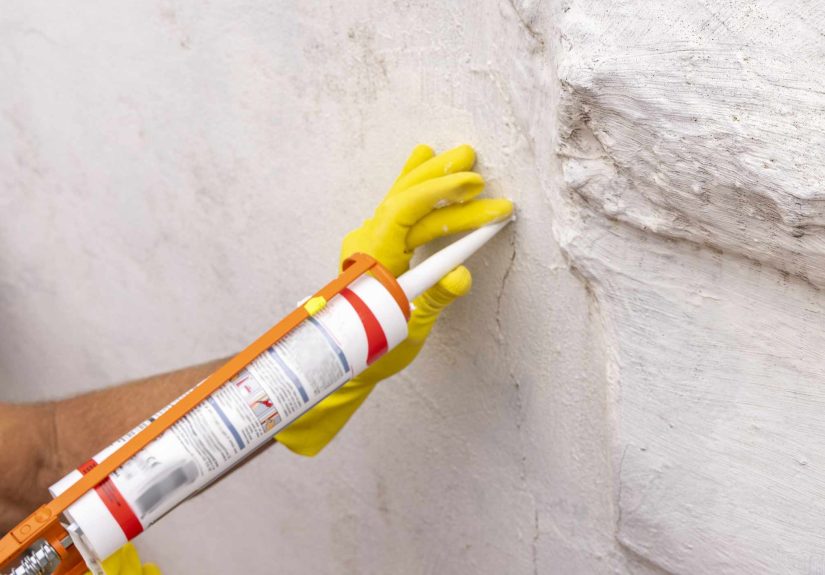
Before you start, gather the right materials. For stationary gaps, use high-quality silicone or siliconized acrylic latex caulk. For doors and windows, use weatherstripping and door sweeps. For larger or chew-prone openings around pipes and utility lines, use copper mesh, hardware cloth, metal flashing, or sheet metal along with sealant. In masonry areas, mortar or cement-based patch products may be the better choice. One important note: spray foam by itself is not a miracle fix. It can help as part of a repair, but many rodents can chew through it if it is the only barrier.
1. Seal around utility lines, pipes, and cable penetrations
This is the first place to check because it is one of the most commonly missed. Look where plumbing, gas lines, electrical conduits, dryer vents, HVAC lines, and cable wires pass through exterior walls. Installers often leave a little extra space around these penetrations, which is fine for the equipment but fantastic for pests.
Walk the outside of your home and inspect areas near the air conditioner, outdoor faucets, electric meter, hose bibs, dryer vent, and cable entry points. Then head indoors and look under sinks, behind laundry machines, near the water heater, and around utility closets. If you see an irregular gap around a pipe or wire, you have found a likely entry point.
Best fix
For small gaps, caulk may be enough. For larger openings or rodent-risk areas, pack the gap with copper mesh or hardware cloth first, then seal around it. In masonry, use mortar where appropriate. The goal is to create a tight seal that cannot be chewed, shifted, or weather-damaged within one season.
This step matters because utility openings often lead straight into wall voids, and wall voids are basically a pest superhighway. If something gets into that cavity, it can travel quietly to the kitchen, attic, basement, or bathroom without ever filing a change-of-address form.
2. Seal exterior doors, thresholds, and garage door edges
If you can see daylight under a door, pests can see opportunity. Exterior doors are one of the easiest access points for insects and rodents because seals wear down gradually. Homeowners stop noticing the gap, but pests absolutely do not.
Check your front door, back door, side door, patio door, and the door from the garage into the house. Then inspect the garage door itself, especially along the bottom corners and side seals. These spots are prime access points for ants, beetles, earwigs, spiders, mice, and all the other little opportunists that prefer not to knock first.
Best fix
Install or replace door sweeps, repair worn thresholds, and add weatherstripping around the frame where needed. For garage doors, replace damaged bottom seals and side weatherstripping. Make sure the door closes tightly and evenly across the floor. If gnawing is a concern, consider more durable materials or protective metal reinforcement.
This is also where maintenance pays off fast. A new sweep is inexpensive, easy to install, and often makes an immediate difference. It can also help with drafts, dust, and energy loss, which means your pest-proofing project may quietly improve comfort and utility efficiency too. Not bad for a fix that takes less time than scrolling through home-renovation videos you were never actually going to start.
3. Seal windows, screens, trim, and loose exterior joints
Windows do not need to be broken to let pests in. Worn caulk, shrinking trim, torn screens, and loose exterior joints can all create just enough access for insects to sneak indoors. Flying pests get extra help from damaged screens, while crawling pests take the scenic route through cracks around the frame.
Inspect window perimeters inside and out. Look for cracked or missing caulk, gaps between trim and siding, loose casing, and screens with tears or poor fit. Pay attention to basement windows and low ground-level windows in particular, because they are often closer to mulch, leaf litter, and moisture, which pests love.
Best fix
Remove failed caulk and apply a fresh bead of exterior-grade sealant. Repair or replace torn screens, and make sure frames close fully. If trim is pulling away or wood has begun to rot, fix the underlying problem before resealing. Caulk is helpful, but it is not a personality transplant for damaged wood.
This area is especially important if you deal with seasonal invaders like stink bugs, lady beetles, or overwintering insects that look for tiny wall and window gaps when temperatures start to drop. A well-sealed window line helps stop both the everyday creepers and the once-a-year swarm that makes you question your life choices.
4. Seal foundation gaps and low-level openings near the ground
Low on the house is where a lot of pest problems begin. Ants trail along the foundation. Mice investigate gaps where siding meets masonry. Roaches and crickets follow moisture and shelter near the base of the structure. If you have mulch piled too high against the house, vegetation touching the siding, or cracks where the foundation meets the ground line, you are giving pests cover and access at the same time.
Inspect the entire perimeter of your home. Look for cracks in the foundation, separation where materials meet, openings around crawl-space doors, and gaps between siding and masonry. Check especially near porches, steps, and utility penetrations close to grade.
Best fix
Use the appropriate patching material for the surface: caulk for small joints, mortar or concrete patch for masonry cracks, and durable sealants where different materials meet. Keep soil, mulch, and leaf buildup from sitting too high against the house. Trim plants back so the foundation is visible and easier to inspect.
One caution: do not block designed drainage or ventilation features just because they look suspicious. Your goal is to seal unintended openings, not create moisture problems by closing off areas that were meant to function. When in doubt, seal the gap around the assembly, not the drainage path itself.
5. Seal attic vents, soffits, crawl space vents, and roofline gaps
This is the area many homeowners forget until they hear something overhead and suddenly become amateur detectives at 2 a.m. Roofline gaps are especially attractive because they lead to warm, quiet spaces with low human traffic. Rodents, insects, and other animals all appreciate a private upper-floor suite.
Inspect attic and crawl-space vents, soffits, eaves, gables, fascia joints, and the area around roof penetrations. Check for damaged vent covers, missing screens, loose trim, and openings where the roofline meets siding or masonry. Also look at chimney caps and any openings around flues or vent stacks, using appropriate safety precautions.
Best fix
Use properly sized metal mesh or hardware cloth to screen vents where appropriate, repair damaged vent covers, and seal nearby gaps with suitable exterior materials. Make sure doors or panels to attic and crawl spaces close tightly. If tree branches or dense vines touch the roofline, trim them back so pests have fewer pathways to investigate.
This area matters because exclusion is not just about ground-level bugs. Roof rats, mice, squirrels, and a surprising number of insects use elevated access points. If you only seal the bottom half of the house, pests may simply choose the penthouse route.
Quick pest-proofing checklist for this weekend
- Walk the outside perimeter of your home with a flashlight and notepad.
- Mark any gap around doors, windows, vents, pipes, or the foundation.
- Replace worn weatherstripping and door sweeps first.
- Seal utility penetrations with appropriate materials, not caulk alone where chewing is likely.
- Repair screens on windows, vents, and crawl-space openings.
- Trim vegetation away from the house and reduce damp clutter near the foundation.
- Recheck problem areas every spring and fall.
When to call a pro
If you already hear scratching in walls, find droppings, notice gnaw marks, or suspect an established nest in the attic or crawl space, sealing alone may trap a problem rather than solve it. In that case, remove the active infestation first, then seal the entry points so it does not happen again. The same goes for bees, wasps, or other pests nesting inside structural voids. Closing the hole before the issue is handled can make the situation worse.
For everyone else, though, prevention is the real power move. It is cleaner, cheaper, and far less dramatic than battling a full-blown infestation. Think of it as home maintenance with a side benefit of not sharing your cereal with strangers.
Conclusion
If you want to stop pests before they move in, do not start with panic. Start with a tube of caulk, a good door sweep, durable screening, and a slow walk around your home. The five most important places to seal are utility penetrations, exterior doors, windows, foundation-level gaps, and attic or crawl-space openings. These are the weak spots pests count on. Tighten them up, and your house becomes a much less inviting place for ants, roaches, spiders, mice, and other invaders.
The best part is that this is one of those rare home projects that is practical, affordable, and deeply satisfying. You are not just fixing cracks. You are cutting off access, lowering risk, and making your home cleaner, quieter, and harder to invade. In the world of pest control, that is not just smart. That is elite.
Real-World Experiences Homeowners Commonly Have After Sealing Entry Points
One of the most common experiences homeowners report is how small the actual problem spots turn out to be. People expect to find one giant hole worthy of a cartoon mouse carrying a bindle. Instead, they find a thin gap under the back door, a ragged opening around a hose bib, or a loose screen on a crawl-space vent. The surprise is not just where the gaps are, but how many there are once you start looking carefully. A homeowner may spend months blaming “the season” for ants in the kitchen, only to discover the real issue was a tiny crack near the window trim above the sink. After sealing it, the traffic slows down dramatically. That experience tends to change how people think about pest control: less magic spray, more building maintenance.
Another familiar experience is how quickly the garage becomes the turning point. Many people focus on the kitchen or basement first, but the garage often acts like a staging area for pests. Homeowners replace the bottom garage-door seal, add a tighter sweep to the side entry door, and suddenly notice fewer crickets, fewer spiders, and less mysterious debris in corners. It is not glamorous work, but it is effective. The same goes for sealing around the water heater, laundry hookups, and dryer vent. People often describe a moment of mild horror when they realize how open those areas really were. Then comes the satisfying part: patching them, cleaning up, and feeling like the house finally stopped broadcasting “vacancy available.”
Seasonal changes also shape the experience. In late summer and fall, homeowners often start noticing insects collecting near windows, door frames, and sunny exterior walls. That is when sealing work feels especially rewarding. A person who spent one weekend recaulking window trim and repairing screens may still see a stray bug now and then, but not the annoying wave of seasonal invaders they dealt with the year before. In colder months, people frequently say the house feels less drafty after weatherstripping and door-sweep upgrades. That is a bonus many do not expect. Pest prevention and comfort improvement often overlap, which makes the project feel less like a chore and more like a smart tune-up for the home.
Perhaps the most useful long-term experience is that homeowners become better inspectors after doing this once. They start noticing the early signs: a bit of daylight under a threshold, mulch creeping too high against the siding, or a vent screen that has pulled loose. Instead of waiting for a pest problem to announce itself with droppings, damage, or a dramatic midnight sighting, they catch the structural issue sooner. That shift in mindset is probably the biggest payoff of all. Sealing your home is not a one-time heroic act followed by eternal peace and orchestral music. It is a habit of noticing, maintaining, and staying a step ahead. And honestly, that is how most successful pest prevention works: quietly, consistently, and with far fewer squeaks in the walls.