Table of Contents >> Show >> Hide
- Before You Start: A Quick Safety & Success Checklist
- How to Harvest Aloe: 8 Steps
- Step 1: Pick the right leaf (outer, thick, and healthy)
- Step 2: Sanitize your tools (because plants hate germs too)
- Step 3: Support the plant and cut the leaf close to the base
- Step 4: Let the yellow latex drain (10–20 minutes, minimum fuss)
- Step 5: Rinse the leaf and trim the spiky edges
- Step 6: Open the leaf (split or filletchoose your adventure)
- Step 7: Scoop out the clear gel (and avoid the “yellow zone”)
- Step 8: Clean, store, and label (future-you will be grateful)
- How to Harvest Aloe Without Hurting the Plant
- What to Do With Fresh Aloe Gel
- Troubleshooting & FAQ
- Conclusion
- Experience Notes: The Real-World “Oops” Moments (and How to Avoid Them)
Aloe vera is basically a spiky little houseplant that’s secretly been running a tiny “first-aid station” inside every leaf. Harvest it the right way and you’ll get clean, soothing gel while your plant keeps thriving. Harvest it the wrong way and you’ll get… a slippery cutting board, a bitter yellow sap situation, and a sad-looking succulent that’s silently judging you.
This guide walks you through how to harvest aloe vera safely and cleanly in 8 practical steps, with pro tips for draining the yellow latex (aloin), extracting the clear gel, and storing it so it doesn’t turn into a science project in your fridge.
Before You Start: A Quick Safety & Success Checklist
What you’ll need
- A mature aloe vera plant (bigger outer leaves = more gel, less drama)
- Sharp knife or clean kitchen shears
- Rubbing alcohol (or hot soapy water) to sanitize tools
- Cutting board (bonus points if it has a juice groove)
- Paper towels or a clean kitchen towel
- A cup or bowl to drain the leaf
- Spoon (for scooping gel) and an airtight container (for storage)
Know what you’re harvesting: gel vs. latex
Inside the leaf are two very different substances:
- Clear inner gel (the part people use topically for soothing skin).
- Yellow latex / sap (often called aloin or aloe latex) near the leaf’s outer layer. It’s bitter and can irritate skin, and it’s not something you want in your homemade gel.
Translation: if you’re harvesting aloe for gel, your mission is simplekeep the clear stuff, ditch the yellow stuff.
How to Harvest Aloe: 8 Steps
Step 1: Pick the right leaf (outer, thick, and healthy)
Start by choosing a mature outer leafone of the bigger leaves growing near the base of the plant. Outer leaves are older and typically contain more usable gel. Skip the small, upright center leaves (those are the plant’s “new growth,” and it needs them to keep looking fabulous).
Look for a leaf that’s plump, firm, and evenly colored. Avoid leaves that are mushy, badly bent, or showing signs of rot. (If it looks like it’s already having a tough week, let it recoverdon’t turn it into skincare.)
Step 2: Sanitize your tools (because plants hate germs too)
Use a sharp knife or kitchen shears and sanitize the blade with rubbing alcohol or very hot, soapy water. A clean cut helps your aloe heal faster, and sanitation reduces the chance of introducing bacteria to the plant or your gel.
Bonus tip: a dull knife crushes tissue instead of slicing it cleanly, which makes everything messierkind of like trying to cut tomatoes with a spoon.
Step 3: Support the plant and cut the leaf close to the base
Hold the leaf gently near the base to stabilize it. Then cut as close to the main stem as you can without nicking nearby leaves. Many gardeners prefer a slight angled cut so the leaf drains more easily.
Don’t yank or twist. Aloe leaves tear like a stubborn stickereasy to start, annoying to finish, and you’ll regret it halfway through.
Step 4: Let the yellow latex drain (10–20 minutes, minimum fuss)
Place the leaf cut-side down in a cup, bowl, or even in the sinkupright like a tiny green antenna. Let it drain for 10–20 minutes until the yellow sap slows down.
This step matters because the yellow latex can irritate skin and makes your gel bitter. If you’re making aloe gel for topical use, draining is the easiest way to keep your final product cleaner.
Step 5: Rinse the leaf and trim the spiky edges
Rinse the leaf under cool water to wash away any lingering latex and surface dirt. Pat it dry. Then lay it flat and carefully slice off the spiny edges on both sides.
You’re not performing surgeryjust removing the parts most likely to poke you while you’re trying to be calm and wholesome.
Step 6: Open the leaf (split or filletchoose your adventure)
You have two common methods:
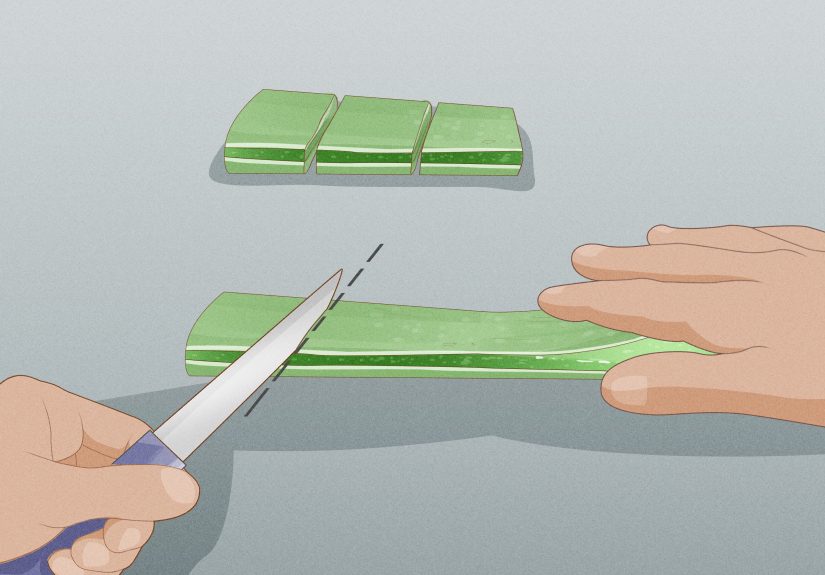
- Split method: Slice the leaf lengthwise down the center to create two long halves.
- Fillet method: Slice off the top green skin layer, then separate the gel from the bottom skin layer.
If you want the cleanest gel with the least green rind contact, the fillet method is your best friend. If you just want quick gel for immediate use, splitting works fine.
Step 7: Scoop out the clear gel (and avoid the “yellow zone”)
Use a spoon to scoop out the translucent gel. Aim for clear, slippery gel, not yellow liquid or green rind. If you see a yellow tint near the skin, scrape around it rather than mixing it into your batch.
Want neat pieces? Cut the gel into cubes. Want a smoother texture? Toss cubes into a blender for a quick pulse. If you blend, you can also strain to remove fibers for a more uniform gel.
Step 8: Clean, store, and label (future-you will be grateful)
If your gel is going directly on skin, many people give the cubes a quick rinse in cool water to remove any residue. Then store in an airtight container.
- Refrigerator: Use within about 1 week for best freshness.
- Freezer: Freeze in ice cube trays for easy portions and longer storage (months).
- Optional preservation: Some DIYers add powdered vitamins (like C or E) to extend fridge life.
Label your container with the date. Aloe gel doesn’t smell “bad” at firstit starts with an “I’m not sure about this” vibe, and that’s not a vibe you want to rub on your face.
How to Harvest Aloe Without Hurting the Plant
Aloe is resilient, but it’s not invincible. Think of harvesting as pruning: you’re removing mature leaves so the plant can keep producing new ones.
Don’t overharvest
- Take only a few leaves at a time. A common rule is no more than 3–4 leaves per harvest, depending on plant size.
- Leave enough healthy leaves for the plant to photosynthesize and recover.
- Wait a few weeks between bigger harvests if your aloe is not huge.
Let wounds dry naturally
After cutting, aloe typically seals the cut area on its own. Keep the plant in good conditions (bright light, well-draining soil, and not too much water) so it can heal like the tough little desert champ it is.
What to Do With Fresh Aloe Gel
Once you have clean gel, you’ve got options:
Option A: Quick-use gel (best for “I need this now” moments)
For minor skin soothing, you can use a small amount immediately. If you have sensitive skin, consider a patch test first: a little on the inner arm, wait a day, and see if your skin complains.
Option B: Aloe cubes for easy storage
Cubes are convenient and let you thaw only what you need. Frozen aloe cubes are also oddly satisfyinglike a spa day for your freezer.
Option C: Smooth blended gel
Blending creates a more uniform gel texture. If you want it extra smooth, strain out pulp. Store blended gel in an airtight container and keep it cold.
Troubleshooting & FAQ
Why is there yellow stuff coming out of my leaf?
That’s aloe latex (often associated with aloin). It’s normal when you cut a leaf. Drain it upright, rinse the leaf, and avoid mixing it into your gel.
My gel turned pink or browndid I break it?
Gel can discolor from oxidation, contamination, or age. If it looks off, smells unpleasant, or has visible mold, toss it. Fresh aloe is best used quickly, and clean tools/storage make a big difference.
Can I eat aloe vera straight from the leaf?
People do use aloe gel in foods, but it’s important to avoid the latex and to be cautious with oral use. Aloe latex and whole-leaf extracts have significant safety concerns, and some health authorities advise against ingesting latex. If you’re considering oral use, it’s smart to talk with a qualified healthcare professional first.
Is aloe safe around pets?
Aloe is widely considered unsafe for many pets if ingested. Keep freshly cut leaves and gel containers out of reach of curious paws.
Conclusion
Harvesting aloe vera isn’t hardit’s just specific. Pick a mature outer leaf, make a clean cut, drain the yellow latex, then extract the clear gel and store it properly. Do that, and you’ll have fresh aloe gel on hand without turning your kitchen into a slip-and-slide or your plant into a sad stick.
If you remember only one thing: clear gel good, yellow latex bad. Your skin, your stomach, and your aloe plant will all thank you.
Experience Notes: The Real-World “Oops” Moments (and How to Avoid Them)
Ask a handful of aloe growers how harvesting went the first time, and you’ll hear the same theme: “I thought it would be simple… and then everything was sticky.” That’s normal. Aloe gel is basically nature’s hair gelslippery, clingy, and determined to migrate from the cutting board to your elbows when you least expect it.
One of the most common beginner experiences is underestimating the yellow latex. You cut the leaf, and suddenly it’s oozing a bitter, yellowish liquid that smells a little… intense. People often assume it’s “extra potent aloe.” Nope. It’s the part you don’t want in your gel. The best real-world fix is the simplest one: stand the leaf upright and let gravity do its job. Ten minutes later, you’ll usually have a cleaner leaf and much less bitterness or irritation risk.
Another classic experience: harvesting from a leaf that’s too young. New center leaves look fresh and eagerlike they’re volunteering. But they tend to have less gel and more “structure,” so you do a lot of slicing for a disappointing amount of payoff. Most people quickly learn that older outer leaves are the gold mine. They’re bigger, easier to handle, and you get more usable gel per minute of effort.
Then there’s the overharvesting mistake. It’s easy to get excited and think, “This plant has so many leavessurely it won’t miss five or six.” But aloe relies on those leaves to store water and energy. People who take too many at once often notice the plant looks deflated afterward, or it slows down for weeks. The lived-and-learned approach is to harvest only a few leaves, then let the plant recover before the next round. Aloe is generous, but it also appreciates boundaries.
Storage brings its own set of experiences. Fresh gel can start out clear and gorgeous, then become watery, oxidized, or weird-smelling if it’s left uncovered or handled with dirty tools. Many people discover that small batches are the sweet spot: harvest one leaf, store gel in a clean container, and use it within a week. If you want long-term convenience, freezing in ice cube trays is the move. You get tidy portions, less waste, and that oddly satisfying feeling of being the kind of person who has “aloe cubes” ready to go.
Finally, the most relatable experience of all: the “I put fresh aloe on my skin and it stungwhat happened?” Often it’s leftover latex or a sensitivity. Real-world aloe users learn quickly to drain well, rinse, and try a small patch firstespecially on the face. Aloe can be soothing for many people, but skin is personal and occasionally dramatic. Treat it like you’d treat a new skincare product: test, observe, then proceed with confidence.