Table of Contents >> Show >> Hide
- What Does “Upcycled Old Desk” Really Mean?
- Why Upcycle an Old Desk Instead of Buying New?
- Start With a Desk Assessment
- Safety First: Know What You Are Sanding
- Best Upcycled Old Desk Ideas
- Tools and Materials You May Need
- How to Upcycle an Old Desk Step by Step
- Design Tips for a Professional-Looking Desk Makeover
- Common Mistakes to Avoid
- Budget-Friendly Upgrades That Make a Big Difference
- Experience Notes: What Upcycling an Old Desk Teaches You
- Conclusion
Some old desks retire gracefully. Others sulk in the corner, wearing coffee rings, wobbly legs, and the emotional expression of a tax form. But before you drag that tired piece of furniture to the curb, consider this: an upcycled old desk can become a stylish home-office centerpiece, a craft station, a vanity, a homework hub, a kitchen command center, or even a raised planter table. Yes, the same desk that once held unpaid bills and suspiciously sticky drawers can still have a second act.
Upcycling is more than a cute weekend project. It is the art of taking something unwanted and giving it new purpose, better function, and a little personality. Unlike recycling, which often breaks materials down, upcycling preserves what already exists and improves it. For an old desk, that might mean sanding, painting, staining, adding new hardware, replacing a damaged top, installing storage baskets, or turning the entire piece into something wildly different.
The beauty of an upcycled desk project is that it meets three modern needs at once: saving money, reducing waste, and creating a one-of-a-kind piece that does not look like it came from aisle seven of “Everybody Has This Furniture.” Whether you found a vintage writing desk at a thrift store, inherited a clunky office desk, or rescued a curbside treasure with “potential” written all over it, this guide will help you plan a makeover that is attractive, durable, practical, and proudly personal.
What Does “Upcycled Old Desk” Really Mean?
An upcycled old desk is a desk that has been repaired, redesigned, or repurposed instead of discarded. The goal is not simply to make it look new. The goal is to make it useful again in a smarter, more beautiful, or more creative way.
For example, a scratched wood desk can become a painted writing table. A bulky executive desk can be converted into a double workstation. A small student desk can become a makeup vanity. A desk with broken drawers can become an entryway console with open shelving. An old desk with a deep drawer can even be transformed into a raised garden planter for herbs and lettuce. In other words, upcycling asks one cheerful question: “What else could this be?”
Why Upcycle an Old Desk Instead of Buying New?
It Saves Money Without Looking Cheap
A new desk can be expensive, especially if you want solid wood, useful storage, or a design that does not wobble when you sneeze. An old desk, on the other hand, may cost very little or already be sitting in your home. With paint, primer, sandpaper, hardware, and a protective finish, you can create a custom piece for far less than many retail options.
It Keeps Usable Furniture Out of the Waste Stream
Furniture waste is a real problem, and desks are often discarded because of surface damage rather than structural failure. A chipped finish, outdated stain, missing knob, or ugly laminate top does not automatically make a desk useless. Repairing and reusing furniture extends the life of materials that have already been harvested, manufactured, shipped, and purchased.
It Gives You a Custom Desk That Fits Your Life
Buying new means choosing from existing options. Upcycling means designing around your actual habits. Need a cable hole for chargers? Add one. Want deeper drawer dividers for art supplies? Install them. Prefer a bold green desk with brass handles and a sealed wood top? Congratulations, you are now the creative director of your own furniture rescue mission.
Start With a Desk Assessment
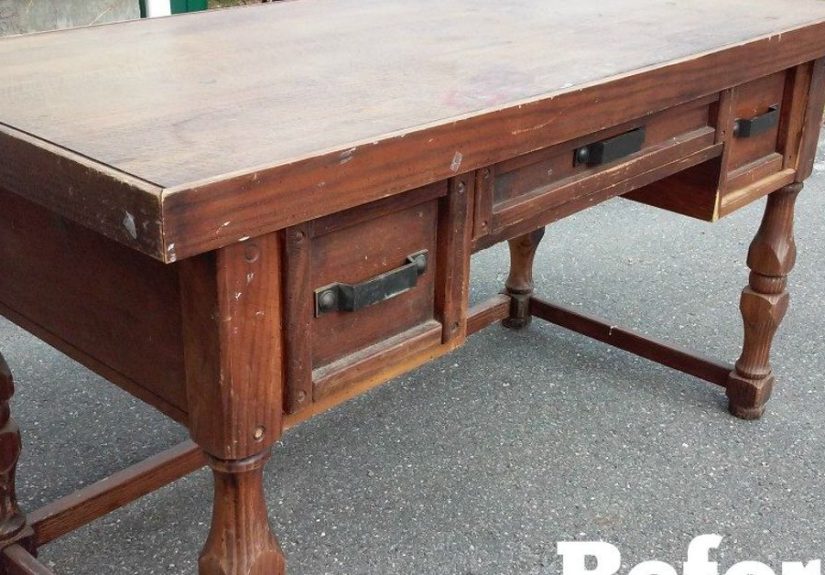
Before buying supplies, inspect the desk carefully. A good upcycling project starts with a realistic look at the piece’s condition. Check the legs, frame, drawers, top, back panel, and hardware. A desk with cosmetic problems is usually worth saving. A desk with severe water damage, crumbling particleboard, mold, or major structural instability may require more effort than it is worth.
Ask These Questions Before You Begin
- Is the desk solid wood, veneer, laminate, MDF, metal, or particleboard?
- Are the legs sturdy and level?
- Do the drawers open and close smoothly?
- Is the top flat enough for writing, working, or crafting?
- Are there odors, stains, peeling finish, or signs of pests?
- Will the desk fit the space where you plan to use it?
If the answer to most of these questions is positive, you probably have a strong candidate for an old desk makeover. If the desk is made of real wood, even better. Solid wood is forgiving, durable, and highly refinishable. Veneer and laminate can also be painted beautifully, but they need careful prep and the right primer.
Safety First: Know What You Are Sanding
If your desk is very old or has layers of unknown paint, be careful before sanding aggressively. Older painted furniture may contain lead-based paint. Avoid dry sanding mystery finishes without proper precautions. Work in a ventilated area, wear a respirator, use protective eyewear, and keep children and pets away from the work zone. If you suspect lead paint, use a proper test kit or consult a professional before disturbing the finish.
This is not the glamorous part of upcycling, but it is the part that keeps your charming desk makeover from becoming a tiny dust-themed disaster. Good safety habits are part of good craftsmanship.
Best Upcycled Old Desk Ideas
1. Painted Home Office Desk
The classic painted desk makeover is popular for a reason. Paint can hide scratches, unify mismatched repairs, and instantly update an outdated finish. Navy blue, soft black, warm white, sage green, mushroom beige, and deep charcoal are especially strong choices for a modern home office. For a playful look, paint the drawer fronts a contrasting color or add a stencil detail to the sides.
2. Two-Tone Wood and Paint Desk
If the desktop is real wood and still attractive, consider sanding and staining the top while painting the base. This creates a high-end custom look. A natural wood top with a black or olive base feels modern. A walnut-stained top with a cream base feels cozy and traditional. A pale oak top with a soft blue base says, “I have my life together,” even if the drawer contains eleven pens that no longer work.
3. Desk-to-Vanity Conversion
A small writing desk can become a beautiful vanity with a mirror, drawer organizers, and updated hardware. Add a glass top or sealed finish to protect the surface from makeup, skincare products, and the occasional perfume spill. A padded stool or vintage chair completes the look.
4. Craft Station or Sewing Table
An old desk is ideal for a craft room because it already has a work surface and storage. Add pegboard above it, small bins inside drawers, hooks on the side, and a washable protective mat on top. If the desk has deep drawers, use dividers for thread, scissors, tape, glue, and other supplies that normally migrate around the house like tiny crafty raccoons.
5. Kids’ Homework Desk
A thrifted desk can become a cheerful homework zone with bright paint, labeled drawers, and a durable topcoat. For younger kids, add a chalkboard-painted side panel or a corkboard backing. Choose rounded hardware and a finish that can handle pencil marks, stickers, and enthusiastic snack crumbs.
6. Entryway Command Center
A narrow desk can work beautifully in an entryway. Use it for mail, keys, bags, pet leashes, and charging devices. Remove damaged lower drawers and replace them with baskets for shoes or seasonal gear. Add hooks above the desk and a lamp on top, and suddenly your entryway looks intentional instead of like everyone dropped their belongings during a small tornado.
7. Raised Planter Desk
For a desk that is no longer useful indoors, consider turning it into a raised planter. Remove the desktop or drawer sections, install a lined planting box, drill drainage holes, and seal any exposed wood for outdoor use. This works especially well for shallow-rooted plants like herbs, lettuce, and flowers. Just remember: indoor furniture needs weather protection if it is going outside.
Tools and Materials You May Need
Your exact supply list depends on the desk material and design plan, but most old desk upcycling projects use a similar set of basics.
- Screwdriver or drill
- Wood filler or epoxy filler
- Putty knife
- Sandpaper or sanding block in medium and fine grits
- Tack cloth or microfiber cloth
- Mild soap or degreaser
- Primer suited to wood, laminate, metal, or MDF
- Furniture paint, enamel paint, chalk-style paint, or stain
- Brush, mini roller, or paint sprayer
- Clear protective topcoat, wax, or polyurethane
- New knobs, pulls, legs, drawer liners, or trim
How to Upcycle an Old Desk Step by Step
Step 1: Clean the Desk Thoroughly
Start by removing dust, grease, grime, tape residue, and mystery substances from the desk. Use mild soap and warm water for general cleaning. For oily surfaces, a degreaser may help. Let the desk dry completely before sanding or priming. Paint does not like dirt. Paint is dramatic that way.
Step 2: Remove Hardware and Drawers
Take off knobs, pulls, hinges, and removable drawer slides if needed. Label screws and parts in small bags so you do not end up conducting an archaeological dig on your garage floor later. Remove drawers and paint them separately for a cleaner finish.
Step 3: Repair Damage
Fill small dents, holes, and scratches with wood filler. For deeper damage, use a stronger epoxy filler. Let repairs dry according to product directions, then sand smooth. If a drawer sticks, check the slides and edges. A little sanding, wax, or adjustment may solve the problem.
Step 4: Sand for Adhesion
Sanding helps primer and paint bond to the surface. You do not always need to strip the desk to bare wood. In many cases, light sanding is enough to dull a glossy finish. For stained wood, start with medium grit and finish with fine grit. For laminate, sand gently so you scuff the surface without tearing through the outer layer.
Step 5: Wipe Away Dust
After sanding, remove all dust with a tack cloth or slightly damp microfiber cloth. Dust left behind can create bumps, streaks, and a finish that feels more “desert road” than “smooth designer desk.”
Step 6: Prime the Surface
Primer is the quiet hero of furniture painting. It improves adhesion, blocks stains, and creates a more even base for paint. Use a bonding primer for laminate or glossy surfaces. Use stain-blocking primer if the desk has water marks, tannin bleed, or old stains. Bare wood may need primer to seal the surface before painting.
Step 7: Paint or Stain
Apply thin, even coats rather than one thick coat. Thick paint tends to drip, pool, and sulk in corners. A brush works well for details, while a mini roller can create a smoother finish on broad surfaces. Let each coat dry fully before adding the next. For staining, sand bare wood properly, apply stain with the grain, wipe off excess, and build color gradually.
Step 8: Seal the Desk
A desk is a work surface, so it needs protection. Use a clear topcoat, polyurethane, furniture wax, or water-based sealer depending on the paint type and desired finish. A satin or matte finish hides minor imperfections better than high gloss. For heavy use, choose a durable protective coat and allow proper curing time before placing monitors, lamps, or coffee mugs on the surface.
Step 9: Upgrade the Details
New hardware can transform the whole piece. Brass pulls look warm and classic. Matte black handles feel modern. Ceramic knobs add charm. Leather pulls can soften a minimalist desk. You can also add peel-and-stick wallpaper inside drawers, install cable management clips, attach casters, or replace short legs with taller ones.
Design Tips for a Professional-Looking Desk Makeover
Choose a Color That Matches the Room
Do not pick a desk color in isolation. Look at the wall color, flooring, curtains, rug, chair, and nearby furniture. A bold desk can become a focal point, but it should still belong in the room. If your space already has several strong colors, a neutral desk may look more polished.
Balance Beauty With Daily Use
A delicate finish may look lovely in photos, but a desk must survive real life: laptops, notebooks, elbows, coffee cups, and the occasional crisis snack. Use durable paint and a protective topcoat if the desk will be used daily.
Keep Original Features When They Add Character
Not every old mark needs to disappear. Small dents, aged brass, old keyholes, carved details, and worn edges can give a desk personality. The trick is knowing the difference between “charming patina” and “this drawer looks like it fought a lawn mower.” Preserve details that tell a good story. Repair damage that weakens the function.
Common Mistakes to Avoid
Skipping Prep Work
Most furniture makeover failures begin with poor prep. Cleaning, sanding, repairing, and priming are not optional chores; they are the foundation of a durable finish. Paint applied over dirt or gloss may peel, chip, or scratch easily.
Painting Valuable Antiques Without Research
Some antique desks are worth more with their original finish. If you suspect the piece is historically valuable, research it before painting. Refinishing, cleaning, or repairing may be better than covering the original surface.
Using Wall Paint Without Protection
Wall paint can work on some furniture projects, but desks need a tougher finish. Choose furniture paint, enamel, cabinet paint, or a strong topcoat to increase durability.
Rushing Drying and Curing Time
Paint may feel dry before it is fully cured. If you place heavy items on the desk too soon, you can dent, mark, or peel the finish. Give the surface time to harden. Your patience will be rewarded with fewer fingerprints from the universe.
Budget-Friendly Upgrades That Make a Big Difference
You do not need a luxury budget to create an impressive upcycled old desk. Small details often create the biggest transformation. Replace dated knobs. Add drawer liners. Paint only the legs. Stain only the top. Install a keyboard tray. Add a removable glass top. Use contact paper inside cubbies. Attach a power strip under the back edge. Add baskets where missing drawers used to be.
For a high-impact upgrade, consider changing the desk’s silhouette. Removing a bulky hutch can make the piece feel lighter. Adding tapered legs can make it look midcentury-inspired. Cutting down a large desk can create a compact console. Sometimes the best makeover is not just a new color but a new proportion.
Experience Notes: What Upcycling an Old Desk Teaches You
One of the best things about upcycling an old desk is that the project teaches patience in a very practical way. At first, it is tempting to jump straight into painting because paint is the fun part. Paint feels like progress. Sanding feels like punishment with dust. But after working on a few old desks, you quickly learn that the boring steps decide whether the final piece looks handmade in a good way or homemade in a “please do not zoom in” way.
A real desk makeover also teaches you to respect old furniture. Even a plain desk may have clever joinery, solid drawer boxes, or stronger materials than many new budget pieces. When you remove the hardware and inspect the frame, you begin to see how the piece was built. Sometimes you discover solid wood under a dark, dated finish. Sometimes you discover veneer that needs gentler handling. Sometimes you discover a drawer full of paper clips, one button, and a receipt from 2009. Every project has its mysteries.
The most satisfying part is watching the desk slowly become useful again. A scratched desktop becomes smooth under your hand after sanding. A dull brown finish turns modern with primer and paint. Old hardware gives way to new pulls that completely change the style. The first coat may look alarming, especially if primer is streaky, but the second coat usually brings hope back into the room. By the time the topcoat dries, the desk no longer feels like junk. It feels chosen.
There is also a personal rhythm to the work. You start noticing how much pressure to use with sandpaper. You learn not to overload the brush. You learn that drawers should be painted flat when possible, that dust appears from nowhere like it pays rent, and that “just one quick coat” is a phrase that has betrayed many innocent DIYers. You learn to step back, check the piece from different angles, and fix small flaws before they become permanent decorations.
Most importantly, upcycling changes how you see old furniture. After one successful old desk makeover, thrift stores become treasure maps. Curbside furniture starts looking less like trash and more like possibility. You begin imagining new legs, fresh paint, hidden storage, and better hardware everywhere you go. This is both wonderful and slightly dangerous, because suddenly your garage may contain three “future projects” and a chair you swear has potential.
But that is part of the charm. Upcycling an old desk is not only about saving money or reducing waste. It is about creating something with your hands, solving small problems, and ending up with a piece that has a story. A new desk can be convenient, but an upcycled desk has character. It reminds you that usefulness does not end when something looks tired. Sometimes all it needs is a plan, a little sanding, a brave color choice, and someone willing to see the second life hiding under the scratches.
Conclusion
An upcycled old desk is one of the most rewarding DIY furniture projects because it combines creativity, sustainability, and everyday function. With the right assessment, careful prep, durable materials, and a clear design plan, an outdated desk can become a beautiful workstation, vanity, craft table, entryway organizer, or garden feature. The project does not require perfection. It requires curiosity, patience, and a willingness to look at old furniture with fresh eyes.
Instead of asking whether the desk is too old, ask what it could become next. That scratched surface might be tomorrow’s writing desk. Those dated drawers might hold art supplies. That awkward brown finish might be hiding a gorgeous painted makeover. Upcycling is not just furniture rescue; it is creative problem-solving with a paintbrush in one hand and optimism in the other.
Note: This article is written in original American English and synthesizes practical DIY guidance from reputable home improvement, sustainability, furniture refinishing, and upcycling resources.