Table of Contents >> Show >> Hide
- What Is a Putty Knife?
- Flexible vs. Stiff Putty Knives
- Choosing the Right Size Putty Knife
- Metal vs. Plastic Putty Knives
- How to Hold a Putty Knife
- How to Use a Putty Knife for Spackle
- How to Use a Putty Knife for Drywall Repair
- How to Use a Putty Knife for Scraping Paint
- Important Safety Note About Old Paint
- Using a Putty Knife for Caulk Removal
- Using a Putty Knife With Wood Filler
- Cleaning and Maintaining a Putty Knife
- Common Putty Knife Mistakes
- Best Putty Knife Setup for Beginners
- Field Experience: What Using a Putty Knife Teaches You Over Time
- Conclusion
A putty knife may not look like much. It does not roar like a circular saw, flash like a laser level, or make your garage feel like a superhero lair. It is simply a handle with a flat blade. And yet, this humble tool can save walls, rescue paint jobs, remove stubborn gunk, smooth filler, scrape old caulk, and make small home repairs look like they were handled by someone who owns more than one pair of work gloves.
Using a putty knife correctly is one of those basic DIY skills that pays off immediately. Whether you are patching nail holes before moving out of an apartment, preparing a wall for paint, applying wood filler to trim, removing peeling paint, or scraping residue from a surface, the right technique makes the difference between “freshly repaired” and “the wall has a rash.”
This guide explains how to choose the right putty knife, how to hold it, how to use it for common home projects, how to avoid rookie mistakes, and how to keep the blade clean enough that it does not become a mysterious fossil in your toolbox.
What Is a Putty Knife?
A putty knife is a flat-bladed hand tool used for applying, spreading, smoothing, scraping, and lifting materials. It is commonly used with spackle, joint compound, glazing putty, wood filler, adhesives, caulk, and paint-prep materials. In everyday DIY language, people often use “putty knife,” “spackle knife,” and “scraper” interchangeably, although each tool has slightly different strengths.
The classic putty knife has a short blade, usually between 1 inch and 6 inches wide. Narrow blades are useful for precision work, such as filling nail holes or scraping tight corners. Wider blades are better for smoothing larger patches, feathering joint compound, and blending repairs into the surrounding wall.
Flexible vs. Stiff Putty Knives
The first rule of using a putty knife is simple: do not ask one blade to do every job. A flexible putty knife and a stiff putty knife may look similar, but they behave very differently.
Flexible Putty Knife
A flexible putty knife bends slightly under pressure. This makes it ideal for spreading spackle, joint compound, lightweight patching compound, and wood filler. The blade flexes against the wall, helping you apply thin, even coats without digging into the surface.
Use a flexible putty knife for:
- Filling nail holes and small dents
- Applying spackle or joint compound
- Smoothing drywall patches
- Feathering edges around a repair
- Working filler into small cracks
- Applying glazing putty around old window panes
Stiff Putty Knife
A stiff putty knife has a more rigid blade. It is better for scraping, lifting, prying lightly, and removing material. It does not flex much, so it can slide under paint flakes, old stickers, dried caulk, adhesive residue, or hardened putty.
Use a stiff putty knife for:
- Scraping loose paint
- Removing old caulk
- Lifting stickers or tape residue
- Cleaning dried compound from surfaces
- Removing glazing putty from window frames
- Preparing trim or walls before painting
Trying to spread joint compound with a very stiff blade is like frosting a cake with a credit card. Technically possible, emotionally unnecessary.
Choosing the Right Size Putty Knife
Putty knives come in several widths, and size matters. A tiny blade gives control; a wider blade gives coverage. For most homeowners, three sizes will handle nearly every common project.
1-Inch to 2-Inch Blade
A narrow putty knife is perfect for detail work. Use it for nail holes, hairline cracks, small dents, tight corners, and small trim repairs. If you are patching a few holes left by picture hangers, this is the blade you will reach for first.
3-Inch to 4-Inch Blade
This is the everyday workhorse. It is wide enough to smooth small wall repairs but still easy to control. A 3-inch flexible putty knife works well for spackle, patching compound, and small drywall fixes.
5-Inch to 6-Inch Blade
A wider blade helps feather the edges of a repair so the patch disappears after sanding and painting. Use a 6-inch knife for larger dents, drywall tape, mesh patches, and smoothing compound over a broader area. For bigger drywall repairs, you may eventually graduate to a taping knife, but a 6-inch putty knife is a strong starting point.
Metal vs. Plastic Putty Knives
Putty knife blades are usually made from stainless steel, carbon steel, or plastic. Each material has a place.
Stainless Steel
Stainless steel resists rust and cleans up easily. It is a great choice for frequent use, especially if you work with water-based compounds or tend to clean tools in a hurry. A stainless steel flexible putty knife is a dependable all-around tool.
Carbon Steel
Carbon steel can be strong, sharp, and responsive, but it needs care. If left wet, it can rust. Wipe it dry after use and store it properly. Many pros like carbon steel because it has a satisfying feel and a useful edge for scraping.
Plastic
Plastic putty knives are inexpensive and less likely to scratch delicate surfaces. They are useful for quick jobs, disposable adhesive work, or spreading filler on surfaces where metal might leave marks. The downside is that plastic blades can flex too much, wear quickly, or fail against stubborn material.
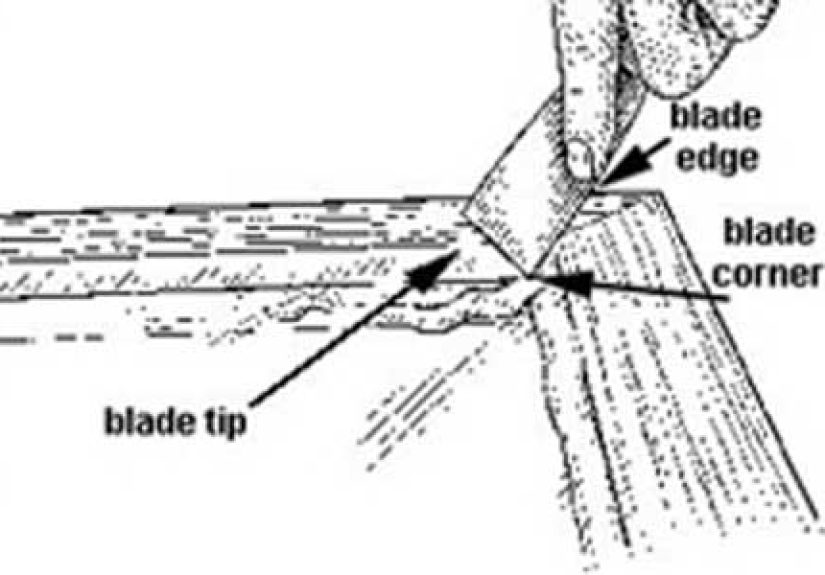
How to Hold a Putty Knife
Good results begin with a good grip. Hold the handle firmly but not like you are trying to win an arm-wrestling championship. Place your index finger along the spine or near the base of the blade for control. This helps guide pressure and angle.
For spreading compound, hold the blade at about a 30- to 45-degree angle to the surface. A lower angle lays material down smoothly. A steeper angle scrapes more material off. Once you understand that angle controls thickness, the tool becomes much easier to use.
For scraping, use a slightly steeper angle and push carefully. Keep your other hand out of the blade path. The tool may be small, but a sudden slip can still turn a simple project into a dramatic kitchen-sink first-aid moment.
How to Use a Putty Knife for Spackle
Spackling small holes is one of the most common putty knife jobs. The goal is not to pile on a mountain of filler. The goal is to fill the hole, smooth the surface, and leave as little extra material as possible.
Step 1: Clean the Area
Remove dust, loose paint, drywall crumbs, or raised paper around the hole. A clean surface helps the patching compound bond properly. If the edges are rough, lightly scrape or sand them before applying spackle.
Step 2: Load the Knife
Scoop a small amount of spackle onto the edge of the putty knife. For a nail hole, you need less than you think. The first-time DIY instinct is to load the knife like a peanut butter sandwich. Resist.
Step 3: Press the Spackle Into the Hole
Drag the blade across the hole while pressing the compound into it. Move in one direction, then cross over from another direction to make sure the hole is filled completely.
Step 4: Smooth the Surface
Hold the blade at a 45-degree angle and scrape away excess compound. The patch should sit slightly proud or flush, depending on the product and whether it shrinks as it dries. For deeper holes, apply thin layers instead of one thick blob.
Step 5: Let It Dry, Sand, and Paint
Follow the drying time on the product label. Once dry, sand lightly with fine-grit sandpaper or a sanding sponge. Wipe away dust, prime if needed, and paint.
How to Use a Putty Knife for Drywall Repair
For small drywall dents and holes, a putty knife is often all you need. For medium holes, use a self-adhesive mesh patch or drywall patch kit. For large holes, you may need a drywall saw, backing support, drywall screws, joint tape, and a wider taping knife.
When applying joint compound over a patch, use thin coats. Spread the compound beyond the damaged area and feather the edges outward. Feathering means gradually thinning the compound as it moves away from the repair. This helps the patch blend into the wall instead of creating a visible island.
A common beginner mistake is sanding too aggressively after applying too much compound. The better approach is to apply cleaner, thinner coats from the start. Your future self, covered in less drywall dust, will thank you.
How to Use a Putty Knife for Scraping Paint
A stiff putty knife can remove peeling paint, loose flakes, and surface debris before repainting. Hold the blade at a shallow angle and push under the loose edge. Work gently. The goal is to remove failing paint, not carve your initials into the wall.
For delicate surfaces, use a plastic putty knife or wrap the blade edge with painter’s tape to reduce scratching. For stubborn paint, a dedicated paint scraper may be better than a putty knife. A putty knife can handle light scraping, but it is not a bulldozer.
Important Safety Note About Old Paint
If your home was built before 1978, be cautious before scraping or sanding painted surfaces. Older homes may contain lead-based paint. Disturbing lead paint can create hazardous dust, especially during scraping, sanding, drilling, or demolition. In that situation, consider testing the paint and hiring a lead-safe certified professional. At minimum, avoid dry sanding or aggressive scraping until you understand the risk.
For any scraping or patching project, wear safety glasses when chips or dust may fly. Gloves can help protect your hands, especially when using stiff blades. Keep floors dry and uncluttered so you are not performing accidental slapstick comedy with a sharp tool in hand.
Using a Putty Knife for Caulk Removal
A stiff putty knife can help remove old caulk around trim, sinks, tubs, backsplashes, and windows. First, score the caulk line with a utility knife. Then slide the putty knife under the loosened edge and lift it away.
Do not gouge the surface. Work in short passes and keep the blade controlled. If the caulk is stubborn, use a caulk remover product according to the label directions. Once the old caulk is removed, clean the area thoroughly before applying new caulk. Fresh caulk over dirty residue is like putting a clean shirt over a muddy dog. It may look hopeful, but the problem remains.
Using a Putty Knife With Wood Filler
Putty knives are excellent for filling nail holes, dents, and small cracks in wood trim, doors, furniture, and molding. Use a flexible blade for pressing wood filler into the imperfection. Scrape off excess before it dries, leaving the repair slightly raised if the filler shrinks.
After drying, sand smooth with the grain. If the wood will be stained rather than painted, test the filler first. Some fillers absorb stain differently than surrounding wood, which can make the patch stand out like a bad toupee.
Cleaning and Maintaining a Putty Knife
Clean your putty knife immediately after use. Water-based spackle and joint compound usually wash off with warm water before they dry. Use a rag, sponge, or another scraper to remove residue from the blade and handle.
For dried material, soak the blade briefly if the product allows it, then scrape gently. Avoid leaving metal knives wet. Dry them thoroughly to prevent rust, especially carbon steel blades. If a blade develops small rust spots, clean them with fine steel wool or sandpaper and apply a light coat of oil before storage.
Store putty knives flat or hanging, not tossed into a drawer where the blade edge can bend or nick. A damaged edge can leave lines in your compound, which means more sanding, and nobody has ever said, “Fantastic, more sanding.”
Common Putty Knife Mistakes
Using Too Much Compound
More filler does not mean a stronger repair. It usually means more drying time, more shrinkage, and more sanding. Use thin coats and build up as needed.
Choosing the Wrong Blade
Use flexible blades for spreading and stiff blades for scraping. This single decision solves many beginner problems.
Skipping Surface Prep
Dust, grease, loose paint, and crumbling drywall prevent good adhesion. Clean first, patch second.
Pressing Too Hard
Heavy pressure can dig into drywall, leave ridges, or pull compound out of the hole. Smooth, moderate pressure works better.
Painting Before the Patch Is Dry
If the compound is not fully dry, paint can reveal texture problems, bubbling, or dull spots. Let the repair dry completely, then sand and prime if needed.
Best Putty Knife Setup for Beginners
If you are building a simple DIY kit, start with three tools: a 2-inch flexible putty knife, a 3-inch or 4-inch flexible putty knife, and a 2-inch stiff scraper-style putty knife. Add a 6-inch taping knife or wide putty knife if you plan to repair drywall patches larger than a nail hole.
Also keep lightweight spackle, joint compound, sanding sponges, painter’s tape, a utility knife, rags, safety glasses, and a small container of wood filler nearby. With those basics, you can handle most small wall and trim repairs without turning one tiny dent into a weekend documentary.
Field Experience: What Using a Putty Knife Teaches You Over Time
The funny thing about using a putty knife is that it teaches patience faster than almost any other small tool. The first time many people patch a wall, they treat spackle like cake frosting. They scoop too much, smear too wide, leave ridges, and assume sanding will fix everything. Sanding does fix many sins, but it also creates dust, sore shoulders, and a strong desire to make better choices next time.
After a few repairs, you learn that the best putty knife work is quiet and controlled. You clean the hole first. You use just enough compound. You hold the blade at a steady angle. You make one smooth pass, then another lighter pass. Instead of fighting the wall, you let the blade glide over it. The repair starts to look less like a panic response and more like craftsmanship.
One practical lesson is that wider blades are often more forgiving. Beginners tend to reach for a tiny knife because the hole is tiny. That works for filling the hole, but smoothing the surrounding area often requires a wider blade. A 6-inch knife can feather the patch so the eye does not catch the edge after painting. This is especially important in rooms with natural light, where every bump on the wall suddenly appears to have its own spotlight.
Another lesson is to clean the blade constantly while working. Dried crumbs of compound on the knife edge create drag marks in fresh material. Keeping a damp rag nearby makes the job cleaner and smoother. Wipe the blade after every few passes. It feels fussy at first, but the finish improves immediately.
Experience also teaches respect for the surface. Drywall paper tears easily. Painted trim scratches. Old caulk fights back. A putty knife is useful, but it is not magic. When scraping, short controlled strokes are better than one heroic shove. When spreading, thin layers beat thick lumps. When removing old material, patience beats force.
Perhaps the biggest lesson is that “good enough before paint” is rarely good enough after paint. Paint does not hide texture as much as people hope. In many cases, it highlights it. Run your hand over the patch after sanding. Look at it from the side with a light. If you can feel or see a ridge, add another thin coat, feather it wider, and sand again. It is much easier to fix before the roller comes out.
With time, a putty knife becomes one of those tools you reach for constantly. It opens paint cans in emergencies, scrapes mystery residue, cleans edges, spreads filler, lifts gunk, and patches the tiny wall wounds of everyday life. It may never be glamorous, but in the world of home repair, the putty knife is the dependable friend who shows up with coffee, solves the problem, and does not ask for applause.
Conclusion
Using a putty knife well is a small skill with big rewards. The right blade can make wall repair, paint prep, caulk removal, wood filling, and surface cleaning faster, cleaner, and more professional. Choose a flexible knife for spreading, a stiff knife for scraping, and the right width for the size of the job. Keep the blade clean, use thin coats, feather your edges, and give repairs enough time to dry before sanding or painting.
A putty knife may be simple, but simple tools often do the most work. Learn how to use one properly, and you will start seeing small repairs as manageable weekend wins instead of reasons to rearrange furniture in front of wall damage.