Table of Contents >> Show >> Hide
- What Is an Antique Wash Stand?
- Why Make Over an Antique Wash Stand?
- Before You Begin: Decide Whether to Restore or Paint
- Tools and Supplies for an Antique Wash Stand Makeover
- Step 1: Inspect the Wash Stand Like a Detective
- Step 2: Clean Before You Sand
- Step 3: Make Repairs That Matter
- Step 4: Sand With Restraint
- Step 5: Prime for a Durable Painted Finish
- Step 6: Choose the Right Paint or Stain
- Step 7: Seal the Finish for Real Life
- Turning an Antique Wash Stand Into a Bathroom Vanity
- Hardware: Keep, Clean, or Replace?
- Styling Ideas for a Finished Antique Wash Stand
- Common Mistakes to Avoid
- Color Combinations That Work Beautifully
- Budget-Friendly Makeover Plan
- Experience Notes: What an Antique Wash Stand Makeover Teaches You
- Conclusion
An antique wash stand makeover is one of those DIY projects that starts with innocent optimism and ends with you whispering encouraging words to a drawer that refuses to slide. But that is also the charm. A wash stand is not just “old furniture.” It is a hardworking little survivor from the era before modern bathrooms, when people used pitchers, basins, soap dishes, and a brave sense of morning discipline to get ready for the day.
Today, these compact pieces are perfect for farmhouse bedrooms, vintage bathrooms, entryways, powder rooms, guest suites, and even coffee-bar corners. With the right cleaning, repairs, finish, and styling, an antique wash stand can become a one-of-a-kind statement piece that looks expensive without requiring you to sell your dining table to pay for it.
This guide walks through how to assess, restore, paint, stain, seal, and style an antique wash stand while respecting its history. The goal is not to erase every wrinkle. The goal is to help the piece age gracefullylike a movie star with excellent lighting.
What Is an Antique Wash Stand?
A wash stand, sometimes called a washstand or basin stand, was originally designed to hold a pitcher and basin for personal washing before indoor plumbing became common. Many pieces included a marble or wood top, a backsplash, a small drawer, lower shelving, towel bars, or cabinet storage for grooming essentials. In the 19th and early 20th centuries, wash stands were common bedroom furniture, especially in homes where a full bathroom was a luxury rather than a standard feature.
Because they were made for daily use, many antique wash stands are sturdy, compact, and beautifully detailed. Oak, walnut, mahogany, pine, and maple are common materials. Some have turned legs, carved backsplashes, marble tops, porcelain casters, wooden knobs, or original keyholes. That combination of function and character is exactly why modern homeowners love turning them into accent cabinets, nightstands, bathroom vanities, plant stations, and charming storage pieces.
Why Make Over an Antique Wash Stand?
A good antique wash stand makeover does three things: it preserves charm, improves function, and makes the piece fit your home. New mass-produced furniture may be convenient, but it rarely comes with dovetail drawers, aged wood grain, or a mysterious stain that makes you wonder whether Great-Aunt Mildred once kept cough syrup in there.
Repurposing an antique wash stand is also budget-friendly and sustainable. Instead of buying a brand-new cabinet, you give existing furniture another life. It is a smart choice for small spaces because most wash stands are narrow and practical. A restored wash stand can work as a bedside table, a hallway drop zone, a linen cabinet, a powder-room vanity, or a decorative bar for tea, coffee, or glassware.
Before You Begin: Decide Whether to Restore or Paint
Before grabbing a brush, pause. Not every antique should be painted. If your wash stand is rare, museum-quality, highly valuable, or in excellent original condition, a full paint makeover may reduce its collector value. Look for maker’s marks, unusual carvings, high-quality veneer, original marble, or hand-cut joinery. When in doubt, ask an antiques dealer or furniture restorer for an opinion.
For most thrifted, inherited, or flea-market wash stands, however, a thoughtful makeover is fair game. Pieces with damaged finish, missing hardware, water rings, peeling varnish, chipped veneer, or outdated stain can often be improved dramatically. The trick is choosing the right level of intervention. Sometimes the best makeover is a deep clean, wax, and new hardware. Other times, the poor thing is begging for primer and a fresh coat of paint.
Good Candidates for Painting
Paint is a great choice for wash stands with severe finish damage, mismatched repairs, dark stain that does not suit your room, or wood that is not especially decorative. Painted furniture can look classic, cottage-style, coastal, farmhouse, modern vintage, or softly distressed depending on the color and finish.
Good Candidates for Staining or Oil Finish
If the wood grain is beautiful, keep it visible. A wash stand with quarter-sawn oak, walnut, tiger maple, or a rich mahogany tone may only need cleaning, light sanding, stain touch-ups, and a protective topcoat. Natural wood adds warmth and keeps the antique character front and center.
Tools and Supplies for an Antique Wash Stand Makeover
You do not need a professional workshop to complete this project, but you do need patience and the right supplies. Gather mild soap, microfiber cloths, mineral spirits, gloves, eye protection, a dust mask or respirator, screwdrivers, wood glue, clamps, wood filler, sandpaper in several grits, tack cloth, primer, furniture paint or stain, brushes, foam rollers, wax or polyurethane, and replacement hardware if needed.
If the piece has old paint, especially if it may date before 1978, treat it cautiously. Lead-based paint was used in many older American homes and furnishings. Avoid dry sanding unknown old paint. Test first, use proper protective equipment, work with ventilation, and follow lead-safe practices. This is the part of the project where “winging it” is not charming; it is just dusty and dangerous.
Step 1: Inspect the Wash Stand Like a Detective
Start with a full inspection. Check the legs, drawer runners, back panel, top, backsplash, shelves, and joints. Wiggle the piece gently. If it sways like it has just heard bad news, you may need to reglue joints or tighten fasteners. Look for missing veneer, cracked marble, swollen wood, insect damage, musty odors, or drawer problems.
Take photos before removing hardware. Label screws and knobs in a small bag. Antique hardware can be irregular, and the left screw from one hinge may not fit the right hinge because old furniture enjoys keeping secrets.
Step 2: Clean Before You Sand
Cleaning is the most underrated step in any furniture makeover. Old furniture collects wax, oil, dust, smoke residue, furniture polish, and mystery grime. If you sand first, you can drive that residue into the wood and create finish problems later.
Use a barely damp cloth with mild soap and water for the first pass. Do not soak the wood. Antique furniture and excessive water are not friends. Dry the surface immediately. For stubborn grime, mineral spirits on a clean cloth can help remove old wax and oily buildup. Work with the grain, use gloves, and keep the area ventilated.
Step 3: Make Repairs That Matter
Once the wash stand is clean and dry, fix structural issues. Reglue loose joints with wood glue and clamps. Fill small nail holes or dents with wood filler if you plan to paint. For stained finishes, use stainable filler or colored wax sticks that blend with the wood tone.
If the drawer sticks, inspect the runners. A little sanding on swollen edges or a rub of paste wax on the runners can make a stubborn drawer behave like it attended finishing school. If the back panel is loose, secure it carefully without overdriving screws into fragile wood.
Step 4: Sand With Restraint
Sanding is not a punishment. The goal is to smooth the surface and help the new finish adhere, not to erase 100 years of history in one afternoon. For painting, scuff-sand with medium-to-fine grit sandpaper, often around 180 to 220 grit, depending on the condition of the finish. For refinishing with stain, you may need a more complete sanding process, starting coarser and moving finer.
Always sand with the grain. Use sanding sponges for curves, carvings, and turned legs. Vacuum the dust and wipe with a tack cloth before priming or staining. Any dust left behind will show up in the finish like glitter at a formal dinneruninvited and impossible to ignore.
Step 5: Prime for a Durable Painted Finish
If you are painting, primer is your best friend. Primer helps paint grip the surface, blocks stains, and creates a more even finish. It is especially important when painting dark wood a light color, covering glossy varnish, or dealing with tannin-rich woods that may bleed through paint.
Choose a bonding primer for slick finishes and a stain-blocking primer for pieces with water stains or reddish wood tones. Apply a thin, even coat. Let it dry fully, then sand lightly with fine-grit sandpaper. Wipe away dust before painting. Thin coats are better than one thick coat that looks like frosting applied during an earthquake.
Step 6: Choose the Right Paint or Stain
For an antique wash stand makeover, furniture paint matters. Wall paint is not ideal because furniture gets touched, bumped, wiped, and used. Acrylic enamel, mineral paint, chalk-style paint with a protective topcoat, milk paint, or cabinet-grade paint can all work depending on the look you want.
Soft white, sage green, charcoal, navy, warm greige, dusty blue, and creamy beige are popular choices for vintage furniture. For a farmhouse look, try muted white with a stained top. For a moody powder room, deep green or black with brass hardware can look elegant. For a cottage bedroom, pale blue or warm ivory keeps the piece light and friendly.
If staining, test the color on an inconspicuous area first. Antique wood absorbs stain unevenly, especially if the previous finish was stripped or worn. A pre-stain conditioner can help on blotchy woods like pine. Finish with polyurethane, furniture oil, shellac, lacquer, or wax depending on the desired durability and sheen.
Step 7: Seal the Finish for Real Life
A wash stand may look delicate, but if you plan to use it daily, the finish needs protection. Painted pieces should be sealed with furniture wax, water-based polyurethane, polycrylic, or another compatible topcoat. For bathroom use, choose a water-resistant sealer and pay special attention to the top surface.
Use multiple thin coats and let each one dry according to the product directions. Sand very lightly between coats if recommended. For a bathroom vanity conversion, seal the inside of any sink cutout, plumbing holes, and the underside of the top. Water always finds the one unsealed spot, because apparently water has a law degree in loopholes.
Turning an Antique Wash Stand Into a Bathroom Vanity
One of the most popular wash stand makeover ideas is converting the piece into a bathroom vanity. This can be stunning, especially in a powder room where storage needs are modest and style matters. A vessel sink often works well because it sits on top and requires a smaller drain hole than an undermount sink. Wall-mounted faucets can also reduce the amount of cutting needed on the furniture top.
Before converting a wash stand, measure everything: height, width, depth, sink size, plumbing location, drawer clearance, and faucet reach. Standard bathroom vanity height is often taller than antique furniture, so you may need to add legs, bun feet, casters, or a custom base. Protect the wood or marble top thoroughly, and hire a plumber if you are not comfortable making water connections.
Smart Vanity Conversion Tips
Use a template for sink and drain holes. Preserve drawer fronts by converting the top drawer into a false front if plumbing blocks its use. Add a waterproof liner inside the cabinet. Seal every cut edge. If the wash stand has a marble top, have a professional drill it to reduce the risk of cracking. Antique marble is gorgeous, but it does not appreciate amateur enthusiasm with a hole saw.
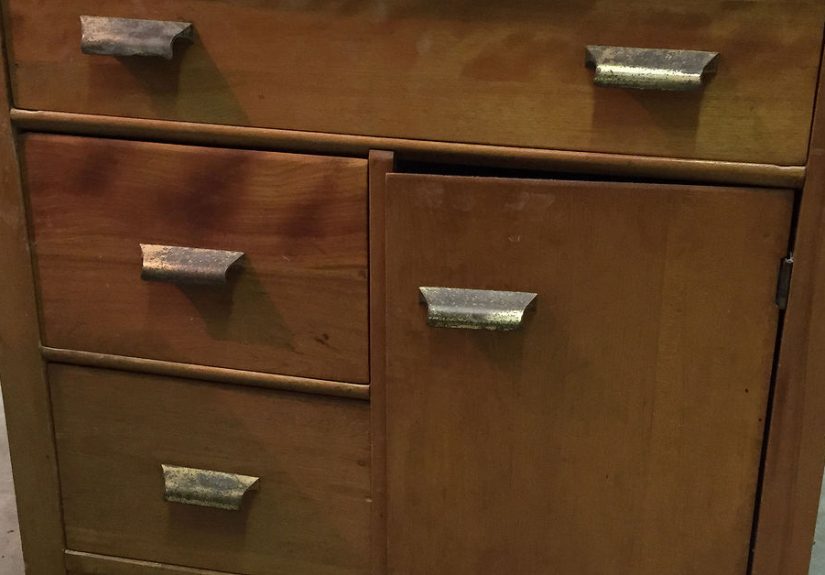
Hardware: Keep, Clean, or Replace?
Original hardware adds authenticity, so clean it before replacing it. Brass knobs and pulls can often be revived with gentle cleaning. If the hardware is missing or broken, choose replacements that match the scale and era of the piece. Cup pulls, glass knobs, small brass bail pulls, ceramic knobs, or simple black iron hardware can all work beautifully.
Do not choose oversized modern hardware unless you want a bold contrast. On a small wash stand, huge handles can look like the furniture is wearing novelty sunglasses. Keep proportions in mind.
Styling Ideas for a Finished Antique Wash Stand
Once the makeover is complete, styling brings the piece to life. In a bedroom, use it as a nightstand with a vintage lamp, a stack of books, and a small dish for jewelry. In an entryway, add a mirror above it, a tray for keys, and baskets below for shoes or scarves. In a bathroom, pair it with an antique mirror, brass faucet, linen hand towels, and a small vase of greenery.
For a cottage look, add a pitcher and basin as decorative accents. For a modern farmhouse style, combine a natural wood top with matte black hardware. For a romantic vintage mood, use soft paint, floral wallpaper nearby, and warm lighting. The best styling feels collected, not staged.
Common Mistakes to Avoid
The biggest mistake is rushing prep work. Paint rarely fails because the color was wrong; it fails because the surface was dirty, glossy, dusty, or poorly primed. Another mistake is over-distressing. A little wear on edges can look charming. Sanding random patches all over the front can make the piece look like it lost a fight with a raccoon.
Also avoid ignoring odors. Musty drawers may need sunlight, baking soda, activated charcoal, or shellac to seal persistent smells. Do not install an antique wash stand in a damp bathroom without proper sealing and ventilation. Old wood can handle a lot, but constant moisture is asking too much.
Color Combinations That Work Beautifully
Classic Cottage
Paint the base warm white and stain the top medium brown. Add aged brass knobs and a small floral arrangement. This look works in bedrooms, bathrooms, and hallways.
Moody Vintage
Choose deep green, black, or navy paint with satin sheen. Pair it with brass hardware, a marble top, and a round mirror. This is perfect for a dramatic powder room.
Natural Farmhouse
Keep the wood finish, repair imperfections, and seal with a soft matte topcoat. Add woven baskets and linen towels. This style celebrates age instead of hiding it.
Soft Modern
Use greige, mushroom, taupe, or muted blue. Keep hardware simple and clean. This approach lets the antique shape shine without making the room feel too old-fashioned.
Budget-Friendly Makeover Plan
A simple antique wash stand makeover can be surprisingly affordable. If the piece is structurally sound, your main costs may be cleaner, sandpaper, primer, paint, sealer, and hardware. Reusing the original knobs keeps costs down. A no-strip refresh with cleaning, touch-up stain, and wax can be even cheaper.
The most expensive version is a bathroom vanity conversion because it may involve a sink, faucet, plumbing, countertop work, and professional labor. Still, compared with buying a custom vanity, repurposing an antique wash stand can deliver more character for the money.
Experience Notes: What an Antique Wash Stand Makeover Teaches You
After working through an antique wash stand makeover, the first lesson is that old furniture has opinions. You may plan for a quick weekend refresh, but the piece may reveal loose joints, hidden water stains, missing screws, or a drawer that has been silently plotting rebellion since 1912. That does not mean the project is failing. It means the furniture is telling you what it needs.
One helpful experience is to begin slowly. Set the wash stand somewhere bright, remove the drawers, and study it for a day before deciding on paint or stain. The first idea is not always the best idea. A piece that looks dull in a garage may show beautiful grain after cleaning. A top that seems ruined may only need light sanding and a protective finish. On the other hand, a shiny dark finish may hide veneer damage that makes painting the smarter and kinder choice.
Another practical lesson is that cleaning can change everything. Many beginners jump straight to sanding, but a wash stand that has lived through decades of wax, dust, and furniture polish needs a proper bathjust not a soaking one. Once the grime is gone, details appear. Carvings look sharper. Hardware looks warmer. Even the color of the wood may shift from “haunted basement brown” to “actually quite handsome.”
Repairs are also more satisfying than expected. Tightening a wobbly leg or fixing a sticky drawer gives the piece dignity again. There is something deeply rewarding about making old furniture useful without stripping away its personality. Small imperfections should not scare you. A nick on the edge, a faint ring on the top, or a slightly uneven drawer gap can make the finished piece feel authentic. Perfectly imperfect is often the whole point.
Paint teaches patience. Thin coats look better, dry harder, and last longer. If you rush the second coat, the surface can drag, wrinkle, or stay tacky. If you skip primer, old stains may bleed through like tiny ghosts of furniture past. If you forget to seal the top, the first wet glass may leave a mark that feels personally offensive. Good results come from respecting dry time, even when you are excited to put the knobs back on and admire your masterpiece.
Hardware can completely change the mood. Original brass keeps the antique feeling. Glass knobs add cottage charm. Matte black pulls create contrast. But the best choice is usually the one that looks like it belongs to the scale of the piece. A small wash stand needs hardware with manners.
The final experience is emotional. An antique wash stand makeover is not just about furniture. It is about rescue. You take something overlooked, dusty, and maybe a little cranky, and you make it useful again. Then one day it holds towels, flowers, books, or a sink, and someone says, “Where did you buy that?” That is when you get to smile and say, “I made it over.” Try not to say it too smugly. Or do. You earned it.
Conclusion
An antique wash stand makeover is the perfect blend of restoration, creativity, and practical design. Whether you clean and preserve the original wood, paint it in a fresh color, or convert it into a bathroom vanity, the key is to respect the piece while making it work for modern life. Start with careful inspection, clean thoroughly, repair what matters, sand gently, choose quality finishes, and seal for durability.
The best makeovers do not make antique furniture look brand new. They make it look loved, useful, and ready for its next chapter. With thoughtful planning and a little patience, an old wash stand can become one of the most charming pieces in your homeproof that good design does not expire, it just occasionally needs primer.
Note: This original article synthesizes practical guidance from reputable U.S. home improvement, furniture restoration, bathroom design, preservation, and safety resources.