Table of Contents >> Show >> Hide
- Is It Really a Binary Clock?
- Why Old-School LEDs Still Look So Good
- The Retro Logic Engine Behind the Glow
- The Fancy Graphic PCB Is More Than Decoration
- How to Design a Similar LED Logic Clock
- Why This Type of Clock Still Matters
- Experience Notes: What It Feels Like to Build and Live With a Logic LED Clock
- Conclusion
Note: This article uses “binary clock” as the popular project label while clarifying the difference between binary-coded displays and one-hot decade logic.
A digital clock does not need an app, Wi-Fi, a subscription, or a dramatic push notification to be interesting. Sometimes it just needs a pile of glowing LEDs, a handful of classic logic chips, and a printed circuit board with enough visual swagger to make your desk lamp feel underdressed.
That is the charm of a cool binary clock built around old-school components. It turns timekeeping into a small theater of electronics: lights advance, counters reset, and a custom graphic PCB becomes both the clock face and the stage. The result is part functional desk accessory, part electronics lesson, and part conversation starter for anyone brave enough to ask, “What time is it?”
What makes this particular style of LED clock especially appealing is that it celebrates technology that most modern gadgets hide. Instead of burying everything inside a tiny microcontroller, the design lets the logic do its work in plain sight. Each chip, LED, resistor, trace, and label has a job. It is a clock with its homework showing, and that is exactly why it is so fun.
Is It Really a Binary Clock?
The phrase binary clock gets used generously in the electronics world. Sometimes it describes a true binary display, where each lit LED represents a power of two. Other times, it describes a clock built with binary logic chips. And sometimes, as with decade-counter designs, it is a friendly nickname that stuck around because “one-hot decimal LED time display” sounds like something a robot would name its pet.
A conventional binary-coded decimal, or BCD, clock usually represents each time digit with a vertical group of LEDs. The lights stand for values such as 1, 2, 4, and 8. To read the display, you add the illuminated values in each column. For example, the digit 7 may appear as 4 + 2 + 1. It looks mysterious for the first thirty seconds, then suddenly feels like reading secret agent paperwork.
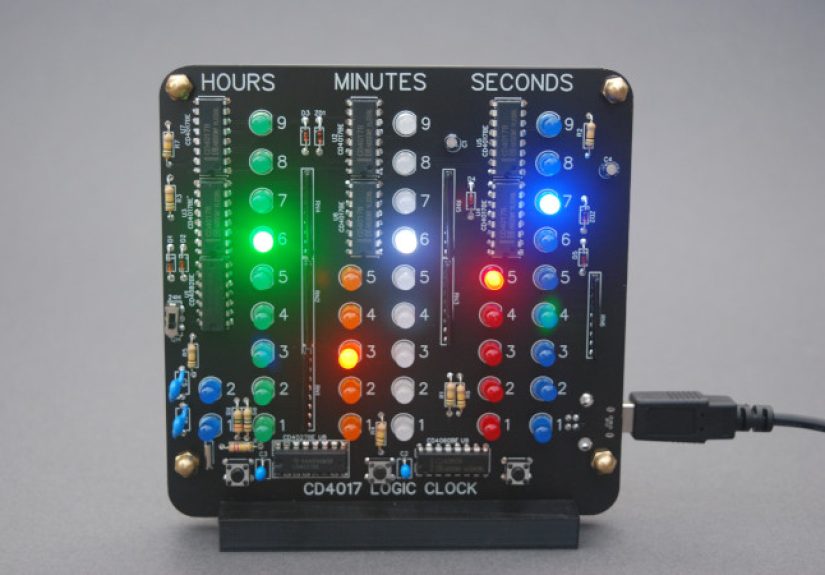
One-Hot Logic Makes the Clock Easier to Read
The 4017-based approach uses a different visual language. A CD4017 decade counter has ten decoded outputs, allowing one output at a time to become active as the count advances from zero through nine. Rather than asking the viewer to add LED values, the display can simply illuminate the LED associated with the current decimal digit.
Imagine the clock reading 14:27:53. In a BCD clock, you decode several columns of lights. In a decade-display clock, the hour-tens section identifies “1,” the hour-ones section identifies “4,” and the same pattern continues for minutes and seconds. The time is immediate. No arithmetic, no squinting, no pretending you totally knew that four glowing dots meant 11.
That readability matters. A clock can be experimental without becoming a daily quiz. The best unusual clocks strike a balance: they make people pause for a second, but they do not make them miss the bus.
Why Old-School LEDs Still Look So Good
Through-hole 5 mm LEDs may not be the newest kids in the component drawer, but they still have serious visual appeal. Their round lenses rise above the board, catch ambient light, and make a clock feel physical. Surface-mount LEDs can be wonderfully compact, but tiny glowing rectangles often disappear into a modern board. A through-hole LED announces itself like a miniature traffic light with a résumé.
For a decorative LED clock, that height is a feature rather than a flaw. The LEDs create depth, shadows, and a tactile grid that looks different from across the room than it does up close. When they turn on in sequence, the display has motion and personality. A single LED may be humble, but a carefully arranged field of them can look downright cinematic.
There is also a practical benefit for hobbyists. Larger through-hole parts are generally easier to identify, position, and solder than extremely small surface-mount components. That makes this style of custom clock approachable for someone who wants a challenging project without needing microscope-level hand control.
Brightness Is Not a Contest
The goal is a readable, inviting clock, not a desk-mounted sunrise simulator. Each LED needs suitable current limiting, typically with a resistor selected for the supply voltage, the LED’s forward voltage, and the desired operating current. Skipping that resistor is not a clever shortcut; it is an express train to dim LEDs, overheated parts, and a very disappointing light show.
It is also worth planning for the environment. A clock in a dim bedroom may need gentler light than one sitting in a sunny workshop. Diffused LEDs, tinted acrylic, lower current, or a simple dimming option can keep the display pleasant instead of aggressively enthusiastic at 2:00 a.m.
The Retro Logic Engine Behind the Glow
The most impressive part of a discrete logic clock is not the LEDs. It is the invisible rhythm that keeps them honest. A digital clock needs a dependable timing reference, and many classic designs start with a 32.768 kHz quartz crystal. That frequency is famous in watches and clocks because it divides neatly down to one pulse per second.
In a logic-only design, a binary counter and oscillator stage can divide the crystal frequency into slower signals. A 4060-family counter is well suited to this kind of work because it combines an oscillator section with multiple binary divider stages. Once the signal is reduced to a manageable pulse rate, a flip-flop stage can divide it again to produce the familiar one-second heartbeat.
From there, the clock becomes a relay race. Seconds count upward until they reach their limit, then trigger the minute stage. Minutes do the same for hours. Logic gates and reset connections make sure the display rolls over at the correct points, rather than wandering off into impossible times like 29:88:91. That might be a fun album title, but it is not a useful clock reading.
Why Avoid a Microcontroller?
A microcontroller could handle this whole job with a short program, fewer chips, and a generous amount of invisible wizardry. That is not a criticism. Microcontrollers are excellent tools. But using separate logic chips changes the project’s purpose.
With discrete CMOS logic, the clock becomes a visible lesson in oscillation, frequency division, counters, flip-flops, decoding, and reset behavior. You can trace the path from a crystal vibration to a blinking second LED. You can see how one stage influences the next. It is not merely a clock that happens to work; it is a clock that explains itself to anyone willing to follow the traces.
That transparency gives the project a special kind of satisfaction. It feels less like installing software and more like assembling a tiny mechanical orchestra, except every musician is a logic gate and nobody complains about rehearsal space.
The Fancy Graphic PCB Is More Than Decoration
A standard green PCB with white labels would still make a functional LED clock. But a graphic PCB transforms the project from a circuit into an object people want to display. Artwork can establish the theme, improve readability, identify the digit positions, and turn empty board space into part of the experience.
Silkscreen printing is one common way to add text, outlines, logos, and assembly labels. A more elaborate board can use copper, exposed metal finishes, solder mask colors, printed graphics, or multiple layers of visual detail. The PCB becomes a canvas with strict electrical rules, which is a surprisingly good description of most creative hobbies.
The most successful board art serves the clock first. Labels should help people understand what each LED group represents. Contrast should remain high enough for practical viewing. Decorative patterns should not make repair, soldering, or inspection harder. A gorgeous board that hides every component label is like a beautiful cookbook written entirely in disappearing ink.
Good PCB Art Still Needs Good Engineering
Custom graphics do not excuse bad layout. Traces need appropriate clearance. Footprints must match the actual parts. Mounting holes need room around them. Text should not overlap pads. The design should be checked against the fabrication house’s requirements, then verified with a design rules check before manufacturing files are generated.
This is where the project becomes a satisfying blend of art and discipline. You can create an expressive layout, but the clock still has to count correctly at midnight. The laws of electricity remain stubbornly unimpressed by your excellent font choice.
How to Design a Similar LED Logic Clock
Start With the Display Language
Before drawing a schematic, decide how the clock should be read. A BCD display is compact and educational, but it requires users to decode powers of two. A one-hot decimal display is easier for visitors to understand at a glance. A seven-segment display is familiar, while an LED matrix offers more flexibility but introduces more circuitry.
For a desk clock intended to be admired by non-engineers, readability often wins. For a teaching project, BCD may be the better choice. For a project designed to confuse your friends during game night, the possibilities are nearly unlimited.
Choose a Stable Time Base
Accuracy starts with the timing source. A quartz crystal can provide a stable frequency for a logic divider chain. A dedicated real-time clock module is another option, especially when backup power or calendar functions matter. Network time synchronization is useful for connected projects, but it changes the personality of the build. A purely discrete logic clock is charming precisely because it keeps time with local components and careful design.
Plan the LED Circuit Carefully
Every LED should have an intentional current path and suitable current limiting. Keep in mind that different LED colors can have different forward voltages, so mixing colors without checking the design can produce uneven brightness. Use the actual specifications of the chosen parts rather than assuming every LED behaves the same.
It also helps to consider how many LEDs may be active at once. A display with multiple lit segments can draw more current than expected, especially if the design uses bright LEDs. Power supply capacity, heat, and logic-output limits should all be considered before the first solder joint is made.
Design for Assembly and Repair
Use clear reference labels. Group related components together. Mark polarity for LEDs, diodes, electrolytic capacitors, and power connectors. Leave enough space to reach solder joints. Add test points for the timing signal, power rail, and reset line where practical.
These details may not appear in the glamour photo, but they determine whether the clock is enjoyable to build. A board that is easy to troubleshoot is a board you are more likely to finish, fix, and proudly show off.
Why This Type of Clock Still Matters
It would be easy to dismiss a discrete LED clock as nostalgia. That would miss the point. Projects like this preserve useful skills: reading schematics, understanding counters, calculating resistor values, planning layouts, testing signals, and learning from mistakes that blink back at you.
They also make technology feel less mysterious. Most people interact with electronics all day but rarely see how a digital system moves from a clock pulse to an output. A visible logic clock turns that process into something approachable. It reminds us that a modern computer, smartwatch, or smart speaker may be vastly more complex, but the fundamental ideas of timing, counting, switching, and display are still there.
And honestly, a glowing clock built from classic chips has more personality than another black rectangle silently asking for a firmware update.
Experience Notes: What It Feels Like to Build and Live With a Logic LED Clock
There is a particular moment in an electronics project when it stops being a collection of parts and becomes a thing. With a logic LED clock, that moment usually arrives when the first second rolls over correctly. One LED changes, another stage responds, and suddenly the board is keeping time. It may only be a tiny pulse moving through a few integrated circuits, but it feels oddly dramatic. You built a small machine that understands the difference between now and one second from now.
The early assembly stage tends to be calm and methodical. Resistors go in first. Then sockets, capacitors, switches, connectors, and LEDs. The board can look almost boring at this stage, like a tiny city before anyone turns on the lights. That changes quickly when the LEDs are installed. Even before power is applied, rows of colored lenses give the clock a personality. It starts to look less like a circuit board and more like a prop from a science-fiction movie that had a modest but tasteful budget.
Testing is where the project becomes educational. A clock that does not advance may have a timing issue. A clock that races may have a divider problem. A clock that gets stuck at an impossible value may have an incorrect reset connection. Those problems can be frustrating, but they are also wonderfully specific. Unlike a mysterious software crash, a visible logic clock often gives clues. You can watch the LEDs, probe a signal, inspect a solder joint, and narrow down where the expected sequence stops behaving.
The display style changes the daily experience, too. A classic BCD clock rewards familiarity. At first, you mentally decode the LEDs. After a few days, your brain begins to recognize patterns. A one-hot decade display feels more immediate because the digits are obvious, but it still has the unusual visual rhythm of separate LED groups activating as time changes. Either version makes checking the time feel more intentional than glancing at a phone screen.
A graphic PCB adds another layer to the experience. The artwork is not just visible when the clock is off; it remains part of the object all day. In daylight, the board looks like a designed piece of desktop art. At night, the LEDs take over and the graphics become a quiet backdrop. That shift gives the clock two personalities: technical illustration by day, miniature light sculpture by evening.
There is also a social side. People notice unusual clocks. Someone will ask whether it is connected to Wi-Fi. Someone else will assume it is an Arduino. Explaining that it runs on classic logic chips, counters, a crystal, and LEDs is often more satisfying than simply saying, “It is a smart clock.” It is not smart in the voice-assistant sense. It is smart in the “a careful arrangement of basic ideas can do something beautiful” sense.
Living with a clock like this also makes you appreciate small imperfections. Maybe the hand-soldered LEDs are not perfectly aligned. Maybe a label is slightly crooked. Maybe the enclosure took three attempts before it stopped looking like a sandwich container with ambitions. Those details become part of the story. A handmade electronic object does not need to look factory-perfect to feel complete. In many cases, the visible evidence of making is exactly what gives it character.
Ultimately, the experience is not just about telling time. It is about seeing time happen. The seconds do not disappear behind glass and software. They move through a chain of parts you can identify, understand, and repair. That makes a logic LED clock more than a gadget. It is a tiny, glowing reminder that useful technology can also be playful, visible, and deeply satisfying to build.
Conclusion
A cool binary clock with old-school LEDs and a fancy graphic PCB proves that practical electronics can still be expressive. Its visible logic turns a familiar everyday task into a lesson in counting and timing. Its through-hole LEDs provide depth and personality. Its graphic board makes the circuitry feel like a finished object rather than a hidden mechanism.
Whether you call it a binary clock, a decade logic clock, or a very stylish excuse to buy more LEDs, the appeal is the same: it makes time visible in a way that modern screens rarely do. Build one carefully, give the PCB some personality, and let every glowing second earn its place on your desk.