Table of Contents >> Show >> Hide
- Why Build a Rustic Modern Plant Stand?
- Best Design for a DIY Rustic Modern Plant Stand
- Materials and Tools
- Step-by-Step: How to Build a DIY Rustic Modern Plant Stand
- Rustic Modern Finish Ideas
- Protecting the Wood From Water
- Styling a Rustic Modern Plant Stand
- Common Mistakes to Avoid
- Budget-Friendly Variations
- Experience Notes: What Building a DIY Rustic Modern Plant Stand Teaches You
- Conclusion
- SEO Tags
A DIY rustic modern plant stand is one of those home projects that looks expensive, feels satisfying, and does not require you to mortgage your coffee budget. It combines warm wood, clean lines, practical height, and just enough handmade charm to make your favorite houseplant look like it has its own tiny stage.
The beauty of this project is balance. “Rustic” brings the texture: visible grain, slightly imperfect boards, a cozy handmade look, and a finish that does not scream “plastic showroom.” “Modern” brings the restraint: simple geometry, slim legs, smart proportions, and a design that works in an apartment, farmhouse kitchen, sunroom, office corner, or minimalist living room. Together, they create a plant stand that looks stylish without acting like it knows the password to an exclusive design club.
This guide walks you through the planning, materials, measurements, construction ideas, finishing options, styling tips, and real-life lessons behind building a wooden plant stand that is sturdy, attractive, and beginner-friendly. Whether you want a single stand for a fiddle-leaf fig, a raised perch for a snake plant, or a small cluster of stands for a leafy corner, the same principles apply: build square, keep it stable, protect the wood, and let the plants do the dramatic posing.
Why Build a Rustic Modern Plant Stand?
Store-bought plant stands are everywhere, but making your own gives you three major advantages: custom size, better material control, and personality. A DIY wooden plant stand can be built to fit the exact pot you already own. That matters because plant pots are like jeans: the label says one size, but somehow every brand fits differently.
You can also choose wood that matches your home. Pine is affordable and easy to work with. Poplar gives a smoother painted finish. Cedar is a smart choice for covered outdoor areas because it naturally handles moisture better than many common softwoods. Oak, maple, or walnut can make the project feel more like furniture than a weekend experiment. Reclaimed wood adds rustic character, but it should be clean, dry, and free of questionable old finishes before you bring it indoors.
Most importantly, a plant stand solves practical problems. It raises plants closer to natural light, makes watering easier, protects floors from direct pot contact, and creates height variation in a plant display. A flat row of pots can look like a waiting room for vegetation. Add stands at different levels, and suddenly the corner feels designed.
Best Design for a DIY Rustic Modern Plant Stand
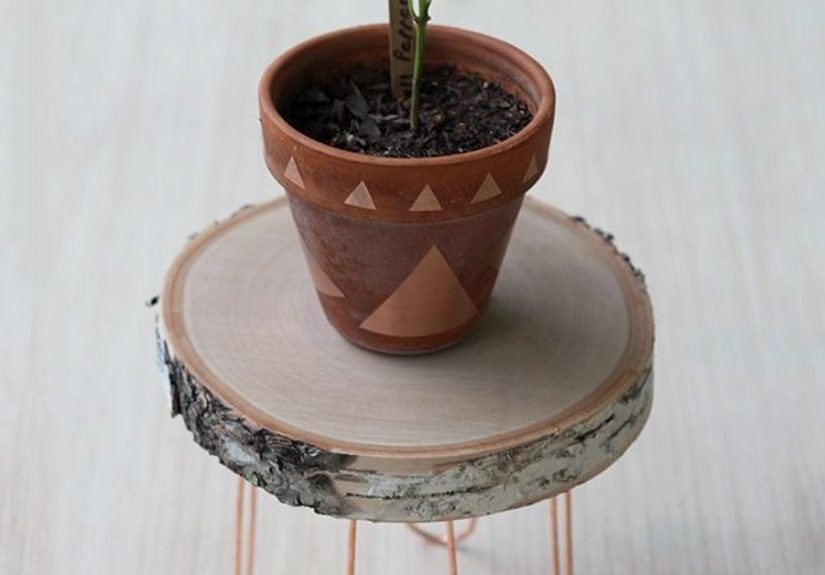
The simplest and most reliable design is a square or round-top stand with four legs and lower cross braces. Think of it as a tiny table with better vibes. The top supports the pot, while the braces prevent wobbling and add visual structure. For a rustic modern look, keep the silhouette clean and use the finish to add warmth.
Recommended Size
For a medium indoor planter, a great starter size is 12 inches wide, 12 inches deep, and 18 to 22 inches tall. This height works well beside a sofa, near a window, or in a bedroom corner. For larger floor plants, increase the top to 14 or 16 inches and use thicker legs. For small plants, a 9-inch top and 12-inch height can work beautifully on a covered porch or as part of a tiered grouping.
Weight and Stability
A plant stand must be stable before it is stylish. Wet soil is heavier than dry soil, ceramic pots add weight, and trailing plants can make the load visually unbalanced. Use a top that fully supports the pot base, not just the outer rim. If the pot is heavy, choose wider legs, add lower stretchers on all four sides, and avoid making the stand too tall and narrow.
A good rule: the taller the stand, the wider the footprint should be. A tall, skinny stand may look elegant in photos, but one curious pet, one backpack, or one heroic vacuum-cleaner move can turn it into botanical slapstick.
Materials and Tools
Materials
- One 1×12 board or glued-up wood panel for the top
- Four 1×2 or 2×2 boards for legs
- 1×2 boards for lower braces or stretchers
- Wood glue
- Wood screws or pocket-hole screws
- Sandpaper in 120, 180, and 220 grit
- Wood stain, paint, or clear finish
- Water-resistant polyurethane or polycrylic for protection
- Felt pads or rubber feet
- Optional: wood filler, pre-stain conditioner, decorative corner brackets
Tools
- Tape measure
- Pencil
- Speed square or combination square
- Saw, such as a miter saw, circular saw, or handsaw with miter box
- Drill and drill bits
- Clamps
- Sander or sanding block
- Paintbrush, foam brush, or lint-free cloth
- Safety glasses, dust mask, and hearing protection when appropriate
For younger DIYers, power tools should be used only with adult supervision. Even a small plant stand deserves careful measuring, safe cutting, and common sense. Fingers are more useful than any finished project.
Step-by-Step: How to Build a DIY Rustic Modern Plant Stand
Step 1: Measure the Planter
Start with the pot you want to display. Measure the diameter or width of the pot base, not just the widest part of the planter. Add at least one inch of support on each side. If the base is 10 inches wide, a 12-inch stand top is a safe and attractive fit.
Also think about drainage. Indoor planters should sit on a saucer or inside a cachepot so water does not collect directly on the wood. Even a sealed finish is not a magical force field. Water left under a pot can eventually cloud, stain, or damage the surface.
Step 2: Cut the Top
Cut the top from a 1×12 board or a project panel. A square top is the easiest option, but a round top softens the look. For a modern rustic plant stand, a square top with slightly rounded edges often gives the best mix of clean and cozy.
If you use reclaimed wood, inspect it carefully. Remove old nails or staples, scrub off dirt, and sand rough spots. The goal is “charming rustic,” not “mysterious garage splinter artifact.”
Step 3: Cut the Legs
Cut four legs to the same length. This is where accuracy matters. If one leg is shorter, your plant stand will wobble like a restaurant table that has seen things. Clamp the legs together and sand the ends evenly if needed.
For a modern look, use straight 2×2 legs. For a lighter look, use 1×2 legs turned so the wider face points outward. If you want a subtle mid-century influence, angle the legs slightly outward, but beginners may prefer straight legs because they are easier to assemble square.
Step 4: Add Lower Braces
Cut four braces to connect the legs near the bottom. Place them about 3 to 5 inches above the floor. These braces make the stand stronger and give it that furniture-like structure. They also create a nice shadow line, which is designer language for “it looks better and we can explain why.”
Attach the braces with wood glue and screws. Drill pilot holes first to reduce splitting. Keep everything square as you work. A clamp is your best friend here; it holds pieces still while you fasten them, unlike your knee, which is enthusiastic but unreliable.
Step 5: Attach the Top
Flip the top upside down and position the leg frame on it. Center the frame carefully, then attach it from underneath with screws. If you want a cleaner finish, use pocket holes or small corner brackets hidden below the top. Add wood glue where the frame meets the top for extra strength.
Before the glue dries, place the stand upright on a flat surface. Check for wobble. If one leg is slightly high, sand it down gently. If one is low, a felt pad can help. This is not cheating; this is furniture diplomacy.
Rustic Modern Finish Ideas
The finish determines whether your plant stand looks farmhouse, Scandinavian, industrial, or modern organic. A rustic modern finish usually highlights the wood grain while keeping the color calm and natural.
Option 1: Warm Walnut Stain
A medium walnut stain gives pine or poplar a richer furniture look. Sand the wood with the grain, working from 120 grit to 180 or 220 grit. Apply stain with a cloth or brush, wipe off excess, and let it dry according to the product instructions. Finish with a protective clear coat.
Option 2: Natural Clear Coat
If the wood already has beautiful grain, skip the stain. Sand smooth and apply a clear water-based finish for a lighter, modern look. This works especially well with maple, birch, light pine, or pale oak. The result feels airy and clean, perfect for minimalist rooms.
Option 3: Black Base, Wood Top
For contrast, paint the legs matte black and leave the top stained or natural. This creates a modern industrial edge while keeping the rustic warmth of wood. It also pairs well with terracotta pots, white ceramic planters, and leafy green plants.
Option 4: Whitewashed Rustic
A light whitewash softens wood grain without hiding it completely. This is a good choice for coastal, cottage, or bright farmhouse interiors. Keep the application thin and uneven in a controlled way. The goal is breezy texture, not “I fought a paint can and lost.”
Protecting the Wood From Water
A plant stand lives near water, soil, humidity, and the occasional enthusiastic watering session. That means protection matters. Apply at least two coats of clear protective finish, sanding lightly between coats once dry. Polyurethane is durable and water resistant, while water-based polycrylic is easy to clean up and keeps lighter woods from yellowing as much.
For indoor use, add a saucer beneath the pot. For outdoor use, choose weather-suitable wood and finish, and keep the stand in a covered area if possible. If rain can hit it directly, design the top with small gaps or drainage space so water does not sit under the planter.
Styling a Rustic Modern Plant Stand
A DIY plant stand is not just a platform. It is part of the room. Match the plant, pot, and stand so they feel intentional together.
Best Plants for a Wooden Plant Stand
- Snake plant: Upright, sculptural, and low-maintenance.
- Pothos: Great for trailing over the edge.
- ZZ plant: Glossy leaves and excellent tolerance for lower light.
- Fiddle-leaf fig: Dramatic, but best on a sturdy, wider stand.
- Rubber plant: Bold leaves with a modern look.
- Peace lily: Elegant shape, but use a saucer because it likes moisture.
- Succulents: Ideal for smaller tabletop-style stands.
Where to Place It
Place the stand near bright indirect light for most indoor plants. A window corner, bedroom nook, home office, or empty hallway spot can work well. Avoid placing delicate plants directly above heating vents or in cold drafts. Also avoid high-traffic spots where someone may bump the stand while carrying laundry, snacks, or emotional baggage from Monday.
Use plant stands in groups of two or three for a layered display. Try one tall stand, one medium stand, and one floor pot. This creates a natural composition and makes a plant corner look curated instead of crowded.
Common Mistakes to Avoid
Mistake 1: Building Too Narrow
A narrow stand may look sleek, but it can tip easily. Make sure the footprint is wide enough for the plant’s height and weight. Tall plants need more stability.
Mistake 2: Skipping Pilot Holes
Screwing into narrow wood without pilot holes can split the board. Drill first, then fasten. Your wood will thank you by not cracking dramatically.
Mistake 3: Forgetting the Saucer
Even a beautiful finish can suffer from trapped moisture. Use a saucer, cork mat, or waterproof liner under the planter.
Mistake 4: Rushing the Finish
Let stain and clear coats dry fully before adding the plant. A tacky finish can collect dust, fingerprints, and regret.
Mistake 5: Ignoring the Room Style
A rustic modern plant stand should complement nearby furniture. Match wood tones where possible, or use contrast intentionally. If your room has black metal accents, a black-legged plant stand can pull everything together beautifully.
Budget-Friendly Variations
If you want to save money, use leftover lumber from another project. Scrap 2x2s and a small panel can become a stylish stand with very little cost. You can also repurpose an old stool, side table, crate, or wood box. Sand it, seal it, and add feet or braces if needed.
For a more industrial rustic look, combine wood with cinder blocks, metal hairpin legs, or black pipe fittings. For a softer natural style, pair the stand with woven baskets, rattan planters, terracotta pots, or linen curtains nearby. Texture is what makes rustic modern design feel alive.
Experience Notes: What Building a DIY Rustic Modern Plant Stand Teaches You
The first thing you learn from building a DIY rustic modern plant stand is that “simple” does not always mean “thoughtless.” A plant stand has only a few parts, but every measurement matters. When the legs are even, the braces are square, and the top is centered, the whole piece feels calm and intentional. When one measurement is off, the stand tells on you immediately by wobbling like it has just heard bad news.
One of the most useful experiences is learning how wood behaves. Pine dents easily but sands quickly. Poplar paints smoothly but can look plain under light stain. Reclaimed wood has unmatched character, but it may require more prep than expected. You may start the project imagining a flawless magazine piece and end it appreciating one tiny knot in the corner because it gives the stand a little soul. That is the charm of rustic modern DIY: perfection is not the goal; clean structure plus natural character is.
Another lesson is that finishing takes patience. Many beginners want to rush from assembly to styling, because the plant is sitting nearby looking bored. But sanding, staining, sealing, drying, and sanding lightly between coats can turn a basic build into something that looks polished. A smooth finish also makes the stand easier to wipe clean when soil spills or water drips. And yes, soil will spill. Houseplants are lovely, but they are basically indoor nature with a tiny mess subscription.
You also discover that plant stands change how a room feels. Raising a plant even 12 or 18 inches can make a corner look brighter, taller, and more layered. A trailing pothos suddenly has room to cascade. A snake plant becomes more sculptural. A ceramic pot that looked too heavy on the floor starts to feel balanced. The stand does not compete with the plant; it frames it.
From a practical standpoint, building one stand often leads to building another. Once you understand the basic frame, you can adjust height, width, color, and wood type. You might make a shorter version for a windowsill, a taller one for a reading corner, or a pair of matching stands for an entryway. The project becomes a small design system rather than a one-time object.
The biggest experience-based tip is to test the stand before declaring victory. Place the empty pot on it. Add weight. Gently press the sides. Check the feet. Look at it from across the room. If it feels slightly unstable, fix it before adding a living plant. A good DIY project should not create daily suspense.
In the end, a DIY rustic modern plant stand is more than a place to park a pot. It is a small confidence-building woodworking project, a home decor upgrade, and a reminder that useful furniture does not have to be complicated. Sometimes four legs, a top, a few braces, and a good finish are enough to make your plant look like it has finally moved into the nice part of town.
Conclusion
A DIY rustic modern plant stand is the perfect weekend project for anyone who wants to add warmth, greenery, and custom style to a home. With basic lumber, careful measurements, safe tool use, and a protective finish, you can build a stand that looks clean, natural, and far more expensive than it is. The key is to design for stability first, beauty second, and plant drama always.
Choose wood that fits your space, size the top to your planter, add braces for strength, and finish the surface so it can handle real life. Whether your style leans farmhouse, Scandinavian, industrial, boho, or modern organic, this project adapts easily. Build one, style it with a favorite plant, and do not be surprised when the empty corner of your room suddenly starts acting like it belongs in a design magazine.