Table of Contents >> Show >> Hide
- Why an Old Wooden Ladder Makes a Great Blanket Storage Shelf
- What You’ll Need
- Before You Build: Inspect the Ladder Like a Skeptic
- Step 1: Clean the Ladder Thoroughly
- Step 2: Sand, Fill, and Prep the Surface
- Step 3: Decide on the Shelf Layout
- Step 4: Measure and Cut Your Shelf Boards
- Step 5: Attach the Shelves Securely
- Step 6: Anchor the Unit to the Wall
- Step 7: Paint, Stain, or Seal the Piece
- Best Ways to Style Your Blanket Storage Shelves
- Mistakes to Avoid
- Is This DIY Worth It?
- My Experience Building Blanket Storage Shelves Out of My Grandpa’s Old Wooden Ladder DIY
- Conclusion
Some people inherit money. Some inherit a watch. And some of us inherit a slightly wobbly wooden ladder that smells faintly like sawdust, old barns, and “don’t touch that, it still works.” If that ladder belonged to your grandpa, tossing it out feels wrong. Turning it into blanket storage shelves, though? That feels like a proper family plot twist.
This DIY project blends sentimental value, practical storage, and just enough rustic charm to make your living room look intentional instead of “I ran out of closets and started improvising.” Better yet, an old wooden ladder is almost perfect for vertical storage. With the right prep, a few boards, and smart anchoring, you can transform it into a sturdy shelf that holds folded throws, baskets, books, and the kind of cozy clutter people suddenly call “curated” when it looks good.
In this guide, you’ll learn how to build blanket storage shelves out of an old wooden ladder safely, cleanly, and with enough style that your guests will say, “Wow, where did you buy that?” and you’ll get to be very annoying in the best possible way by replying, “Oh, that? I made it.”
Why an Old Wooden Ladder Makes a Great Blanket Storage Shelf
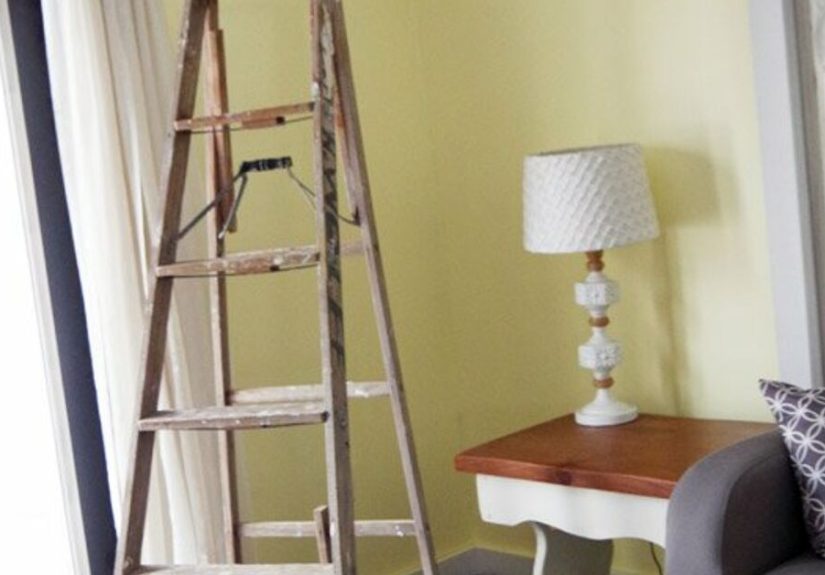
A vintage wooden ladder already has the bones of a fantastic shelving unit. It gives you height without hogging floor space, which is ideal if your home is short on storage and long on blankets. The angled shape also works beautifully in bedrooms, guest rooms, entryways, and living rooms where you want storage that doesn’t look like a giant beige plastic bin gave up on life.
There is also the design factor. A ladder shelf naturally brings character to a room. It feels collected, warm, and a little nostalgic. If the ladder came from your grandpa’s garage, shed, or workshop, it adds meaning that no flat-pack shelf can fake. Scratches, worn paint, and dents become part of the story instead of flaws to apologize for.
Functionally, this kind of upcycled ladder shelf is especially good for blanket storage because blankets are soft, forgiving, and visually appealing. Folded throws sit nicely on wooden planks, and rolled blankets can go into baskets on the lower shelves. In other words, your storage can finally stop pretending it isn’t also decor.
What You’ll Need
Tools
- Drill and driver bits
- Measuring tape
- Level
- Stud finder
- Sander or sanding block
- Saw for cutting shelf boards, if needed
- Clamps
- Paintbrushes or clean cloths for finish
Materials
- Old wooden ladder
- Wood boards for shelves
- Wood screws
- L-brackets, pipe straps, or shelf brackets
- Wood filler
- Sandpaper in coarse, medium, and fine grits
- Primer and paint, or wood stain/oil finish
- Clear protective topcoat or sealing wax
- Wall anchors if you cannot hit studs
- Optional baskets, labels, felt pads, and decorative hooks
Before You Build: Inspect the Ladder Like a Skeptic
Before you fall in love with the idea, inspect the ladder itself. Old wood can be charming, but charming is not the same thing as structurally sound. Check the rails for cracks, loose joints, rot, insect damage, and badly split wood. Look at every rung and step. If anything feels flimsy, repair it before you build or retire the ladder from this project and preserve it as decor only.
This is also the stage where you decide how much of the old finish to keep. If the ladder has beautiful worn paint or a naturally aged patina, you may want to preserve that look. If it is mostly grime and mystery stains, go ahead and clean it up. There is a difference between vintage and “this came from a shed with opinions.”
Step 1: Clean the Ladder Thoroughly
Start with a dry brush or vacuum to remove loose dust and cobwebs. Then wipe the ladder with a damp cloth and mild cleaner. If the wood is especially greasy or dirty, use a degreasing cleaner sparingly and let the ladder dry completely before sanding.
Do not skip this step. Sanding dirty wood is basically just rubbing grit and old gunk deeper into the surface. That is less “DIY craftsmanship” and more “tiny home-improvement revenge.”
Step 2: Sand, Fill, and Prep the Surface
Once the ladder is dry, sand rough patches and splinters first with a coarser grit, then move to medium and fine grits for a smoother finish. If there are old screw holes, shallow dents, or small imperfections you want to hide, fill them with wood filler and sand again after the filler dries.
If you are painting the piece, you do not need to erase every sign of age. A little texture adds character. But if you are staining or oiling the ladder, smoother prep matters more because the finish will highlight the wood grain and surface variation.
Step 3: Decide on the Shelf Layout
Now comes the fun part: figuring out where your shelves will go. If you are working with a step ladder that opens into an A-frame, you can place boards across the steps to create a true ladder shelf. If you are using a straight ladder, you can mount it at an angle or secure it upright and attach boards across the rungs and rails.
For blanket storage shelves, deeper lower shelves are the most useful. That is where baskets, folded quilts, and bulkier throws should live. Upper shelves can be narrower and used for lighter items such as small folded blankets, books, framed photos, or decor. In general, the heaviest items should sit low, where the structure feels most stable and the weight is easier to manage.
A good approach is to cut shelf boards so they get slightly wider as they move downward. That creates a balanced, ladder-bookcase look and makes the piece more practical for real-life storage, not just magazine-style pretending.
Step 4: Measure and Cut Your Shelf Boards
Measure the distance between the ladder rails at each shelf location. If the ladder tapers, each shelf may need a slightly different width or depth. Cut the boards carefully and dry-fit them before attaching anything. This step saves you from the classic DIY experience of holding a board in place and whispering, “Well, that’s not right.”
If you want a softer, more finished look, sand the board edges and slightly round the corners. That makes the shelf feel more furniture-like and less like it was assembled during a panic at the lumber aisle.
Step 5: Attach the Shelves Securely
Place each board in position and check it with a level. On a step ladder, you may be able to screw directly into the steps and rails. On a rung-style ladder, use sturdy pipe straps, brackets, or other supports where needed so the boards sit flat and stay put.
Pre-drilling pilot holes is a smart move, especially on older dry wood that may split easily. Work from the top shelf down so you can keep checking alignment as you go. Tighten all fasteners firmly, but do not crank them down so hard that the old wood complains by cracking in half.
Step 6: Anchor the Unit to the Wall
This is the grown-up part of the project, and yes, it matters. Even if the ladder shelf looks stable, secure it to the wall. Use a stud finder to locate studs, then fasten the top or upper rear portion of the unit with brackets into those studs whenever possible. If studs are not available exactly where you need them, use anchors rated for the load and follow the hardware specifications carefully.
Anchoring is especially important if you plan to store multiple blankets, baskets, or heavier decor. A shelf that tips forward is not rustic. It is just dramatic in the wrong way.
Step 7: Paint, Stain, or Seal the Piece
Once construction is done, choose your finish. If you want a light cottage look, paint the ladder and shelves in a soft neutral or muted color. If you prefer a natural, heritage feel, apply stain, Danish oil, or another wood-friendly finish that brings out the grain. Then protect it with a clear sealer, wax, or topcoat.
For a sentimental ladder, I like a balanced approach: preserve as much character as possible while still sealing the surface so it is smooth, clean, and safe around fabrics. Blankets and splinters are not a dream team.
Best Ways to Style Your Blanket Storage Shelves
Once the shelf is built, do not just stack every textile in your house on it like you are fleeing winter. Style it with intention. Fold your thickest blankets on the bottom shelf. Use baskets for rolled throws. Add one or two books, a small plant, or a framed photo on an upper shelf so the unit feels finished rather than overloaded.
Color matters, too. If your blankets vary wildly, group them by tone. Creams, browns, rusts, blues, and grays usually work well together. The goal is cozy, not laundry-room flashback.
This DIY wooden ladder shelf also works beautifully beyond the living room. In a guest room, it can hold extra bedding and towels. In an entryway, use the lower shelves for baskets and the upper area for seasonal throws. In a bedroom, it becomes a compact blanket station with serious personality.
Mistakes to Avoid
Using a damaged ladder without repairs
If the rails or joints are weak, no amount of cute styling will fix a structural problem. Repair first or choose another piece.
Skipping wall anchoring
A ladder shelf is tall and narrow. That shape needs stabilization, especially in homes with kids, pets, or enthusiastic adults.
Ignoring weight distribution
Put heavier baskets and folded quilts on the lower shelves. Keep lighter pieces up top.
Over-sanding away all the character
Do not erase the soul of the ladder. Smooth the hazards, keep the history.
Using a finish that stays tacky
Give every coat enough drying time. Blankets should rest on the shelf, not become part of the finish.
Is This DIY Worth It?
Absolutely. Building blanket storage shelves out of your grandpa’s old wooden ladder is the kind of project that checks all the right boxes. It is useful, affordable, meaningful, and good-looking. It helps you organize your home without buying a forgettable piece of furniture. And it gives an old object a second life that still honors where it came from.
That combination is hard to beat. You are not just building storage. You are building a story people can see.
My Experience Building Blanket Storage Shelves Out of My Grandpa’s Old Wooden Ladder DIY
When I first dragged my grandpa’s old ladder into the garage, I had two competing thoughts. The first was, “This is going to look amazing.” The second was, “This thing might also be older than half the furniture in my house combined.” It had paint flecks on the rails, worn spots where hands had gripped it for years, and a kind of quiet sturdiness that made me slow down and pay attention. I realized pretty quickly that this project was not just about building blanket storage shelves. It was about keeping something useful alive in a new way.
The biggest surprise was how much the ladder told me once I started cleaning it. Under the dust were little nicks and dents that clearly came from real work, not decorative distressing designed in a factory. One rung had a smoother patch where it must have been handled again and again. I kept imagining my grandpa carrying it around the yard or setting it against the side of a shed. That made me more careful with every decision. I did not want to over-sand it and erase the evidence that it had already lived a full life before becoming a shelf.
I also learned that old wood makes you earn the final result. New lumber is predictable. Old ladders are more like opinionated relatives. Nothing was perfectly square, some parts were drier than expected, and every measurement required a second look. I had to adjust the shelf boards one by one because the ladder narrowed slightly and the spacing was not as uniform as I first assumed. That could have been frustrating, but it actually made the finished project feel more custom and more honest.
The emotional part hit me later, after the shelf was anchored, sealed, and finally styled. I folded a couple of thick throw blankets on the bottom shelf, added a basket, and stepped back. Suddenly it no longer looked like a leftover ladder waiting for a purpose. It looked like furniture. Good furniture. The kind that starts conversations. The kind that feels personal in a room full of items people bought because an algorithm thought they might “complete the look.”
What I love most now is that the piece works every day. It is not a fragile memorial nobody can touch. We actually use it. Guests grab blankets from it. Family notices it. And every now and then someone asks where it came from, which gives me the chance to tell the story. That may be the best part of the whole project. A useful object from one generation became a useful object for another, just in a different form.
If you are thinking about making your own wooden ladder blanket shelf, I would say this: do not rush it. Respect the material, build it safely, and let the imperfections stay where they add character. You are not trying to make an old ladder look brand-new. You are trying to make it matter again. And when you get that right, the final project feels better than anything you could have ordered online at two in the morning while pretending you were “just browsing.”
Conclusion
If you want a DIY project that combines storage, style, and sentiment, this one is hard to top. An old wooden ladder can become a beautiful blanket storage shelf with just a little planning, careful prep, and proper anchoring. The result is practical enough for everyday life and meaningful enough to keep for years. Not bad for something that used to lean in a garage waiting for retirement.