Table of Contents >> Show >> Hide
- Before You Start: Make Sure It Is Safe to Jump the Battery
- What You Need to Hook Up Jumper Cables
- Understanding the Battery Terminals: Positive vs. Negative
- How to Hook Up Jumper Cables to a Battery: The Correct Order
- Starting the Cars After the Cables Are Connected
- How to Remove Jumper Cables Safely
- How Long Should You Drive After Jump-Starting a Car?
- Common Mistakes When Connecting Jumper Cables
- What If the Car Still Will Not Start?
- Can Jump-Starting Damage Modern Cars?
- Portable Jump Starter vs. Jumper Cables
- Real-World Experiences: What Jump-Starting Teaches You
- Final Thoughts
- SEO Tags
Note: This guide is written for standard 12-volt gasoline vehicles and many common passenger vehicles. Always check your owner’s manual first, especially if you drive a hybrid, EV, diesel truck, luxury vehicle, or any car with clearly marked remote jump-start terminals.
A dead car battery has a special talent for appearing at the worst possible time: before work, outside a grocery store, in the rain, or precisely when you are wearing shoes that were not built for “automotive adventure.” The good news is that learning how to hook up jumper cables to a battery is not mysterious wizardry. It is a simple, careful sequence: identify the terminals, connect the clamps in the correct order, start the donor vehicle, revive the dead vehicle, and remove the cables safely.
The not-so-good news? Doing it wrong can cause sparks, damage electronics, or turn a small roadside inconvenience into a very dramatic afternoon. The secret is patience. Jumper cables are not spaghetti. They do not appreciate improvisation.
In this step-by-step guide, you will learn how to connect jumper cables, where the red and black clamps go, what to avoid, how long to let the battery charge, and what to do after your car starts. The “with pictures” part includes image placement ideas and captions you can use when publishing the article with your own photos or illustrations.
Before You Start: Make Sure It Is Safe to Jump the Battery
Before you pop the hood like a confident movie mechanic, take a minute to inspect the situation. A jump-start is meant for a weak or discharged battery, not a damaged battery. If the battery case is cracked, swollen, leaking, frozen, or smells strongly like rotten eggs, do not connect jumper cables. Call roadside assistance or a qualified technician instead.
Also, confirm both vehicles use the same voltage. Most modern passenger vehicles use 12-volt batteries, but older classics, some specialty equipment, and unusual setups may differ. Connecting mismatched systems can damage electrical components faster than you can say, “Well, that was expensive.”
Safety Checklist
- Park both vehicles on level ground, close enough for the jumper cables to reach, but not touching.
- Put both vehicles in Park or Neutral and set the parking brakes.
- Turn off headlights, radios, heated seats, phone chargers, and other accessories.
- Remove loose jewelry and keep scarves, sleeves, hair, and cables away from moving engine parts.
- Wear safety glasses and gloves if you have them.
- Read the owner’s manual for specific jump-start points or warnings.

What You Need to Hook Up Jumper Cables
You only need a few things, but each one matters. First, you need a set of jumper cables in good condition. Look for thick insulation, clean clamps, and no exposed wire. Thin, damaged, or bargain-bin cables may struggle to deliver enough current, especially in cold weather or with larger engines.
Second, you need a donor vehicle with a charged battery. The donor vehicle should be compatible with your vehicle’s electrical system. Third, you need a clean metal ground point on the dead car. This is usually an unpainted bolt, bracket, or engine block surface away from the battery and fuel lines.
A portable jump starter can replace the donor vehicle, but the basic idea is similar: positive to positive, negative to a safe ground or manufacturer-recommended connection point. Many modern jump starters include reverse-polarity warnings, lights, and built-in safety protections, which is helpful if your brain goes offline during emergencies.
Understanding the Battery Terminals: Positive vs. Negative
A car battery has two terminals. The positive terminal is usually marked with a plus sign (+), the letters “POS,” or a red cover. The negative terminal is usually marked with a minus sign (-), the letters “NEG,” or a black cover. If the battery is dirty, corroded, or hidden under a plastic cover, slow down and locate the markings before connecting anything.
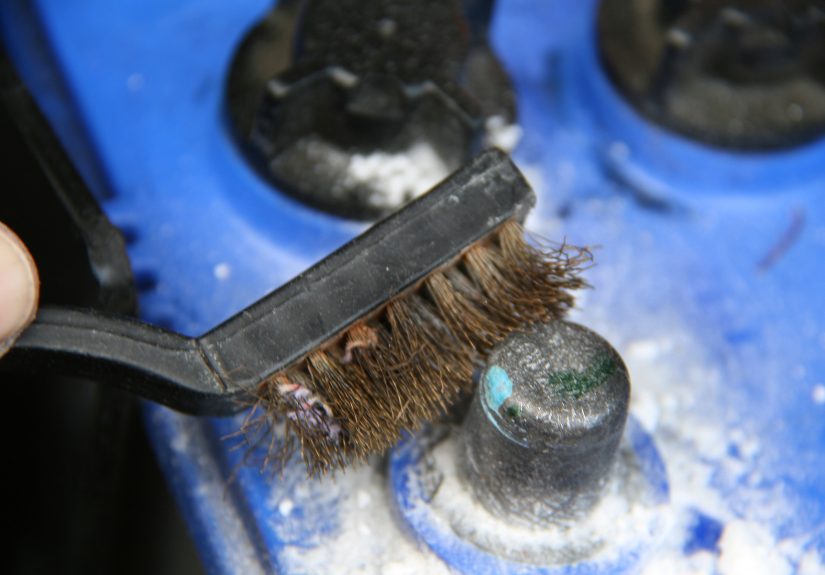
Corrosion often looks like white, blue, or green crust around the terminals. A little corrosion can prevent a good connection, so cleaning the terminal with a battery brush or suitable tool may help. Do not touch battery corrosion with bare hands, and do not let tools bridge the positive and negative terminals.

How to Hook Up Jumper Cables to a Battery: The Correct Order
The order matters. Think of it like a tiny ceremony for electricity. You are creating a safe path for power while reducing the chance of sparks near the dead battery.
Step 1: Connect the Red Clamp to the Dead Battery’s Positive Terminal
Attach one red clamp to the positive (+) terminal on the dead battery. Make sure the clamp bites onto clean metal. A loose clamp can cause a weak connection, which may lead to clicking, slow cranking, or no start at all.

Step 2: Connect the Other Red Clamp to the Donor Battery’s Positive Terminal
Attach the other red clamp to the positive (+) terminal on the working battery. At this point, both positive terminals are connected. Keep the black clamps from touching each other, the red clamps, or random metal parts.
Step 3: Connect the Black Clamp to the Donor Battery’s Negative Terminal
Now connect one black clamp to the negative (-) terminal on the donor vehicle’s battery. This is the good battery, not the dead one. The donor battery is now ready to provide the boost.
Step 4: Connect the Last Black Clamp to a Ground Point on the Dead Car
Attach the final black clamp to a clean, unpainted metal surface on the vehicle with the dead battery. Choose a sturdy bolt, bracket, or engine block surface away from the battery, belts, fans, and fuel lines. This grounding point helps reduce the risk of sparks near the battery.
Here is the easy memory trick: Red to dead, red to donor, black to donor, black to metal. If that sounds like a strange pirate chant, good. Strange pirate chants are memorable.

Starting the Cars After the Cables Are Connected
Once the jumper cables are connected securely, start the donor vehicle. Let it idle for a few minutes. This gives the weak battery a small charge and helps stabilize the connection. Do not aggressively rev the engine. Your goal is to help, not audition for a street-racing sequel nobody asked for.
After a few minutes, try to start the vehicle with the dead battery. Turn the key or press the start button as you normally would. If the engine cranks slowly but does not start, wait a few more minutes and try again. Avoid cranking for long periods; short attempts are kinder to the starter.
If the vehicle starts, let it run. If it does not start after several careful attempts, stop. The issue may be a completely failed battery, corroded terminals, a bad starter, alternator trouble, a blown fuse, or another electrical problem. At that point, roadside assistance or a technician is the smarter move.
How to Remove Jumper Cables Safely
Removing jumper cables is just as important as connecting them. The safe rule is to remove them in reverse order. Keep the clamps from touching each other while any part of the system is still connected.
- Remove the black clamp from the metal ground point on the revived vehicle.
- Remove the black clamp from the donor battery’s negative terminal.
- Remove the red clamp from the donor battery’s positive terminal.
- Remove the red clamp from the revived battery’s positive terminal.
After removing the cables, close the hoods securely and let the revived vehicle continue running. A quick start does not mean the battery is fully charged. It simply means your car has returned from its little electrical nap.

How Long Should You Drive After Jump-Starting a Car?
After the dead vehicle starts, drive it for at least 15 to 30 minutes if conditions allow. This gives the alternator time to put some charge back into the battery. A longer drive is better than simply idling in the driveway for two minutes and declaring victory.
If the car dies again soon after the jump, the battery may be too weak to hold a charge. It could also indicate alternator trouble or a parasitic electrical drain. In plain English: something is stealing power, failing to make power, or refusing to store power. None of those are solved by optimism alone.
Many auto parts stores and repair shops can test your battery and charging system. Testing is especially useful if your battery is more than three years old, your headlights look dim, the starter sounds sluggish, or you have needed multiple jump-starts recently.
Common Mistakes When Connecting Jumper Cables
Mistake 1: Reversing the Polarity
Connecting positive to negative is one of the biggest mistakes. It can create sparks, blow fuses, damage electronics, or harm the batteries. Always match positive to positive and negative to the proper negative or ground point.
Mistake 2: Connecting the Final Black Clamp to the Dead Battery
Some older advice shows the final black clamp going directly to the dead battery’s negative terminal. Many modern safety guides recommend using a clean metal ground away from the dead battery instead. This reduces the chance of sparks near battery gases.
Mistake 3: Letting the Clamps Touch
Once one end of the cables is connected, the other ends should be treated as live. Do not let red and black clamps touch each other. Do not toss them casually into the engine bay like you are feeding a metal octopus.
Mistake 4: Ignoring the Owner’s Manual
Some vehicles have remote jump-start posts because the battery is under a seat, in the trunk, or hidden beneath covers. Others have sensitive electronics or special procedures. The owner’s manual is not thrilling literature, but in this case it can save money.
Mistake 5: Trying to Jump a Damaged Battery
A leaking, cracked, swollen, or frozen battery is not a “try it and see” situation. Do not jump-start it. Call for help and replace or service the battery safely.
What If the Car Still Will Not Start?
If the dead car clicks but does not start, check the cable connections. Wiggle the clamps slightly to make sure they have a firm grip on clean metal. If the terminals are corroded, cleaning them may help. If the engine cranks but refuses to run, the problem may not be the battery at all.
If there is no sound, no lights, and no dashboard activity, the battery may be extremely discharged or the connections may be loose. If the lights work but the engine does not crank, the starter, ignition switch, neutral safety switch, or another system could be involved.
If the car starts with a jump but dies after the cables are removed or shortly after driving, suspect the alternator or charging system. A healthy alternator should help keep the vehicle running and recharge the battery while the engine operates.
Can Jump-Starting Damage Modern Cars?
Jump-starting is generally safe when done correctly, but modern vehicles contain many electronic modules. Wrong connections, voltage spikes, weak cables, or careless clamp placement can cause problems. This is why the safest approach is to follow the vehicle manufacturer’s instructions, connect the cables in the proper order, and avoid shortcuts.
If you drive a newer car with advanced electronics, a portable jump starter with built-in safety features may be a smart addition to your emergency kit. Many units include reverse-polarity alerts, overload protection, and on/off switches. They also remove the awkward social ritual of asking a stranger, “Excuse me, may I borrow your functioning electricity?”
Portable Jump Starter vs. Jumper Cables
Jumper cables are inexpensive, reliable, and never need charging. Their downside is obvious: you need another vehicle. A portable jump starter is self-contained, compact, and convenient, but it must be kept charged. For many drivers, the best setup is both: jumper cables in the trunk and a portable jump starter in the emergency kit.
When buying jumper cables, look for strong clamps, flexible insulation, and enough length to reach between vehicles parked in different positions. When buying a portable jump starter, choose one rated for your engine size and pay attention to safety features, not just flashy peak-amp numbers.
Real-World Experiences: What Jump-Starting Teaches You
The first time many people learn how to hook up jumper cables to a battery, they are not calmly standing in a sunny driveway with a printed checklist and a fresh cup of coffee. They are usually in a parking lot, slightly embarrassed, holding red and black clamps while pretending they remember something their uncle explained twelve years ago.
One of the biggest lessons from real-life jump-starts is that preparation beats confidence. A driver who keeps clean, heavy-duty jumper cables in the trunk is already halfway to solving the problem. A driver who also keeps gloves, a flashlight, and a small battery terminal brush is basically the neighborhood wizard. You do not need to be a mechanic; you just need the right tools and a calm process.
Another common experience is discovering that battery terminals are not always easy to access. Some batteries are tucked under plastic covers. Some have side terminals. Some vehicles use remote jump posts under the hood even though the battery lives elsewhere. That is why checking the owner’s manual before an emergency is genuinely useful. It is much easier to learn where the jump point is while parked at home than while standing beside a silent car in freezing wind.
Weather also changes the story. Cold weather slows chemical reactions inside a battery, which is why weak batteries often fail on chilly mornings. Hot weather can be just as cruel because heat accelerates battery wear. A battery that seems fine in September may surrender dramatically in January. If your car cranks slowly several mornings in a row, take the hint. The battery is waving a tiny white flag.
There is also the “second jump-start” lesson. If your vehicle needs a jump once because you left the dome light on overnight, that may be a one-time mistake. Congratulations, you are human. If your vehicle needs a jump twice in one week, the battery or charging system deserves testing. Repeated jump-starts are not a maintenance plan. They are your car texting “we need to talk.”
People also learn quickly that clamp quality matters. Cheap clamps may slip, bite poorly, or fail to grab side posts. A bad connection can make you think the battery is beyond saving when the real problem is simply weak contact. When the clamps are secure, the lights may brighten, the starter may crank stronger, and the entire process feels less like guessing.
Finally, jump-starting teaches humility. Even experienced drivers can feel nervous around batteries, and that is healthy. Respecting the process keeps you safe. Slow down, identify positive and negative, connect in the correct order, keep clamps separated, and remove them in reverse. Do that, and a dead battery becomes an inconvenience instead of a roadside opera.
Final Thoughts
Knowing how to hook up jumper cables to a battery is one of those practical skills every driver should have. The basic process is simple: park safely, turn everything off, connect red to dead positive, red to donor positive, black to donor negative, and black to a clean metal ground on the dead vehicle. Start the donor car, wait a few minutes, start the dead car, then remove the cables in reverse order.
The most important part is not speed. It is accuracy. A careful jump-start can get you back on the road without drama, sparks, or expensive electrical regrets. Keep good cables in your vehicle, learn where your battery or jump posts are located, and test an aging battery before it chooses a parking lot as its retirement destination.