Table of Contents >> Show >> Hide
- Why Festive Buckets Work So Well on a Christmas Porch
- What You Need for a Christmas Porch Festive Bucket Decorations DIY
- How to Choose the Right Bucket or Container
- The Simple Design Formula: Thriller, Filler, Spiller
- Step-by-Step: How to Make Christmas Porch Bucket Decorations
- Best Greenery and Decorative Elements to Mix
- Fresh vs. Faux: Which Is Better?
- Common Mistakes to Avoid
- Outdoor Safety Tips That Matter
- How to Style the Buckets on Your Porch
- How to Keep Your DIY Porch Buckets Looking Good All Season
- Extra Experience and Real-Life Decorating Lessons From Making Christmas Porch Festive Bucket Decorations DIY
- Conclusion
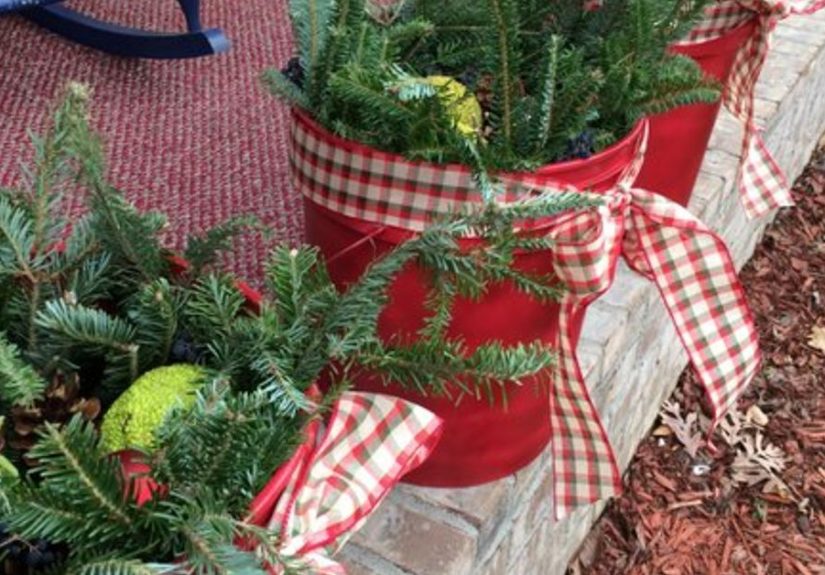
Some people put out a wreath and call it a day. Respectfully, that is adorable. But if you want your front porch to look like Christmas personally dropped off a basket of cheer, festive bucket decorations are the move. They are charming, easy to customize, surprisingly forgiving for beginners, and they make your entryway look pulled together even when the inside of your house is being held together by cookie tins, wrapping paper, and seasonal optimism.
This Christmas porch festive bucket decorations DIY project combines rustic charm with classic holiday curb appeal. Think galvanized buckets, evergreen branches, pinecones, berries, ribbon, twigs, lights, and a little creative swagger. The result can look elegant, farmhouse-inspired, cottage cozy, or full-on “Santa definitely knows this address.” Better yet, you do not need advanced crafting skills. You just need a container, a simple formula, and a willingness to play with texture and height.
Below, you will learn exactly how to make festive Christmas porch buckets, what supplies to gather, how to arrange everything so it looks balanced instead of chaotic, and how to keep the display looking great through the season. There is also a long section at the end packed with hands-on experience and real-world lessons, because holiday decorating always looks effortless online right up until the ribbon starts flapping sideways in the wind.
Why Festive Buckets Work So Well on a Christmas Porch
Bucket decor hits a sweet spot between practical and pretty. A bucket is sturdy, simple, and naturally rustic, which makes it a perfect match for winter greenery. It also works on porches of almost any size. A pair of matching buckets can frame a front door beautifully, while a single oversized bucket can anchor a smaller stoop without swallowing the whole entrance.
Another reason this idea works is flexibility. You can use live evergreen cuttings, faux stems, mini trees, berry branches, birch logs, magnolia leaves, ornaments, plaid bows, lanterns, or waterproof lights. You can go classic red-and-green, snowy white, woodland neutral, or metallic glam. In short, the bucket is the little black dress of outdoor Christmas decorating.
What You Need for a Christmas Porch Festive Bucket Decorations DIY
Main Materials
- Galvanized buckets, metal pails, wooden crates, crocks, or other outdoor-safe containers
- Floral foam, nursery pots, bricks, sand, gravel, or packed soil for support
- Evergreen branches such as cedar, pine, fir, juniper, or spruce
- Accent stems like red berries, birch branches, red twig dogwood, curly willow, or magnolia
- Pinecones, ornaments, faux fruit, bells, or rattan balls for texture
- Outdoor ribbon or weather-resistant bows
- LED fairy lights or battery-operated outdoor lights
Helpful Tools
- Garden pruners or wire cutters
- Work gloves
- Zip ties or floral wire
- Hot glue gun for indoor prep work only
- Drill, if your repurposed bucket needs drainage holes
- Pot feet or risers if the bucket will sit on a wood porch
A quick tip before you start: bigger containers usually look more polished outdoors. Tiny buckets can disappear visually once they are placed beside a front door, railing, doormat, wreath, and all the other holiday competition. A larger container gives you room for height, fullness, and better proportion.
How to Choose the Right Bucket or Container
The best container for this DIY is one that can handle cold weather and moisture. Galvanized buckets are popular because they are lightweight, rustic, and easy to find. Stoneware crocks, urns, wooden crates, and large metal planters also work beautifully.
If you are using a repurposed container, check two things. First, make sure it is durable enough for outdoor use. Second, make sure it has drainage or can be modified for drainage. Winter moisture that has nowhere to go can freeze, create a mess, and shorten the life of both your container and your arrangement. If you are placing the bucket on a wood porch, raising it slightly with pot feet or risers helps reduce trapped moisture underneath.
The Simple Design Formula: Thriller, Filler, Spiller
The easiest way to make your arrangement look intentional is to follow the classic container-garden formula: thriller, filler, spiller.
Thriller
This is your tall focal point. It could be a cluster of birch branches, red twig dogwood, curly willow, a mini evergreen tree, or several dramatic magnolia stems. The thriller adds height and makes the bucket visible from the street rather than just from two feet away.
Filler
This is the body of the arrangement. Evergreen boughs, boxwood stems, magnolia leaves, berried picks, and pinecones all help fill out the middle so the display feels lush rather than sparse.
Spiller
This is what softens the edge of the container. Cedar boughs, trailing ivy, loose fir branches, or flexible faux greenery can drape gently over the sides and make the bucket feel generous and layered.
That formula sounds fancy, but it is really just a decorating cheat code. Tall in the middle, fullness around it, a little movement at the edge. That is the whole magic trick.
Step-by-Step: How to Make Christmas Porch Bucket Decorations
Step 1: Prep the Base
If your bucket is deep, do not fill the whole thing with premium materials unless you are in a committed relationship with overspending. Instead, place a smaller upside-down nursery pot, bricks, or tightly packed filler inside the bucket to raise the working area closer to the top. This saves materials and helps keep stems upright.
Secure floral foam, packed soil, or sand on top of that support layer. The goal is to create a firm base that will grip stems. For faux arrangements, foam works well. For fresh cuttings, damp soil or sand can be useful, especially in milder climates.
Step 2: Add Your Thriller
Start with the tallest elements first. Insert birch poles, red twig dogwood, or other branches in the center or slightly toward the back if the bucket will sit against a wall. Keep the silhouette balanced. You want height, not a botanical traffic accident.
Step 3: Build the Evergreen Shape
Add your longest evergreen branches around the outer edge first. Angle them outward so the arrangement begins to widen naturally. Then fill inward with shorter branches until the bucket looks full from every angle that matters. If the bucket will face the street, prioritize the front and sides.
Step 4: Layer in Color and Texture
Now add berries, pinecones, magnolia leaves, faux apples, ornaments, or decorative balls. Place them in odd numbers for a more relaxed look. Tuck them in at different heights so the arrangement feels collected rather than flat.
Step 5: Add Ribbon or a Bow
A large bow tied around the bucket handle or attached near the front can instantly make the whole display feel more finished. Plaid ribbon is classic. Velvet is elegant. Burlap reads rustic. Bright red says, “Yes, I absolutely started humming carols while decorating.”
Step 6: Light It Up
Wrap outdoor-rated LED fairy lights through the branches or around your vertical stems. Tuck the battery pack or cord out of sight. Lights make the display glow after dark and help the arrangement still earn its keep once the sun clocks out at what feels like noon.
Best Greenery and Decorative Elements to Mix
The prettiest porch buckets usually combine different textures instead of relying on one material. Here are a few combinations that work especially well:
Classic Christmas
- Pine and fir branches
- Red berry picks
- Pinecones
- Red velvet bow
- Warm white lights
Rustic Woodland
- Cedar and juniper
- Birch branches
- Brown pinecones
- Jute ribbon
- Lantern beside the bucket
Elegant Neutral
- Magnolia leaves
- White berries
- Gold or champagne ornaments
- Soft cream ribbon
- Cool white lights
Farmhouse Porch
- Mixed evergreens
- Red twig dogwood
- Galvanized bucket
- Plaid bow
- Wood sign or small lantern nearby
Fresh vs. Faux: Which Is Better?
Both have their place. Fresh greenery has real scent, natural movement, and that just-cut look that makes a porch feel alive. Faux greenery is easier, cleaner, and often reusable for years. Many people use a mix of both: faux structure pieces with fresh cut evergreen tucked in where it shows most.
Fresh cuttings can last surprisingly well in winter, especially in colder areas and when they are not roasting in direct sun all day. In milder climates, placing stems into moist soil or adding a little water to vessels that can hold it may help keep greenery looking supple longer. Faux materials are handy for berries, bows, ornaments, and any detail you do not want turning soggy, faded, or wind-tossed by New Year’s.
Common Mistakes to Avoid
- Using a bucket that is too small: Outdoor decor needs visual weight.
- Skipping drainage: Water buildup and freezing are not festive.
- Making everything one height: Height variation creates drama.
- Adding too many tiny decorations: Porch decor should read clearly from a distance.
- Using indoor-only lights outside: Always check the label.
- Placing real candles in or near greenery: That is not ambiance. That is paperwork.
Outdoor Safety Tips That Matter
Holiday porch decor should be pretty, but it should also be smart. Use outdoor-rated lights and extension cords, inspect strings for damaged wires or loose connections, and avoid overloading outlets. LED holiday lights are a great choice because they are durable and energy-efficient. Use clips instead of nails to hang cords, and keep decorations clear of doors so the entry stays safe and functional.
If you are styling around a lantern, flameless candles are the safest route near greenery, ribbon, and wooden porches. They still give that cozy holiday glow without adding a “call the fire department” subplot to your decorating plans.
How to Style the Buckets on Your Porch
A single bucket can look great, but a pair of matching arrangements usually delivers the most polished curb appeal. Place one on each side of the front door. Add a wreath above, a welcome mat below, and perhaps a garland or lantern to tie everything together.
For a layered look, vary the height around the buckets. A stool, crate, or lantern next to one container can add dimension. On wider porches, group a bucket with a mini tree, sled, bench, or basket. On tiny stoops, keep the rest simple and let the bucket be the star.
How to Keep Your DIY Porch Buckets Looking Good All Season
Trim away anything that turns brown or limp. Brush off heavy snow gently so branches do not snap under the weight. Straighten ribbon after storms. Replace lightweight decorative picks that get blown around. If your arrangement includes fresh stems in soil and your climate is still relatively mild, occasional watering may help. In colder regions, nature usually takes over and keeps everything nicely preserved.
One of the best tricks is to create a design that can transition beyond Christmas. Remove bright red bows or ornaments after the holiday, and your bucket can still look elegant through the rest of winter with evergreens, birch, pinecones, and neutral lights.
Extra Experience and Real-Life Decorating Lessons From Making Christmas Porch Festive Bucket Decorations DIY
Here is the honest part nobody tells you in the glamorous photos: the first time you make Christmas porch buckets, you will almost certainly underestimate how much greenery you need. You will place three branches in a bucket, step back, and realize it looks less like a lush winter arrangement and more like a mildly festive broom. That is normal. Outdoor decorating needs fullness because open air visually “eats” detail. What looks almost too full on the ground usually looks just right on the porch.
Another common experience is discovering that the bucket itself changes the vibe more than expected. A shiny metal pail reads different from an old crock, a matte black planter, or a weathered crate. If your house has white trim and a traditional red door, classic greenery and red ribbon will look timeless. If your exterior is more modern, cleaner lines and a restrained palette, such as greens, whites, and warm lights, may feel much more natural. The best bucket decoration is not the one with the most stuff packed into it. It is the one that looks like it belongs to the house.
Wind is also the great holiday editor. A bow that looks dramatic indoors can look like it is trying to escape the property once it is outside. Wired ribbon holds its shape better, and heavier ornaments usually behave better than tiny lightweight picks. After one blustery afternoon, many decorators become accidental experts in zip ties. Nobody plans this. It just happens.
There is also the question of symmetry. In theory, two identical porch buckets are elegant. In reality, natural branches have personalities. One side may be fluffier, taller, or slightly more rebellious. Instead of fighting for clone-level perfection, aim for visual balance. If one bucket has more height, let the other have a touch more fullness. Your porch is not a math equation. It is a holiday welcome.
One especially useful lesson is to build the arrangement where you plan to use it, or at least dry-fit the design outdoors before calling it done. Lighting changes everything. What feels rich and dimensional in a garage can flatten out on the porch. Likewise, a bucket that feels huge indoors can suddenly look modest once placed under a tall doorway. A quick outdoor check saves a lot of second-guessing.
Many people also discover that the best decorative additions are often the least fussy. Pinecones, berry stems, birch branches, cedar, magnolia, and simple warm lights do a lot of heavy lifting. Once you add too many mini ornaments, signs, picks, bells, glitter branches, bows, faux birds, and three different ribbon patterns, the arrangement starts to look like your craft closet won an argument. Editing is a decorating skill. Christmas does not always need more. Sometimes it just needs better.
The final real-world truth is that these porch buckets create an emotional effect that goes beyond decor. They make arriving home feel more special. They greet guests before the door even opens. They make dark winter evenings feel warmer. And yes, they absolutely make you pause on the walkway and think, “Well, look at me. I have become the sort of person who has Christmas porch buckets.” That is growth. Seasonal, glitter-adjacent growth.
Conclusion
Making a Christmas porch festive bucket decorations DIY display is one of the simplest ways to add serious holiday charm to your home. Start with a sturdy bucket, build around a strong focal point, layer in evergreen fullness, add texture and color, and finish with weather-safe lights or ribbon. Keep the design scaled to your porch, prioritize outdoor durability, and do not be afraid to make it lush. Christmas decor is not the time to whisper.
Whether your style leans rustic, traditional, elegant, or farmhouse, festive porch buckets are easy to personalize and surprisingly fun to build. They can be inexpensive, long-lasting, and dramatic in the best possible way. In other words, they are the kind of DIY project that makes your entryway look like it has its life together, even when the kitchen counter is currently buried under cookie cutters and tape.