Table of Contents >> Show >> Hide
- Before You Start: The 60-Second “Raw Fish” Reality Check
- Choosing Salmon for Sushi: What to Buy (and What to Avoid)
- Tools and Setup: Your Sushi Prep Starter Kit
- Step-by-Step: How to Prepare Salmon for Sushi
- Step 1: Buy the right salmon and transport it cold
- Step 2: Store it correctly (your fridge is part of the recipe)
- Step 3: Thaw frozen salmon the right way (slow and cold)
- Step 4 (Optional but recommended): Do a quick “firming cure”
- Step 5: Remove the skin (or buy skin-off to simplify)
- Step 6: Remove pin bones (the “surprise crunch” prevention plan)
- Step 7: Trim and portion for how you’ll serve it
- Step 8: Chill before slicing (cold fish = clean cuts)
- Step 9: Slice like a sushi bar (long strokes, minimal sawing)
- Step 10: Serve promptly and keep it cold
- What About Freezing Salmon at Home to Make It “Sushi-Safe”?
- Common Mistakes (and How to Fix Them Fast)
- Mini FAQ: Quick Answers People Actually Need
- Real-World Tips and Experiences: What People Learn After Making Salmon Sushi a Few Times (Extra)
- Conclusion
- SEO Tags
Making salmon sushi at home feels like a flex. It’s also a tiny bit like hosting a very fancy science experiment
where the goal is “buttery, clean slices” and the stakes are “please don’t give anyone a miserable stomach.”
The good news: with the right salmon, cold-chain discipline, and a few chef-y tricks, you can prep salmon for
sushi that tastes restaurant-level and looks like it belongs under flattering lighting.
This guide walks you through selecting salmon, keeping it safe, trimming and portioning it, and slicing it for
nigiri, sashimi, and rollsplus a reality-check section on “sushi-grade” labels (spoiler: it’s not a magical spell).
You’ll also get a practical “experience” section at the end: the little lessons people learn after making salmon sushi a few times.
Before You Start: The 60-Second “Raw Fish” Reality Check
1) “Sushi-grade” isn’t a regulated guarantee
In the U.S., “sushi-grade” (or “sashimi-grade”) is commonly used by sellers to signal “good quality and handled for raw use,”
but it’s not an official standard with one universal definition. Treat it like a helpful hintnot a force field.
The most important factor is a reputable supplier who can tell you how the fish was handled and frozen.
2) Parasites and bacteria are different problems
Freezing is primarily about parasites. It does not make raw fish “sterile,” and it does not eliminate all germs that can cause foodborne illness.
That’s why sourcing, cleanliness, and keeping the fish cold matter as much as anything you do with a knife.
3) Some people should skip raw fish entirely
If someone is pregnant, immunocompromised, very young, or older, most public health guidance recommends avoiding raw or undercooked fish.
When in doubt, make seared salmon sushi, baked salmon rolls, or a “salmon bowl” with cooked fish. You still get the glorywithout the gamble.
Choosing Salmon for Sushi: What to Buy (and What to Avoid)
The safest, simplest option: commercially frozen salmon intended for raw consumption
If you want the easiest path with the fewest “what ifs,” buy salmon that was commercially frozen and sold specifically for raw applications.
Many seafood counters and online fish sellers can confirm whether the fish was frozen under time/temperature controls used to reduce parasite risk.
This matters because many home freezers aren’t cold enough to reliably meet parasite-destruction targets.
Farmed vs. wild salmon: why it matters
Wild salmon can have a higher parasite risk than responsibly farmed salmon, depending on where and how it was caught.
That doesn’t mean “wild = bad.” It means “wild = handle with extra care and buy from a supplier you trust for raw use.”
If your goal is salmon sushi at home, many people choose high-quality farmed Atlantic salmon from reputable sources because it’s consistent,
fatty (hello, melt-in-your-mouth texture), and commonly handled for raw preparations.
Avoid these “raw salmon” red flags
- Strong fishy odor (fresh salmon should smell like the ocean, not like a dock).
- Soft, mushy flesh or gaps in the muscle (can signal poor handling or temperature abuse).
- “Previously thawed” salmon sitting in a warm display case with unknown history.
- Fish packaged with lots of liquid and a tired gray/brown look (not the vibe).
Tools and Setup: Your Sushi Prep Starter Kit
You don’t need a samurai sword. You do need a sharp knife and a clean workspace.
Essential tools
- Sharp slicing knife (a long chef’s knife works; a sashimi knife is a bonus).
- Tweezers or clean needle-nose pliers (for pin bones).
- Cutting board (preferably plastic for easy sanitizing, or a very clean wooden board reserved for fish).
- Paper towels (dryness = better slices).
- Food-safe gloves (optional) (great for grip and cleanliness).
- Instant-read thermometer (optional) (useful for checking fridge temps and keeping food safely cold).
Cleanliness rules that actually matter
- Wash hands, then wash them again like you’re about to meet royalty.
- Sanitize the board and knife before and after. Keep raw fish away from ready-to-eat foods.
- Keep salmon cold while you work: prep small batches and return the rest to the fridge.
Step-by-Step: How to Prepare Salmon for Sushi
Step 1: Buy the right salmon and transport it cold
Choose salmon from a reputable fishmonger or seafood supplier. Ask one clear question:
“Was this salmon handled and frozen for raw consumption?”
If they can’t answer, pick a different seller or choose cooked sushi.
Bring an insulated bag and an ice pack if you have more than a short drive home. Warm salmon is the enemy of both texture and safety.
Step 2: Store it correctly (your fridge is part of the recipe)
Store salmon in the coldest part of the fridge (usually the back, not the door). Keep it wrapped, set on a plate,
and ideally over a small rack or paper towels to avoid sitting in moisture.
- If it’s frozen: keep it frozen until you’re ready to thaw.
- If it’s fresh and intended for raw use: plan to use it as soon as possible for best quality.
Step 3: Thaw frozen salmon the right way (slow and cold)
For best texture, thaw in the refrigerator. Place the wrapped salmon on a plate (to catch drips) and thaw overnight.
If you need it faster, seal it in a leakproof bag and submerge in cold water, changing the water occasionally to keep it cold.
Avoid warm water thawingmushy texture and higher risk aren’t worth saving an hour.
Step 4 (Optional but recommended): Do a quick “firming cure”
A short salt-and-sugar cure improves texture and makes slicing easier. It’s not a safety shortcutit’s a quality upgrade.
- Pat the salmon very dry with paper towels.
- Mix 1 tablespoon kosher salt + 1 tablespoon sugar per pound of salmon.
- Sprinkle evenly over the flesh side.
- Rest in the fridge for 20–45 minutes (thinner pieces need less time).
- Rinse quickly under cold water, then pat very dry.
Result: salmon that feels slightly firmer, slices cleaner, and tastes lightly seasonedlike it went to finishing school.
Step 5: Remove the skin (or buy skin-off to simplify)
If your salmon has skin, you can remove it at home with a sharp knife. Here’s the clean method:
- Place salmon skin-side down. Start at the tail end if possible.
- Grip the skin with a paper towel for traction.
- Slide the knife between flesh and skin at a shallow angle, keeping the blade almost parallel to the board.
- Move the knife forward while pulling the skin backlet the knife do the work.
Don’t panic if you leave a little flesh on the skin. That’s a chef snack. You earned it.
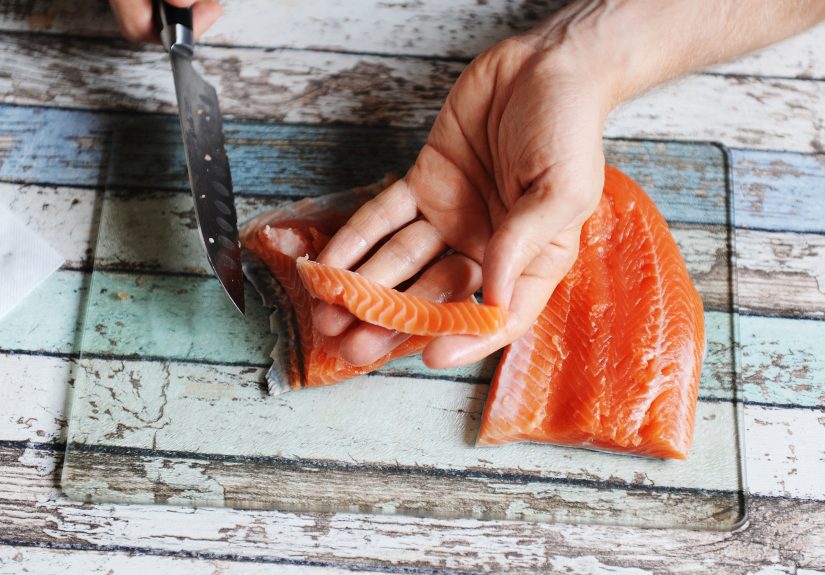
Step 6: Remove pin bones (the “surprise crunch” prevention plan)
Run your fingertips gently along the center line of the fillet. You’ll feel a row of small pin bones.
Use tweezers or clean pliers to pull each bone out in the direction it’s pointing.
Tip: Wipe the tweezers between pulls so they keep a good grip. Also, do this step in good lightingpin bones love drama and shadows.
Step 7: Trim and portion for how you’ll serve it
Sushi prep is easier if you turn your fillet into neat, stable shapes.
For nigiri and rolls: make a “saku block”
Cut the salmon into a rectangular block (often called a saku). This shape gives you consistent slices for nigiri and tidy strips for rolls.
Trim ragged edges and thin belly flaps; save scraps for spicy salmon mix or cooked dishes.
For sashimi: choose the fattier sections
The belly portion is richer and softer; the loin is leaner and cleaner. Mixing both gives your platter variety:
“buttery bites” plus “bright, clean bites.”
Step 8: Chill before slicing (cold fish = clean cuts)
After trimming, chill the salmon for 10–20 minutes. Slightly firmer fish is easier to slice.
If it starts to warm up while you’re working, pause and re-chill it. Sushi is patient; your knife should be too.
Step 9: Slice like a sushi bar (long strokes, minimal sawing)
The #1 slicing mistake is “sawing” back and forth, which tears delicate fish and makes it look fuzzy.
You want long, smooth strokes with a sharp blade.
How to slice salmon for nigiri
- Cut slices about 2.5–3 inches long and 1–1.25 inches wide, depending on your rice size.
- Angle the knife at about 45 degrees and slice in one long motion.
- Aim for slices that drape over the rice, not thick slabs that sit there like a brick.
How to slice salmon for sashimi
- Cut slightly thicker than nigirithink “luxurious bite,” not “paper-thin.”
- Slice across the grain for tenderness.
- Wipe the blade with a damp cloth between cuts to keep edges clean.
How to cut salmon for rolls
- Cut long strips about the length of your nori sheet’s width.
- Keep strips even so every roll bite has salmonnot just the first one.
Step 10: Serve promptly and keep it cold
Once sliced, salmon dries out faster (more surface area). Serve soon after slicing.
If you’re building multiple rolls or a platter, keep slices covered and chilled between batches.
What About Freezing Salmon at Home to Make It “Sushi-Safe”?
Here’s the honest answer: home freezing can be tricky because many home freezers hover around 0°F and may not reliably reach colder targets
needed for parasite destruction. If you’re determined to use freezing as part of your plan, the safest approach is still to buy salmon that
was commercially frozen for raw use.
Public health guidance commonly lists parasite-destruction freezing options such as holding fish at very cold temperatures for set times.
But because temperature accuracy matters, it’s hard to verify at home without specialized equipment.
Translation: if you can’t confidently verify time and temperature, don’t use freezing as your “permission slip” for raw salmon.
Choose a supplier who already handled this step properly.
Common Mistakes (and How to Fix Them Fast)
Mistake: The salmon tastes “fishy”
Fix: Don’t mask it with extra sauce. Fishy flavor usually means the salmon isn’t fresh enough for raw use. Use it cooked instead.
Mistake: The texture is mushy
Fix: Thaw slower and colder next time. Pat very dry. Consider the quick cure to firm it up.
Also make sure your knife is sharpdull knives tear and compress the fish.
Mistake: Your slices look ragged
Fix: Use longer strokes, wipe the blade between cuts, and chill the salmon before slicing.
“Sawing” makes salmon look like it got into a fight with a paper shredder.
Mistake: You found pin bones mid-bite
Fix: Remove pin bones before portioning and run your fingers across the fillet in good light.
This is a “do it once, enjoy forever” step.
Mini FAQ: Quick Answers People Actually Need
Can I use supermarket salmon?
Sometimes, but only if you can confirm it was handled appropriately for raw consumption and kept properly cold.
If you can’t verify, choose cooked salmon sushi. It’s still delicious, and your future self will thank you.
Does curing make raw salmon safe?
No. A quick salt/sugar cure improves texture and flavor, but it does not replace proper sourcing and safe handling.
Is smoked salmon the same as sushi salmon?
Cold-smoked salmon is usually not the same as raw sushi salmon and can carry different food-safety considerations.
Hot-smoked salmon is cooked and works great in rolls, bowls, and “cooked sushi” ideas.
What’s a safer “beginner” option?
Try seared salmon nigiri (quick torch or pan-sear just the outside) or baked salmon rolls.
You get the sushi experience with a bigger safety margin.
Real-World Tips and Experiences: What People Learn After Making Salmon Sushi a Few Times (Extra)
The first time someone makes salmon sushi at home, it’s usually half excitement and half “why does my cutting board suddenly feel like a hospital?”
That’s normal. The learning curve isn’t about fancy techniqueit’s about small habits that add up to better texture, better flavor, and fewer worries.
Here are the most common, experience-based lessons home sushi makers and many cooks share after a few rounds.
Experience #1: The best upgrade isn’t a gadgetit’s a better source.
People often start by hunting for a special label, but the bigger breakthrough is finding a trustworthy fishmonger or supplier who can explain
handling, freezing, and freshness. Once you buy salmon that’s truly meant for raw use, everything else gets easier: the smell is cleaner,
the texture is firmer, and the slices behave. It’s the difference between “I hope this works” and “okay, now we’re cooking… except we’re not cooking.”
Experience #2: Cold salmon slices better, tastes better, and stresses you out less.
Beginners often leave fish on the counter while they set up rice, cut cucumbers, answer a text, and remember they also have a life.
Then the salmon warms, softens, and starts to look ragged when sliced. The fix is simple: work in batches. Prep a small portion, slice it,
plate it, and keep the rest chilled. After a couple of sessions, people start treating the fridge like a “pause button” for sushi prepand it’s a game changer.
Experience #3: Dryness is not the enemyit’s the secret weapon.
New sushi makers worry that patting fish dry will ruin it, but excess surface moisture is what makes salmon slide around and tear under the knife.
Once someone learns to pat the fish dry (and even dry it again after a quick cure), the knife suddenly feels “easier,” and the slices look smoother.
This is also when people realize why sushi chefs keep wiping their knives: clean blade, clean cut.
Experience #4: The “quick cure” becomes a favorite trick.
After a few attempts, many people adopt the short salt-and-sugar curenot because it makes fish “safe,” but because it makes fish amazing.
The salmon firms slightly, tastes more “seasoned like a restaurant,” and becomes more forgiving to slice. It also gives you a consistent result,
especially if you’re working with salmon that’s a bit softer than ideal.
Experience #5: Knife confidence beats knife collecting.
People love to buy new tools. But the real improvement comes from using one sharp knife well: longer strokes, less sawing,
and slicing across the grain. After a few tries, most home cooks stop pressing down hard (which squishes salmon) and start letting the blade glide.
A funny pattern emerges: the better the slicing, the less soy sauce people usebecause the salmon actually tastes good on its own.
Experience #6: Scraps are not scrapsthey’re future snacks.
Trimmings from making a neat “saku block” can become spicy salmon for rolls, salmon hand rolls, or a cooked salmon bowl.
Once people stop trying to make every piece “Instagram perfect,” they enjoy the process more and waste less. Sushi night becomes a flexible menu,
not a single high-pressure performance.
The overall lesson: salmon sushi at home rewards calm, clean, cold prep. If you treat temperature like an ingredient, buy from a supplier you trust,
and slice with patience, you’ll steadily move from “I made sushi!” to “I might never financially recover from how good this is.”
(Don’t worrysalmon is still cheaper than most restaurant omakase.)
Conclusion
Preparing salmon for sushi is equal parts selection, safety, and slicing. Start with salmon from a reputable supplier that can confirm it was handled for raw use,
keep it cold, prep it cleanly, remove skin and pin bones, and slice with long, smooth strokes.
If anything about the fish seems questionableodor, texture, or unclear handlinggo with cooked salmon sushi instead.
You’ll still get an incredible meal, and your confidence will grow with every batch.