Table of Contents >> Show >> Hide
- Why “dogs” in Minecraft are really wolves
- Step 1: Find a wolf in the right biome
- Step 2: Collect bones before you try to make a new best friend
- Step 3: Tame the wolf and learn the signs it worked
- Step 4: Breed two tamed wolves with meat
- Step 5: Raise, protect, and customize your Minecraft dog pack
- Common mistakes players make when taming and breeding dogs in Minecraft
- Frequently asked questions about Minecraft dogs
- Experience: what taming and breeding Minecraft dogs actually feels like
- Conclusion
If you have ever looked at a Minecraft wolf and thought, “Congratulations, you are now my blocky best friend,” you are not alone. In Minecraft, players usually call them dogs once they are tamed, even though the game still treats them as wolves. Either way, they are loyal, surprisingly helpful in a fight, and dangerously good at making you emotionally attached to a creature made of square pixels.
The good news is that learning how to tame and breed a dog in Minecraft is not difficult. The better news is that once you understand the basics, you can build an entire furry security team for your base. This guide walks you through the process in five simple steps, plus the practical tips that stop new players from making classic mistakes like bringing one bone and expecting instant friendship, or trying to breed wolves that are too busy being half-hungry and fully dramatic.
Why “dogs” in Minecraft are really wolves
Before jumping into the steps, it helps to clear up one small but important detail for SEO and for sanity: in Minecraft, wild animals are wolves, but tamed wolves behave like pet dogs. That is why players search for phrases like Minecraft dog taming, how to breed dogs in Minecraft, and how to get a pet dog in Minecraft even though the official mob name is wolf.
Once tamed, your wolf gets a collar, follows commands, helps protect you, and can breed with another tamed wolf to create a puppy. So yes, the title says dog, the game says wolf, and everyone is technically correct. A rare internet miracle.
Step 1: Find a wolf in the right biome
Your first task is locating a wolf in the Overworld. Wolves have long been associated with taiga-style areas, but newer Minecraft updates gave them more coat variations tied to specific biomes. So if your dream is not just “any dog” but a very particular four-legged roommate, location matters.
You can still find the familiar pale wolf in the taiga, but other variants now appear in places like forests, snowy taigas, groves, sparse jungles, wooded badlands, and more. That means wolf hunting is a little more interesting than it used to be. It also means you may accidentally start collecting rare coat colors the way some players collect armor trims or suspiciously large chest rooms.
If you are just trying to tame your first Minecraft dog, do not overthink it. Look for a wolf in any wolf-spawning biome you can reach safely. If you specifically want a rare or unusual companion, plan a biome trip and bring supplies. A snowy wolf that spawns alone in a grove looks great, but it is much less adorable when you realize you forgot food, a bed, and any sense of direction.
Bring a few practical items before you head out: bones, extra food for yourself, a weapon, and a lead or boat if you want to move your new friend more easily later. Nothing says “professional pet owner” like getting lost in the wilderness with a wolf, two porkchops, and pure panic.
Step 2: Collect bones before you try to make a new best friend
To tame a wolf in Minecraft, you need bones. Meat does not tame wolves. It can heal or breed them later, but it will not convince a wild wolf that you are trustworthy. For taming, bones are the whole game.
The most reliable way to get bones is by defeating skeletons. If you have already spent a few nights being pelted with arrows by those rattling little pests, this is your moment for revenge. Bones can also come from loot sources in survival play, but many players simply farm skeletons or collect drops while exploring caves and the surface at night.
Here is the important part: one bone does not guarantee success. Each bone has a chance to tame the wolf, so you may need several. Sometimes the wolf becomes your loyal companion after only one or two bones. Other times it stares at you while casually rejecting a whole stack like a picky restaurant critic. Bring more bones than you think you need.
If you are planning to breed dogs in Minecraft, do not stop at bones. You should also collect meat for the next phase. Raw beef, raw porkchop, raw mutton, rotten flesh, and several other meat items can be useful once the wolves are already tamed. Think of bones as the friendship starter kit and meat as the family expansion pack.
Step 3: Tame the wolf and learn the signs it worked
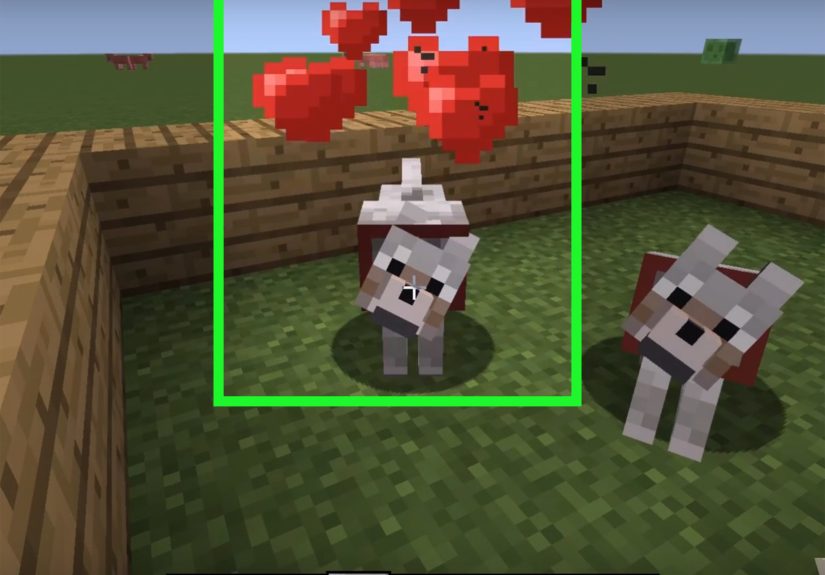
Once you find a wolf, equip a bone and use it on the animal. If taming does not happen, use another bone. Keep going until you see hearts appear. That heart animation is the big moment: the wolf is now tamed.
You will also notice a collar appear around its neck. Traditionally, the collar shows up red by default. That collar is the easiest visual clue that your wild wolf has officially become your Minecraft dog. In Java Edition, a newly tamed wolf will also sit down if it is not swimming, which makes it look very pleased with both itself and your life choices.
After taming, interact with the wolf again to make it sit or stand. This command matters more than many beginners realize. A sitting dog stays put, which is helpful when you are building, mining, or trying not to watch your new pet sprint directly into a bad decision. A standing dog follows you and may join combat, which is useful when you want backup and slightly terrifying when you forget you were only trying to punch a chicken.
Pay attention to the tail, too. In Minecraft, a wolf’s tail position reflects its health. A raised tail means your companion is doing well. A lower tail means it needs healing. This is one of those small details that makes wolves feel more alive than a lot of other passive or neutral mobs in the game.
One warning: do not hit a wolf pack while trying to tame one. Wild wolves can become hostile if attacked, and suddenly your peaceful taming session turns into a very blocky mistake. Approach calmly, use bones, and save the accidental sword swinging for literally almost anything else.
Step 4: Breed two tamed wolves with meat
After taming one wolf, the next step is obvious: get it a friend. To breed dogs in Minecraft, you need two adult tamed wolves. They also need to be healthy enough to enter love mode, so feed them if needed before trying to breed them.
When both wolves are tamed and ready, feed each one meat. This triggers love mode, and a puppy appears shortly after. One of the nicest parts of Minecraft wolf breeding is that the puppy is automatically tamed. You do not need to tame the baby separately, which is excellent because trying to negotiate with a newborn would feel unfair even by Minecraft standards.
Wolves can be bred with a variety of meat items, and this is where the game gets a little funny. They can even breed with items you would never choose for a real pet, such as rotten flesh. Minecraft wolves have cast-iron stomachs and zero concern for your opinions. From a gameplay perspective, that flexibility is useful because it lets you use whatever meat you have available.
After breeding, the parent wolves have a cooldown before they can breed again. So if your plan is to create a huge dog army in ten seconds, Minecraft would like you to slow down and reflect. You can still grow your pack quickly, but it takes a little rhythm: feed, breed, wait, repeat, and avoid losing track of which dog is sitting in the corner like an unpaid intern.
You can also speed up a puppy’s growth by feeding it meat. This is handy if you want a full-sized companion sooner, especially when you are building a wolf pack for exploration or base defense.
Step 5: Raise, protect, and customize your Minecraft dog pack
Taming and breeding are only half the story. If you want your dogs to survive, you need a little management. Minecraft dogs are loyal, but loyalty and survival are not always the same thing. A dog will bravely charge into danger even when the danger is three creepers, a lava pool, and your own questionable judgment.
Give them safe commands
Use the sit command often. Sit dogs when building high platforms, working around lava, or entering tight caves where pathfinding gets weird. Standing dogs are wonderful until they decide that falling off a cliff is part of the team strategy.
Use collars for organization
You can dye a wolf’s collar, which is one of the easiest ways to organize multiple pets. If you have a growing pack, color-coding can save you a lot of confusion. Maybe blue collars are your house dogs, red collars are your travel wolves, and green collars are the dogs you swore you would not bring into the Nether but brought anyway.
Protect them with wolf armor
Modern Minecraft also gives you wolf armor, crafted from armadillo scutes. If you plan to take your dogs on adventures, this is worth the effort. Armor adds protection and makes your pet look far more prepared than most players on their first cave run. It can also be dyed, which means your wolf can be both safer and more fashionable than you are.
Use leads and fenced areas
If you are moving dogs around a base or trying to keep a breeding pair in one place, a lead and a secure fenced area can help. This is especially useful when you are building a kennel or organizing multiple pets. Chaos is fun until your dogs are spread across three biomes and one inexplicably ends up in a boat.
Common mistakes players make when taming and breeding dogs in Minecraft
The first big mistake is trying to tame a wolf with meat. Again, bones for taming, meat for healing and breeding. Mixing that up is basically the Minecraft version of trying to unlock your front door with a sandwich.
The second mistake is trying to breed wolves before they are tamed. Untamed wolves are not interested in starting a family with you as the event planner. They need to be tamed first.
The third mistake is forgetting health. Wolves generally need to be at full health for breeding to work smoothly. If the tails look low or the wolves recently fought something, feed them first. Hungry, injured dogs are not in a romantic mood, and honestly, fair enough.
The fourth mistake is bringing dogs everywhere. Yes, they are useful. Yes, they are adorable. No, they do not need to accompany you into every lava-heavy, cliff-lined, creeper-filled disaster zone you stumble into. Sometimes the best pet care is letting them sit safely at home while you go make terrible decisions alone.
Frequently asked questions about Minecraft dogs
Can you tame a dog in Minecraft with meat?
No. You tame wolves with bones. Meat is used later for healing, breeding, and growing puppies faster.
How many wolves can you tame in Minecraft?
You can tame as many as you want, so long as you have the bones, patience, and emotional capacity to care about square animals more than some real responsibilities.
Why will my wolves not breed?
The usual reasons are simple: they are not both tamed, they are not adults, they are not healthy enough, or they are on breeding cooldown.
What is the difference between a wolf and a dog in Minecraft?
Gameplay-wise, the wild version is a wolf. Once tamed, players usually call it a dog because it behaves like a pet companion.
Experience: what taming and breeding Minecraft dogs actually feels like
One of the most memorable parts of taming a dog in Minecraft is how quickly it changes the tone of your game. Before the first wolf, survival feels like you against the world. After the first wolf, it feels like you and your highly enthusiastic bodyguard against the world. That sounds dramatic, but it is true. Even when a single tamed wolf is not the strongest combat ally in the game, it changes the mood of exploration. You stop wandering alone. You start traveling with a companion that looks goofy, brave, and just a little too willing to pick fights.
The first time many players breed two wolves, there is also a weird little sense of success that goes beyond mechanics. You are not just collecting mobs anymore. You are building a tiny family inside your base. Then the puppy appears, and suddenly your carefully optimized survival world turns into a pet daycare center. You tell yourself the dogs are for defense, but deep down you know at least half of them are there because they look funny sitting in a row by the furnace.
There is also a learning curve that only experience can teach. At first, players tend to take their dogs everywhere. Into caves. Across mountains. Through nighttime forests. Near lava. Near creepers. Near suspicious cliffs with exactly the kind of geometry that makes Minecraft pathfinding do interpretive dance. Then something goes wrong, and you realize that responsible dog ownership in Minecraft means knowing when to leave your companions at home. That lesson arrives fast, usually right after you shout “No, no, no!” at your screen while a dog charges into battle you did not approve.
On the positive side, raising a full pack can make your base feel alive. A few sitting dogs near the front door make a starter house feel less lonely. A kennel with dyed collars gives your world personality. A pair of armored wolves following you through a forest makes even an ordinary supply run feel like an adventure. These are small things, but Minecraft is built on small things. A few blocks become a home. A few wheat seeds become a farm. A few bones become a best friend that follows you across half the map.
That is why the dog-taming loop stays popular year after year. It is simple, but it creates stories. Maybe your first wolf saved you from a skeleton on half a heart. Maybe your breeding pair became the founders of an absurd twenty-dog dynasty. Maybe you traveled to a rare biome just to find the exact coat variant you wanted, then brought it home like it was the final piece of your survival masterpiece. Taming and breeding dogs in Minecraft is not just useful. It is one of the easiest ways to turn a random world into your world, complete with loyal companions, mild chaos, and at least one puppy sitting somewhere it absolutely should not be.
Conclusion
If you want to tame and breed a dog on Minecraft, the formula is straightforward: find a wolf, bring enough bones, tame it, get a second tamed wolf, and use meat to breed them. After that, your job is part trainer, part architect, and part overprotective pet parent. Use collars to organize your dogs, armor to protect them, and the sit command whenever your instincts say, “This situation is about to get stupid.”
That is really the magic of Minecraft dogs. They are simple to get, but they add personality, protection, and a lot of memorable moments to your world. Start with one loyal wolf, and do not be surprised if you end up with a whole pack guarding your base like furry little legends.