Table of Contents >> Show >> Hide
- What Is a Robot Wire Cutter?
- Why Automate Wire Preparation?
- How a Robot Wire Cutter Works
- DIY Robot Wire Cutter vs. Commercial Machine
- Key Features to Look For in an Automatic Wire Cutting Machine
- Where Robot Wire Cutters Are Used
- Quality Matters: Cutting Is Only the First Step
- Common Mistakes When Automating Wire Prep
- How to Implement a Robot Wire Cutter in Your Workflow
- Real-World Example: Small Electronics Kit Production
- Real-World Example: Control Panel Wiring
- Experience Notes: What It Feels Like to Use a Robot Wire Cutter
- Conclusion
Wire prep is one of those jobs that looks harmless until you have 400 identical jumpers to cut, strip, sort, and label. At wire number 37, you feel productive. At wire number 213, you begin negotiating with the universe. At wire number 399, every copper strand looks personally rude. That is exactly where a robot wire cutter earns its tiny mechanical cape.
A robot wire cutter, automatic wire cutting machine, or automated cut-and-strip system helps turn repetitive wire preparation into a controlled, repeatable process. Instead of measuring wire by hand, snipping with diagonal cutters, and hoping your coffee did not affect the last batch, the machine feeds wire from a spool, measures a programmed length, cuts it, and in many systems strips one or both ends. For electronics builders, wire harness manufacturers, control panel shops, robotics teams, repair labs, and small production businesses, that simple change can save hours while improving consistency.
This guide explains how robot wire cutters work, why they matter, what features to look for, and when it makes sense to build one versus buying a commercial wire processing machine. No robot uprising is expected, although your manual wire cutters may feel underappreciated.
What Is a Robot Wire Cutter?
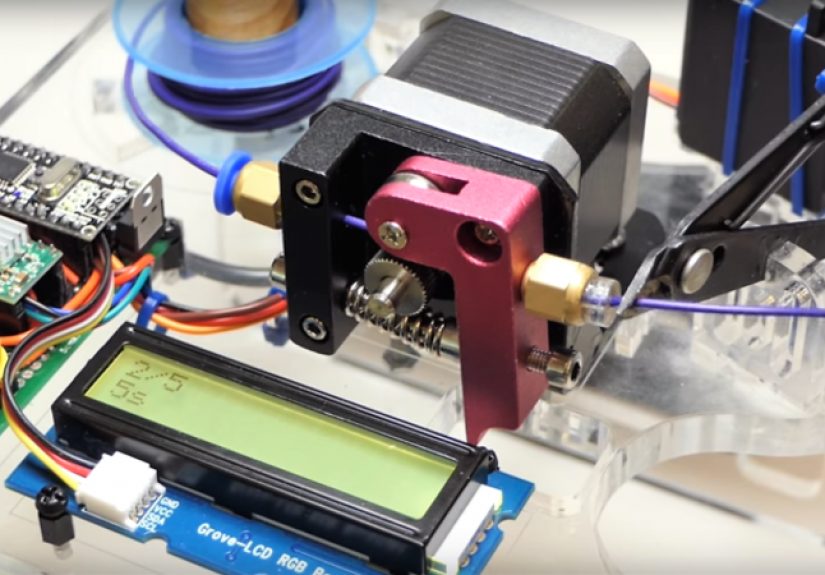
A robot wire cutter is an automated machine designed to feed, measure, and cut wire to a specified length. More advanced versions also strip insulation, batch parts, count pieces, and store cutting programs for repeat jobs. In a simple DIY setup, the machine may use a 3D printer extruder mechanism to feed wire, a stepper motor to control length, and a servo or motor-driven linkage to close a cutter. Commercial machines use purpose-built feed rollers, blade systems, touchscreens, programmable recipes, and optional accessories such as pre-feeders, coilers, labelers, and quality monitoring tools.
The basic goal is beautifully boring: make every piece of wire the same length without forcing a human to repeat the same motion all afternoon. In manufacturing, boring is not an insult. Boring means predictable. Predictable means quality. Quality means fewer mystery failures later when a harness is buried inside a machine and nobody wants to take it apart again.
Why Automate Wire Preparation?
Manual wire prep works fine for one prototype, a weekend repair, or a small hobby project. The problem appears when quantity increases. A product kit, wiring harness, control cabinet, LED assembly, test fixture, or robotics build may require dozens or thousands of wire segments. Each segment needs the right length, clean ends, proper strip length, and reliable handling.
Automation helps in five major ways: speed, repeatability, reduced fatigue, better material control, and easier scaling. A robot wire cutter can process a batch while the operator prepares terminals, checks drawings, organizes bins, or handles another value-added task. Instead of “measure, cut, measure, cut, question life choices,” the workflow becomes “load spool, enter length, enter quantity, press start.” Much more civilized.
Accuracy and Repeatability
Automated wire cutters use controlled feed motion to produce consistent lengths. In DIY machines, this is often done with stepper motors and calibrated rollers. In professional systems, high-torque feed drives, belt feeds, roller feeds, and precision blade mechanisms are common. Consistent wire length matters because even a small error can create slack, tension, routing problems, or connector strain in a finished harness.
Labor Savings
Wire cutting is not usually the most glamorous part of production, but it quietly consumes time. If one wire takes 20 seconds to measure, cut, and place into a bin, 1,000 wires take more than five and a half hours before stripping, crimping, labeling, or inspection. Automation compresses that repetitive labor and lets workers focus on setup, quality checks, assembly, and problem solving.
Cleaner Workflow
A programmed cutter also makes batching easier. You can run 100 red 8-inch leads, then 100 black 8-inch leads, then 50 green 12-inch ground wires. Pair that with labeled trays or bags, and the build table stops looking like a spaghetti convention with copper accents.
How a Robot Wire Cutter Works
Most automated wire cutters follow a similar process. The wire begins on a spool or reel. A feed system pulls or pushes the wire forward. A controller calculates how far the feed motor must move to reach the desired length. A cutting mechanism closes at the correct moment. The finished piece drops into a bin, chute, tray, or collection system. Then the cycle repeats until the programmed quantity is complete.
1. Wire Feeding
The feed mechanism is the heart of the machine. In DIY builds, makers often adapt 3D printer extruders because they are inexpensive, compact, and already designed to push filament with controlled movement. Since small-gauge wire behaves somewhat like flexible filament, the idea works surprisingly well for light-duty applications.
Commercial machines use more robust feed systems. Roller feed designs grip the insulation and move the wire forward. Belt feed systems are gentler on delicate insulation and can be useful for certain cable types. Pre-feeders may be added when the wire spool is heavy or the cable is stiff, because asking a small feed motor to drag a stubborn industrial cable from a reel is like asking a hamster to tow a forklift.
2. Measuring Length
Length is usually controlled by motor movement, encoder feedback, or a combination of both. The operator enters the target length through buttons, an LCD, a touchscreen, or software. The controller converts that value into motor steps or feed distance.
Calibration is essential. If the feed wheel slips, the wire diameter changes, or the roller pressure is wrong, the measured length can drift. Good machines make calibration easy. Great operators verify the first few pieces with a ruler or caliper before running the full batch. Trust the robot, but measure the robot. It has no feelings.
3. Cutting
The cutting mechanism may be a servo-driven hand cutter, a motorized shear, a guillotine blade, rotary blade, pneumatic cutter, or precision blade assembly. The best choice depends on wire gauge, conductor material, insulation type, production volume, and cut quality requirements.
For small electronics wire, a compact blade or modified hand tool may be enough. For heavier cable, battery cable, multi-conductor cable, or tubing, the cutting system must be stronger and more rigid. A weak cutter can crush insulation, deform conductors, or leave ragged ends. That may be acceptable for a quick bench experiment, but it is not acceptable for professional harness work.
4. Stripping
Some robot wire cutters only cut. Others cut and strip. A cut-and-strip machine removes insulation from one or both ends to expose conductor for crimping, soldering, insertion, or testing. Stripping requires careful blade depth because cutting too shallow leaves insulation behind, while cutting too deep nicks or breaks conductor strands.
Advanced machines can store strip lengths, partial strips, full strips, multi-step strips, and different settings for different wire types. This is especially valuable when preparing wires for terminals, ferrules, connectors, and harness assemblies that must meet defined quality expectations.
DIY Robot Wire Cutter vs. Commercial Machine
Should you build a robot wire cutter or buy one? The answer depends on your goals, budget, wire type, production volume, and tolerance for tinkering. A DIY machine is excellent for learning, prototyping, and light-duty repetitive jobs. A commercial automatic wire cutter or cut-and-strip machine is better for production environments where reliability, safety, support, and documented repeatability matter.
When a DIY Robot Wire Cutter Makes Sense
A DIY build makes sense when you need a low-cost solution for small wire, moderate accuracy, and occasional batches. Makers have built functional machines using Arduino or ESP32 controllers, stepper motors, 3D printer extruders, servo-actuated cutters, OLED or LCD screens, and 3D-printed guides. These machines are clever, affordable, and perfect for learning automation fundamentals.
For example, a small electronics shop preparing jumper wires for kits may not need a full industrial machine. A calibrated DIY cutter can save hours and reduce hand fatigue. It also teaches useful lessons about feed pressure, friction, calibration, backlash, blade wear, and why wire has a talent for escaping exactly when you look away.
When to Buy a Commercial Wire Cutter
A commercial machine is the better choice when your wire prep affects customer deliveries, regulated products, high-volume production, or safety-critical assemblies. Professional machines offer better repeatability, stronger feed systems, refined blade geometry, easier programming, machine guarding, documentation, service support, and compatibility with a wider range of wire and cable types.
Commercial systems from established wire processing equipment makers can handle applications such as hook-up wire, multi-conductor cable, coaxial cable, tubing, ribbon cable, high-voltage cable, and heavier-gauge wire. Many are designed for quick changeover, recipe storage, and production environments where downtime is expensive and “the homemade servo bracket cracked again” is not an acceptable shift report.
Key Features to Look For in an Automatic Wire Cutting Machine
Before choosing a machine, define the actual job. Wire automation is not one-size-fits-all. A cutter that works beautifully on 22 AWG PVC hook-up wire may struggle with thick-jacketed cable. A machine built for flexible small wire may not enjoy being introduced to battery cable. Start with the wire, then choose the machine.
Wire Size Range
Check the supported wire gauge or cross-sectional area. Include both your current needs and likely future projects. If your shop handles 26 AWG signal wires today but may add 10 AWG power leads later, that matters. Also consider insulation outside diameter, not just conductor size.
Cut Length and Tolerance
Know your required length tolerance. Prototype jumpers may allow generous variation. Harnesses that must route through tight channels or fit inside compact enclosures need tighter control. Look for specifications on minimum length, maximum length, repeatability, and calibration methods.
Strip Capability
If you only need cut pieces, a cutter may be enough. If the next step is crimping or soldering, a cut-and-strip machine can remove a major bottleneck. Look for adjustable strip length, clean pull-off, insulation slug control, support for partial stripping, and easy blade setup.
User Interface
A friendly interface saves time. Buttons and a simple display are fine for small jobs. Touchscreens and stored programs are useful when operators switch between many wire part numbers. Recipe storage helps prevent mistakes because the machine remembers the correct length and strip settings instead of relying on someone’s handwriting from three Tuesdays ago.
Batching and Counting
Piece counting is a small feature with a big impact. The machine should stop after the programmed quantity and make it easy to run repeat batches. For production, batch separation, sorting bins, or wire collection accessories can make downstream assembly faster.
Safety and Ergonomics
Any machine that cuts wire can also pinch, cut, or snag fingers if used carelessly. Look for guarding, emergency stops, safe operating procedures, and clear maintenance instructions. Automation should reduce repetitive strain and hand injuries, not create a new machine-shaped problem with a power cord.
Where Robot Wire Cutters Are Used
Robot wire cutters are useful anywhere repetitive wire preparation appears. In electronics manufacturing, they help prepare leads for circuit boards, test fixtures, and internal product wiring. In control panel building, they help create consistent wires for terminals, DIN rail components, and industrial enclosures. In automotive, robotics, appliance, medical device, aerospace, and consumer electronics supply chains, wire processing is a foundational step in harness production.
Small businesses also benefit. A seller producing electronics kits can pre-cut wires for customers. A school robotics team can prepare consistent wiring for multiple robots. A repair shop can create repeatable replacement leads. A lab can organize jumper sets for test equipment. Even a hobbyist building a large LED installation can avoid the ancient ritual of measuring wire across the edge of a table while muttering.
Quality Matters: Cutting Is Only the First Step
Automating the cut does not automatically guarantee a perfect harness. Wire prep quality includes length, strip length, conductor condition, insulation condition, terminal fit, crimp quality, pull strength, routing, labeling, and final inspection. Industry standards such as IPC/WHMA-A-620 define acceptance expectations for cable and wire harness assemblies, including materials, methods, tests, and acceptance criteria for interconnections and related assembly activities.
In professional settings, traceability is also important. Manufacturers may need to know which wire lot, terminal, machine, operator, drawing revision, and inspection record belong to a finished harness. Automated equipment supports this by making processes more repeatable and easier to document. When combined with labeling, barcode systems, traveler paperwork, and quality checks, the humble wire cutter becomes part of a much larger production-control system.
Common Mistakes When Automating Wire Prep
Ignoring Wire Behavior
Wire is flexible, but not always cooperative. Soft insulation compresses. Thin wire buckles. Heavy cable resists feeding. Coiled wire keeps memory from the spool. If the feed path is poorly supported, the wire may wander, slip, twist, or jam. Use guides, tubes, rollers, and pre-feeders where needed.
Skipping Calibration
A robot wire cutter is only as accurate as its calibration. Always test the first pieces, measure them, and adjust settings before running a full batch. Recheck after changing wire type, spool tension, feed pressure, or blade setup.
Using Dull Blades
Dull blades create poor cuts, crushed insulation, and inconsistent stripping. Blade maintenance is not exciting, but neither is troubleshooting 500 wires with damaged strands. Keep spare blades or cutting tools available and define a replacement schedule based on use.
Over-Automating Too Soon
Automation should solve a real bottleneck. If you cut ten wires a week, building a complex machine may be more entertainment than efficiency. That is fine if learning is the goal. But if productivity is the goal, calculate the time saved, the scrap reduced, and the labor shifted before investing heavily.
How to Implement a Robot Wire Cutter in Your Workflow
Start by listing your most common wire jobs. Include wire gauge, insulation type, color, cut length, strip length, quantity, and downstream process. Then choose one repeatable job as your pilot batch. Do not begin with the weirdest cable in the building. Automation projects go better when the first test is not a dramatic opera.
Next, set up a clean feed path. Mount the spool so it unwinds smoothly. Add a guide tube or pre-feed support if the wire pulls unevenly. Program the length and quantity. Run five samples. Measure them. Inspect cut quality. If stripping is included, inspect the conductor for nicked strands, leftover insulation, or uneven pull-off.
Once the setup is validated, document it. Record machine settings, blade type, feed pressure, strip length, wire part number, and inspection method. This documentation turns one lucky setup into a repeatable process. The more often the job returns, the more valuable the saved recipe becomes.
Real-World Example: Small Electronics Kit Production
Imagine a small company selling DIY electronics kits. Each kit includes four red wires, four black wires, two yellow signal wires, and one longer ground wire. A batch of 500 kits requires 5,500 wire pieces. Cutting by hand could consume days, and the finished lengths may vary depending on operator fatigue.
With a robot wire cutter, the operator can run each wire color as a separate batch. The machine cuts the correct quantity, the operator verifies samples, and the finished wires go into labeled bins. If the machine also strips the ends, the next assembly step becomes faster. The result is not just speed; it is a cleaner, less chaotic production flow.
Real-World Example: Control Panel Wiring
In control panel shops, wire lengths often repeat across similar enclosures. A wire cutter can prepare sets of conductors for terminal blocks, relays, power supplies, PLC modules, and field connections. When paired with wire marking and organized kitting, automation helps panel builders reduce manual measuring and improve consistency across builds.
The biggest benefit is not always raw speed. Sometimes it is fewer errors. A wire cut too short may need to be remade. A wire cut too long creates clutter. A mislabeled or poorly prepared wire can slow troubleshooting. Consistent wire prep makes the final panel easier to assemble, inspect, and service.
Experience Notes: What It Feels Like to Use a Robot Wire Cutter
The first experience with a robot wire cutter is usually half delight and half suspicion. You load a spool, enter a number, press start, and watch the machine spit out identical wires like a tiny factory with excellent posture. For the first minute, everyone nearby becomes an unofficial quality inspector. Someone measures the first wire. Someone else measures the second. A third person says, “That’s actually pretty good,” using the shocked tone normally reserved for vending machines that accept wrinkled dollar bills.
The biggest practical lesson is that setup matters more than people expect. A wire cutter is not magic; it is controlled motion. If the spool drags, the feed rollers slip. If the wire guide is misaligned, the cutter may clip at an angle. If the blade is dull, the insulation gets mashed instead of sliced. When the setup is right, the machine seems effortless. When the setup is wrong, it becomes a very confident mistake generator.
One useful habit is to create a “first article” routine. Before running a full batch, cut five pieces and measure each one. Check the ends. Tug lightly on stripped insulation slugs if the machine performs stripping. Look for nicked strands, uneven cuts, or insulation that has been stretched. Keep those first samples near the workstation until the batch is complete. They become a quick reference for what acceptable output should look like.
Another experience-based tip is to organize finished wires immediately. Automation can create parts faster than your bench can absorb them. Without bins, labels, or bags, the output becomes a colorful nest of future confusion. Label each batch with wire color, gauge, length, strip length, quantity, project name, and date. It may feel excessive until two similar red wires appear on the bench and nobody remembers which one is 6 inches and which one is 6.5 inches. That half inch will wait patiently until assembly day to cause trouble.
Operators also learn that wire memory is real. Wire coming off a tight spool may curl, twist, or resist feeding straight. A simple guide, a smoother spool holder, or a pre-feed loop can make the machine much happier. For heavier cable, a dedicated pre-feeder may be necessary. The feed motor should control length, not wrestle the spool like it owes money.
For small shops, the emotional benefit is surprisingly large. Repetitive cutting drains attention. Once the robot handles the repetitive part, the operator can focus on crimp quality, connector orientation, documentation, and final assembly. The shop feels calmer. The work feels less like a race against boredom. Even a modest DIY cutter can make a production run feel more professional.
The final lesson is simple: automation does not replace judgment. It rewards preparation. The person who chooses the right settings, checks the output, maintains the blade, and organizes the batch is still the reason the job succeeds. The robot wire cutter just removes the dullest part of the work, which is exactly what a good shop tool should do.
Conclusion
Automating wire prep with a robot wire cutter is one of the most practical upgrades for anyone who repeatedly cuts wire to length. Whether you build a DIY Arduino or ESP32-based cutter for electronics projects or invest in a commercial automatic cut-and-strip machine for production, the benefits are clear: faster batches, better repeatability, less fatigue, cleaner organization, and fewer opportunities for small errors to become big headaches.
The best approach is to match the tool to the job. Hobby projects and small kit runs may only need a simple programmable cutter. Professional harness production, control panel wiring, and customer-facing manufacturing often require industrial machines, documented setup, quality standards, and traceability. Either way, the principle is the same: stop making humans do robot work when a robot can do it more consistently and with far fewer dramatic sighs.
If your bench regularly disappears under piles of half-cut wire, it may be time to automate. Your hands will thank you, your production schedule will relax, and your wire cutters can finally enjoy a semi-retirement with dignity.