Table of Contents >> Show >> Hide
- What Is Developer Mode on Android?
- Why You Might Want to Enable Developer Mode
- How to Enable Developer Mode on Android
- Where to Find Build Number on Popular Android Phones
- How to Access Developer Options After You Enable It
- Most Useful Developer Options for Everyday Users
- Use Developer Mode Carefully
- How to Turn Off Developer Mode on Android
- What to Do If Developer Options Will Not Appear
- Common Mistakes to Avoid
- Final Thoughts
- Experiences Related to Enabling Developer Mode on Android
- SEO Tags
Android phones are packed with features, but some of the most useful ones are tucked behind a little digital curtain called Developer Mode. It sounds dramatic, like you need a hoodie, three monitors, and a suspicious amount of coffee. In reality, turning it on is usually very simple. A few taps in the right place, and suddenly your phone reveals a toolbox full of advanced settings.
So why would a regular person care? Because Developer Mode is not just for app developers. It can help with USB debugging, faster-feeling animations, mock locations, screen recording tutorials, and troubleshooting when your phone and computer refuse to cooperate like two siblings fighting over a charger. The trick is knowing how to enable it safely and what to touch once you get there.
This guide walks you through exactly how to enable Developer Mode on Android, where to find it on major phone brands, what the most useful options do, and which settings you should leave alone unless you truly enjoy chaos. We will also cover how to turn it back off, because sometimes the best advanced setting is the one you can escape from.
What Is Developer Mode on Android?
Developer Mode, often listed as Developer options, is a hidden menu inside Android that unlocks settings for testing, debugging, and fine-tuning system behavior. Google hides it by default so the average user does not accidentally change something obscure and then spend the rest of the afternoon wondering why their phone is acting weird.
Once enabled, this menu can give you access to tools such as USB debugging, wireless debugging, animation controls, touch indicators, mock location settings, and other advanced system tweaks. Some of those are very practical. Some are very nerdy. Some are both, which is honestly Android at its finest.
The important thing to remember is this: turning on Developer Mode is usually safe. Randomly flipping every switch inside it is not. Think of it like opening a utility closet. Opening the door is fine. Running around with the wiring is a different story.
Why You Might Want to Enable Developer Mode
There are plenty of legit reasons to unlock Developer Mode, even if you have never written a line of code in your life.
1. You need USB debugging
This is the big one. If you want your Android phone to communicate properly with a computer for certain advanced tasks, USB debugging is often required. It is commonly used with Android Debug Bridge, file recovery tools, app testing, and some setup or repair workflows.
2. You want your phone to feel faster
Many Android users enable Developer Mode just to reduce animation scales. Lowering those values does not magically upgrade your processor, but it can make your phone feel snappier because windows and transitions move faster. It is the tech equivalent of walking briskly with purpose.
3. You make tutorials or demos
Options like Show taps and Pointer location can make it easier to create tutorials, demos, or troubleshooting videos. If you have ever tried explaining where to tap without visible feedback, you know how quickly that becomes a game of “No, not that button. The other other button.”
4. You need testing or location tools
Some apps, workflows, and developer utilities use features like mock location settings, debugging tools, or default USB configuration changes. These can be helpful for app testing, travel simulations, lab work, and certain specialized troubleshooting tasks.
5. You are setting up wireless debugging
Modern Android versions also support wireless debugging for certain development workflows. If you are tired of the classic cable dance of unplug, replug, flip cable, sigh, repeat, this can be a welcome option.
How to Enable Developer Mode on Android
Here is the standard method that works on most Android phones and tablets.
Step-by-Step Instructions
- Open the Settings app.
- Scroll down and tap About phone or About device.
- Find Build number. On some phones, it may be inside Software information.
- Tap Build number seven times in a row.
- If prompted, enter your PIN, password, or pattern.
- You should see a message confirming that you are now a developer.
- Go back to the main Settings screen, then look for Developer options.
That is it. No app download. No secret code. No chanting. Just seven taps and a little Android magic.
Where to Find Build Number on Popular Android Phones
The biggest source of confusion is not the tapping. It is finding the right menu path, because Android brands love adding their own flavor. Here are the most common routes:
Google Pixel
Go to Settings > About phone > Build number.
Samsung Galaxy
Go to Settings > About phone > Software information > Build number.
Motorola
Go to Settings > About phone or Settings > System > About phone, then tap Build number seven times.
OnePlus
Go to Settings > About phone > Build number.
Other Android phones
If you do not see Build number right away, check these areas:
- About phone
- About device
- System
- Software information
- Android version
If all else fails, use the search bar inside Settings and search for Build number or Developer options. Android sometimes hides things like it is playing a scavenger hunt with your patience.
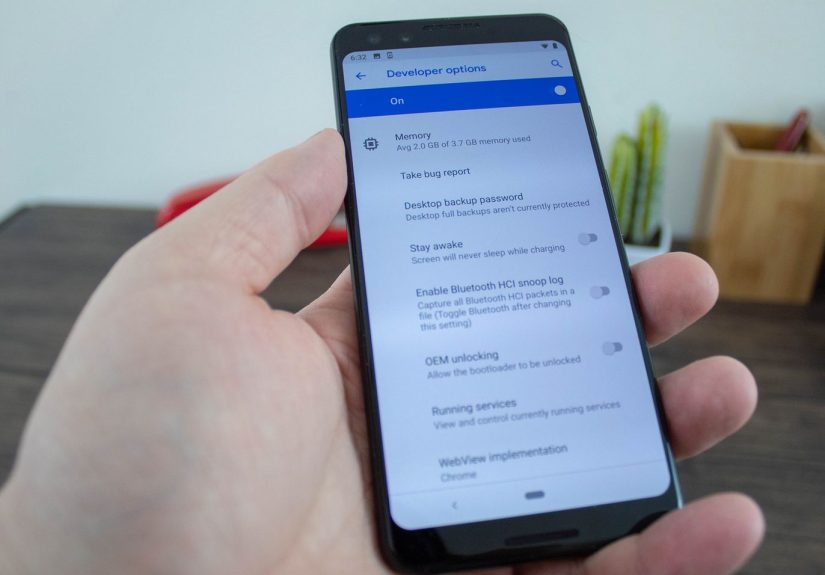
How to Access Developer Options After You Enable It
Once Developer Mode is enabled, return to Settings and look for Developer options. Depending on your device, it may appear:
- Directly on the main Settings screen
- Under System
- Near About phone
- Inside an advanced submenu
Open it, and you will see a long list of settings. Very long. Impressively long. “Maybe I should not touch everything in here” long.
Most Useful Developer Options for Everyday Users
You do not need to explore every setting. These are the options that tend to matter most for regular Android users.
USB Debugging
This allows your phone to communicate with a computer through advanced tools. If you are following instructions for Android troubleshooting, data transfer tools, ADB commands, or app testing, this may be the setting you need. When you connect your phone to a computer, you may also see a prompt asking whether to trust that computer. Only approve devices you actually trust.
Wireless Debugging
On newer Android setups, wireless debugging can let you pair your device to a workstation over Wi-Fi. This is especially useful for development or advanced testing when you do not want a cable attached all the time. For most casual users, this is optional, not essential.
Window Animation Scale and Transition Animation Scale
These settings control how quickly Android animations play. Lowering them to 0.5x can make your phone feel much faster. It is one of the oldest and easiest Android tricks, and it still works surprisingly well. The speed boost is mostly visual, but your thumbs do not care. They just know it feels zippier.
Show Taps
This displays a visible touch indicator whenever you tap the screen. It is fantastic for screen recordings, demonstrations, and helping someone else follow along on your phone.
Stay Awake
This keeps the screen on while the phone is plugged in. It can be useful during setup, presentations, kiosk testing, and long troubleshooting sessions where you do not want the display turning off every thirty seconds like a passive-aggressive roommate.
Select Mock Location App
This is mainly for testing location-based behavior with approved tools. Most everyday users will never need it, but it is handy in development and certain controlled testing environments.
Default USB Configuration
Some Android phones let you choose how the device behaves when plugged into a computer, such as charging only, transferring files, or transferring photos. If you regularly connect your phone to a laptop, this can save a lot of taps.
Use Developer Mode Carefully
Here is the golden rule: enable only the options you understand. Developer Mode contains powerful settings, and some can affect performance, security, connectivity, or app behavior. If you are following a specific guide, stick to the settings that guide mentions and leave the rest alone.
For example, turning on USB debugging for a specific task is common and usually manageable. But casually changing rendering, networking, or bootloader-related settings without understanding them can cause confusion later. This is not because Developer Mode is evil. It is because it assumes the person touching it knows what they are trying to do.
If you are ever unsure, make one change at a time. Test it. Then move on. That approach is slower, but it saves you from the classic “I changed six settings and now I do not know which one made my phone act haunted” scenario.
How to Turn Off Developer Mode on Android
If you are done using it, turning it off is easy.
- Open Settings.
- Tap Developer options.
- Use the main toggle at the top to switch it Off.
On some phones, disabling the main switch turns off most developer settings at once. On others, the menu may still remain visible, but the options themselves are disabled. Either way, if you no longer need USB debugging or other advanced tools, switching the menu off is a smart cleanup step.
What to Do If Developer Options Will Not Appear
If you tapped Build number and nothing useful happened, do not panic. Android is probably being picky, not broken.
Check that you tapped the correct item
Some phones bury Build number under Software information or a similar submenu. Tapping the wrong line seven times is very committed, but sadly ineffective.
Keep tapping until the countdown finishes
Many devices show messages like “You are now 4 steps away from being a developer.” Keep going until you get the final confirmation.
Enter your PIN if prompted
Many phones require your screen lock before enabling Developer options. This is normal and helps prevent casual tampering.
Search Settings
Use the Settings search tool for Build number or Developer options. This is often the fastest fix when menu layouts vary between Android skins.
You may already have it enabled
If Android says you are already a developer, congratulations: your mission is complete, even if the celebration feels anticlimactic. Go back and search for the Developer options menu.
Common Mistakes to Avoid
- Do not enable every setting just because it sounds cool. “Cool” is not a technical standard.
- Do not leave USB debugging on forever if you do not need it. Turn it on for a reason, then turn it off when finished.
- Do not approve unknown computers. If a device asks for debugging authorization and you do not trust it, deny it.
- Do not follow random online advice that tells you to toggle half the menu. Specific problem, specific fix.
- Do not confuse Developer Mode with root access. They are related in some advanced workflows, but they are not the same thing.
Final Thoughts
Enabling Developer Mode on Android is much easier than the name suggests. In most cases, you open Settings, find Build number, tap it seven times, confirm your screen lock, and then head back to find Developer options. That is the whole secret handshake.
For many people, the real value comes after that. USB debugging can help with computer connections, animation tweaks can make a phone feel faster, and options like Show taps can make demos and tutorials much easier. The menu is powerful, but it does not need to be intimidating. Use it with a clear purpose, and it becomes a practical tool instead of a mysterious tech cave.
And if you ever feel overwhelmed by all the switches inside Developer options, remember this comforting truth: Android gave you the key, not a dare.
Experiences Related to Enabling Developer Mode on Android
One of the most common real-world experiences people have with Developer Mode starts with a simple goal that has nothing to do with app development. Someone buys a perfectly decent phone, uses it for six months, and then starts feeling like it has become a little sluggish. Apps open with a pause, menus slide around more dramatically than necessary, and the whole device feels like it had an inspirational speech about slowing down and enjoying life. That person enables Developer Mode, lowers the animation scales to 0.5x, and suddenly the phone feels fresher. Not brand-new, not magical, but definitely more awake. It is often the first moment people realize Developer options can be practical, not just technical.
Another common experience happens when a user tries to connect an Android phone to a computer for something more advanced than charging. Maybe they are moving files, running a recovery tool, testing an app, or following a setup guide that mentions ADB. At first, nothing works. The computer sees the phone, then forgets it. The cable works, except when it absolutely does not. The phone charges proudly while refusing to cooperate in any meaningful way. Then the user enables Developer Mode, turns on USB debugging, confirms the RSA trust prompt, and the connection finally behaves. It feels less like a feature and more like negotiating peace between two tiny governments.
People who create tutorials also tend to have a memorable first experience with Developer Mode. Once they discover Show taps, their videos get easier to follow right away. Instead of saying, “Tap the little icon in the upper-right corner next to the other little icon,” they can simply show the tap point on screen. It sounds small, but it improves clarity a lot. Whether the tutorial is for grandparents, coworkers, students, or a YouTube audience, visible taps turn confusion into confidence.
There is also the cautious user experience, which deserves its own round of applause. This is the person who enables Developer Mode for one exact reason, does that one task, and leaves everything else alone. Honestly, this is elite behavior. They do not wander through obscure options like they are sightseeing in a museum of dangerous switches. They turn on USB debugging, finish the job, and turn it off again. Android loves a disciplined adult.
Then there is the opposite experience, and it is very educational. Someone opens Developer options and decides to “see what happens” by changing three or four random settings with names that sound clever. A day later, they are asking why their phone behaves differently, why the screen stays awake forever, or why animations feel strange. The lesson is usually quick and memorable: Developer Mode is useful, but curiosity works best when paired with restraint. The menu rewards intention, not button-mashing.
Power users often describe Developer Mode as one of the reasons they stick with Android. It gives them access to tools that make the phone feel less like a sealed appliance and more like a flexible device they can shape around their needs. Casual users, meanwhile, often come away with a simpler impression: “I thought that would be hard, but it was actually easy.” Both reactions make sense. Developer Mode can be deeply technical if you need it to be, but it can also be as simple as enabling one setting and moving on with your day.
That balance is what makes the feature so interesting. It supports developers, hobbyists, troubleshooters, content creators, and ordinary users who just want their phone to move a little faster or connect to a computer without drama. For many people, their first experience with Developer Mode starts with curiosity. Their second experience starts with confidence. By the third time, they are the one telling someone else, “Just go to Build number and tap it seven times.”