Table of Contents >> Show >> Hide
- How Housing Works in Animal Crossing: New Horizons
- Step 1: Start the Game and Place Your Tent
- Step 2: Pay Off Your Moving Fees With 5,000 Nook Miles
- Step 3: Talk to Tom Nook About a House
- Step 4: Wait Until the Next Day
- What You Get With Your First House
- How to Pay Off Your 98,000 Bell Loan
- Should You Pay Off the Loan Quickly?
- All Main House Upgrade Stages
- How to Upgrade Your House After the First Loan
- Best Ways to Earn Bells for House Upgrades
- How Home Storage Changes the Game
- Can You Move Your House Later?
- How Exterior Customization Works
- What About Happy Home Paradise?
- Beginner Mistakes to Avoid When Getting a House
- Practical Example: A Simple First-Day House Plan
- Extra Experience: What Getting a House Feels Like in Animal Crossing: New Horizons
- Conclusion
When you first arrive in Animal Crossing: New Horizons, you are not handed a mansion, a welcome basket, and a dramatic HGTV-style reveal. You get a tent. A humble, slightly suspicious tent. It has enough room for a bed, a radio, maybe one decorative item, and your growing realization that Tom Nook has somehow turned island camping into a mortgage pipeline.
The good news is that getting a real house in Animal Crossing: New Horizons is one of the first major upgrades you can unlock. The even better news is that it is not difficult. You do not need rare fish, golden tools, a five-star island, or a perfectly symmetrical flower garden that makes your neighbors cry with admiration. You mainly need to pay off your first moving fee with Nook Miles, talk to Tom Nook, accept your first home loan, and wait until the next day.
This guide explains exactly how to get a house in Animal Crossing: New Horizons, how the loan system works, how to earn Nook Miles quickly, what changes when your tent becomes a home, and how to keep expanding until your tiny island shelter becomes a full-blown dream house. Bring your shovel, your fishing rod, and your emotional readiness for raccoon capitalism.
How Housing Works in Animal Crossing: New Horizons
In Animal Crossing: New Horizons, every player begins life on the island in a tent. This is part of the game’s slow, cozy progression. Your island starts simple: a tent, a few villagers, Resident Services in tent form, and a lot of weeds pretending to be landscaping. As you complete basic tasks, earn Nook Miles, and talk to Tom Nook, you gradually unlock better tools, more buildings, and eventually your own house.
Your house is more than a cosmetic upgrade. It gives you more interior space, unlocks home storage, allows wall-mounted items, and opens the door to future expansions. Once you start upgrading, your home can gain larger rooms, side rooms, an upstairs floor, a basement, exterior customization, and much more storage. In other words, the tent is your starter pack. The house is where the real island life begins.
Step 1: Start the Game and Place Your Tent
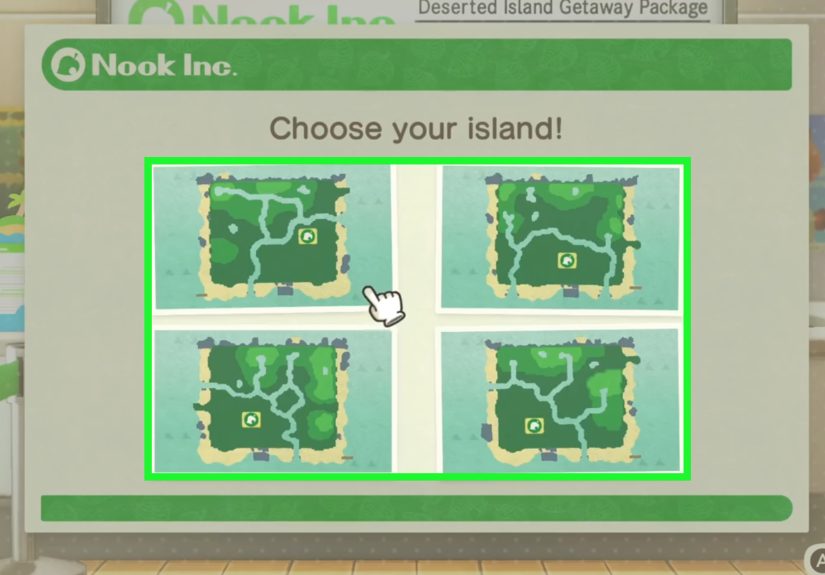
Before you can get a house, you need to settle into your island. At the beginning of the game, Timmy and Tommy help you choose your island layout, and Tom Nook guides you through the arrival process. You will pick a spot for your tent, help your two starting villagers place theirs, gather basic materials, and participate in the opening campfire event.
Do not stress too much about where you put your tent. Later in the game, after Resident Services upgrades from a tent into a proper building, you can relocate your house for a fee. For now, choose a spot you like. Many beginners place their tent near Resident Services because it makes early errands easier. Others choose a beachside location for maximum “I have abandoned society and become a coconut person” energy.
Step 2: Pay Off Your Moving Fees With 5,000 Nook Miles
Your first big goal is paying Tom Nook’s initial moving fee. Instead of Bells, the game asks for 5,000 Nook Miles. Nook Miles are earned by completing island activities, especially beginner-friendly tasks such as catching bugs, catching fish, pulling weeds, collecting shells, talking to villagers, taking photos, crafting tools, and updating your passport.
This early fee is important because paying it unlocks the option to upgrade from a tent to a house. Until you settle that first 5,000-mile moving cost, Tom Nook will not offer the home loan. So yes, your first step toward homeownership is doing a bunch of tiny island chores. Very realistic, honestly, except in real life nobody gives you mortgage credit for catching a sea bass.
Fast Ways to Earn 5,000 Nook Miles
You can earn the first 5,000 Nook Miles surprisingly quickly if you focus on easy achievements. Check the Nook Miles app on your NookPhone often and look for simple tasks that are already close to completion. Early goals usually reward you for doing things you would naturally do anyway, such as catching several fish, catching bugs, selling items, placing furniture outside, chopping wood, picking fruit, or using your camera.
A smart beginner routine looks like this: shake trees for branches, craft tools, collect shells from the beach, fish in rivers and the ocean, catch bugs near flowers and trees, pull weeds, and sell extra items. Talk to your villagers, visit Resident Services, and interact with your NookPhone apps. Many players can pay off the moving fee on the first or second real-world day if they actively complete Nook Miles goals.
Step 3: Talk to Tom Nook About a House
After you pay the 5,000 Nook Miles moving fee, speak to Tom Nook inside Resident Services. He will congratulate you in the calm tone of someone who is about to offer you more debt. Choose the option related to your home or ask about upgrading your living situation. Tom Nook will offer to build you a proper house.
The first home upgrade is not paid upfront. Instead, you accept a loan of 98,000 Bells. This is the first real Bell-based home loan in Animal Crossing: New Horizons. Once you accept the loan, construction begins, and your house will be ready the next day after the daily reset. You do not need to pay the 98,000 Bells before the house appears. You only need to accept the loan.
Step 4: Wait Until the Next Day
Animal Crossing: New Horizons runs on real time, so many upgrades take until the next day to complete. After you accept your first home loan, your tent will become a house the following morning. The game’s daily reset happens at 5 a.m., so if you accept the loan late at night, your new house should appear after the next daily cycle begins.
When you step outside the next day, your tent will be gone, replaced by an actual house. Congratulations: you are now an island homeowner. Please celebrate responsibly by rearranging your furniture twelve times and then deciding everything looked better the first way.
What You Get With Your First House
The first house upgrade gives you a single larger room instead of the tiny tent interior. It also unlocks home storage, which is one of the most useful features in the entire game. Storage lets you put away furniture, clothing, crafting materials, wallpaper, flooring, tools, and other items instead of carrying everything in your pockets like a chaotic raccoon goblin.
You also gain the ability to hang certain items on the walls. This makes decorating much more flexible. Instead of placing everything on the floor, you can add wall clocks, shelves, posters, mounted fish models, art, and other decorations. Your home starts to feel less like emergency lodging and more like a personal space.
How to Pay Off Your 98,000 Bell Loan
Once your house is built, you can repay the 98,000 Bell loan through the ABD machine inside Resident Services. You do not have to pay it all at once. You can deposit small amounts whenever you like. There is no interest, no deadline, and no punishment for taking your time. Tom Nook may be a business mastermind, but at least he is not charging late fees while you sell pears for survival.
To earn Bells early, sell fish, bugs, shells, fruit, fossils you do not need, and crafted items. Native fruit is useful, but non-native fruit sells for more, so visiting mystery islands with Nook Miles Tickets can help you find extra resources. You can also plant money trees, sell hot items at Nook’s Cranny once the shop is built, and save valuable bugs or fish for special visitors like Flick and C.J. if you are willing to wait.
Should You Pay Off the Loan Quickly?
Yes, paying off your loan quickly is usually worth it. The faster you repay a home loan, the faster you can request the next upgrade. House upgrades are tied to progression, storage, and decorating freedom. If you plan to play regularly, expanding your house makes nearly everything easier.
That said, there is no need to panic. Animal Crossing is not a game about speedrunning adulthood. If you want to spend a week fishing, planting flowers, and refusing to financially engage with Tom Nook, the game allows it. Your loan will politely sit there, waiting, like a very patient raccoon-shaped spreadsheet.
All Main House Upgrade Stages
After your first house is built, Tom Nook will offer more upgrades whenever you pay off the current loan. Each upgrade increases your living space, adds rooms, expands storage, or unlocks new customization options. The main house progression generally follows this path:
- Tent: Your starting shelter, paid off with 5,000 Nook Miles.
- First house: Costs 98,000 Bells and unlocks storage.
- Main room expansion: Makes the central room larger.
- Back room: Adds a room at the rear of the house.
- Left room: Adds another side room and unlocks more exterior options.
- Right room: Adds a third side room and more customization.
- Second floor: Gives you a large upstairs room.
- Basement: Adds the final major interior room.
By the time your house is fully expanded, you can create themed spaces such as a bedroom, kitchen, bathroom, study, arcade, music studio, greenhouse room, creepy basement, or “room where I display every gyroid because I have lost control of my life.” The game will not judge you. The Happy Home Academy might, but politely.
How to Upgrade Your House After the First Loan
The process stays simple. Pay off your current loan through the ABD, talk to Tom Nook, choose the home expansion option, accept the next loan, and wait until the next day. The upgrade will be completed after the daily reset. You can repeat this cycle until your house reaches its maximum size.
Each upgrade becomes more expensive, so your Bell-making strategy matters more as you progress. Early fish and bugs help, but later upgrades may require better income methods. Many players use turnips, money trees, high-value sea creatures, rare fish, crafted hot items, fruit orchards, and resource farming to keep the Bell machine moving.
Best Ways to Earn Bells for House Upgrades
Sell Fish, Bugs, and Sea Creatures
Fishing and bug catching are reliable early-game income sources. Some creatures sell for far more than others, especially rare seasonal catches. Diving for sea creatures can also be profitable once you unlock a wetsuit. Keep an eye out for high-value catches and consider saving certain bugs and fish for Flick or C.J., who pay more than the regular shop price.
Use Money Trees
Every day, your island can have a glowing spot on the ground. Dig it up to find Bells, then bury Bells in the same glowing hole to grow a money tree. Many players bury 10,000 Bells because it is a safe and easy amount. A few days later, the tree grows Bell bags. It is not exactly Wall Street, but it is much cuter and involves fewer suits.
Sell Hot Items
Once Nook’s Cranny is open, the shop offers hot items that sell for double their normal crafted value. If the hot item uses common materials like wood, clay, or iron nuggets, crafting and selling it can be a strong money-maker. Check the sign outside the shop or ask inside each day.
Visit Mystery Islands
Nook Miles Tickets let you travel to mystery islands where you can gather fruit, wood, flowers, fish, bugs, rocks, and sometimes special resources. These trips are useful for earning Bells and finding non-native fruit. Bring tools, empty your pockets before leaving, and return with valuable items.
Try the Stalk Market Carefully
Daisy Mae sells turnips on Sunday mornings, and Nook’s Cranny buys them throughout the week at changing prices. Buying low and selling high can make you rich, but prices can also crash. Turnips spoil after a week, so only invest what you are comfortable risking. Your future basement does not need to be funded by vegetable trauma.
How Home Storage Changes the Game
One of the biggest reasons to get a house quickly is storage. In the tent phase, your pockets fill up constantly. You catch two fish, pick up three shells, grab some weeds, and suddenly your inventory looks like a garage sale exploded. A house gives you storage space so you can organize items and keep important materials for later crafting.
As you upgrade your house, your storage capacity increases. This becomes essential for players who collect furniture sets, clothing, seasonal items, DIY materials, wallpapers, flooring, rugs, fossils, and event rewards. Without storage, you may end up covering your island in random objects “temporarily,” which in Animal Crossing means “until you rediscover them three months later behind a tree.”
Can You Move Your House Later?
Yes. Once Resident Services upgrades into a building, you can talk to Tom Nook about infrastructure and relocation. Moving your house lets you redesign your island layout without restarting the game. This is helpful if you originally placed your home somewhere convenient but later decide you want a cliffside cabin, beach bungalow, forest cottage, or dramatic entrance surrounded by waterfalls.
Because relocation becomes available later, beginners should not worry too much about perfect placement. Choose a practical spot at the start, then move your house when your island design vision becomes clearer. Most players change their minds anyway. Your first island plan may be “natural forest paradise,” and your final island may somehow become “neon sushi moon kingdom.” This is normal.
How Exterior Customization Works
As your house expands, you unlock more exterior customization options. Depending on your upgrade stage, you can change features like roof color, door style, siding, mailbox design, and overall exterior look. These options help your house match your island theme.
For example, a cottagecore island may use warm roof colors, wooden doors, and natural tones. A tropical resort island may look better with bright colors and beachy details. A spooky island might lean into dark siding, moody colors, and a mailbox that looks like it receives letters from ghosts. The house exterior becomes part of your island storytelling.
What About Happy Home Paradise?
The Happy Home Paradise DLC is separate from getting your own house, but it connects beautifully with home design. In the DLC, you work with Paradise Planning to design vacation homes for villagers and special characters. It gives you more decorating practice, more creative freedom, and eventually more design features that can influence how you decorate your own island home.
You do not need the DLC to get a house in Animal Crossing: New Horizons. Your main home is part of the base game. However, if your favorite part of getting a house is decorating every inch until your Nintendo Switch fan starts whispering, the DLC adds a lot of value.
Beginner Mistakes to Avoid When Getting a House
The most common mistake is not checking the Nook Miles app often. Many new players wander around doing useful tasks but forget to claim completed rewards. Open the app frequently and collect those Miles. Another mistake is assuming you must pay 98,000 Bells before the house is built. You only need to accept the loan; repayment comes after construction.
Players also sometimes sell everything too quickly. While selling items is great for early Bells, keep some wood, stone, clay, iron nuggets, and tree branches for crafting. You will need materials for tools, furniture, buildings, and island projects. A good rule is to sell common extras but store useful crafting materials once you have a house.
Practical Example: A Simple First-Day House Plan
Here is a realistic beginner plan. On your first day, place your tent near Resident Services. Gather branches and stones, craft basic tools, catch fish and bugs, pull weeds, collect shells, talk to villagers, and complete easy Nook Miles goals. Claim rewards often. Once you reach 5,000 Nook Miles, pay your moving fee to Tom Nook.
Next, talk to Tom Nook again and accept the 98,000 Bell home loan. You can keep playing, collecting resources, and earning Bells, but your house will not appear until the next day. When it does, use storage immediately. Put away materials, decorate your first room, and start saving Bells for the next upgrade. This simple loop takes you from “camping raccoon customer” to “respectable island homeowner with questionable wallpaper choices.”
Extra Experience: What Getting a House Feels Like in Animal Crossing: New Horizons
Getting your first house in Animal Crossing: New Horizons feels bigger than the game makes it sound. On paper, it is just an upgrade: pay 5,000 Nook Miles, accept a 98,000 Bell loan, wait one day, receive house. In practice, it changes the rhythm of your island life. The tent phase is charming, but it is also cramped. You are constantly juggling items, dropping random furniture outside, and pretending that a sleeping bag beside a lantern is a design choice rather than a cry for help.
The first morning you walk out and see an actual house, the island feels more permanent. Suddenly your character is not just visiting. They live there. The house gives you a reason to collect furniture, experiment with wallpaper, and think about what kind of island personality you want. Are you building a cozy cottage? A sleek modern home? A mermaid-themed palace? A suspicious basement full of turnips? The game says yes to all of it.
One of the best experiences after getting a house is discovering how useful storage is. New players often underestimate it. Before storage, every trip becomes an inventory crisis. You want to catch that butterfly, but your pockets are full. You want to pick up iron nuggets, but you are carrying three clumps of weeds, a boot, a sea bass, and a chair you found in a tree. Once storage unlocks, the game immediately becomes smoother. You can save materials, organize furniture, and stop using the ground as a filing cabinet.
Decorating the first room is also surprisingly satisfying. Even if you only have a basic bed, a wooden table, a radio, and one plant, it feels like progress. Over time, that plain room becomes a snapshot of your island journey. Maybe you display your first rare fish model, hang a villager photo, or create a little reading corner. The house becomes a memory box as much as a building.
Another fun part is the emotional comedy of Tom Nook’s loans. The game presents debt in the gentlest possible way. There is no interest, no pressure, and no deadline. Tom Nook simply waits behind his desk, smiling like a furry banker with unlimited patience. This makes the house upgrade system feel rewarding instead of stressful. You can grind Bells for three hours or ignore the loan while you catch butterflies and rearrange flowers. Both are valid island lifestyles.
For many players, the first house is the moment Animal Crossing: New Horizons truly opens up. It gives structure to your goals without forcing you to rush. You start thinking beyond survival: where should the house go, what should the main room look like, which furniture sets should you collect, and how much storage is enough? The answer to the last question is always “more.” No matter how much storage you have, you will fill it with seasonal items, duplicate chairs, crafting materials, and clothing you swear you might wear someday.
The best advice is to enjoy each stage. Do not rush so hard that you miss the charm of the early house. The small first room has its own magic. It reminds you of when the island was new, the weeds were everywhere, and every balloon present felt like destiny. Upgrade when you can, earn Bells at your own pace, and decorate in a way that makes you smile. In Animal Crossing, a house is not just a place to store furniture. It is your island story, one awkward loan payment at a time.
Conclusion
Getting a house in Animal Crossing: New Horizons is simple, but it is one of the most important early milestones in the game. Start by earning 5,000 Nook Miles, pay off your moving fee, talk to Tom Nook, accept the 98,000 Bell loan, and wait until the next day. Your new house unlocks storage, wall decorating, more space, and the long upgrade path toward a fully expanded home.
The key is to treat the process as part of the fun. Catch fish, collect shells, complete Nook Miles goals, sell useful items, and build your island life step by step. Your first house may be small, but it is the foundation for everything that comes next: bigger rooms, better storage, creative decorating, and a home that slowly becomes unmistakably yours.
Note: This article is fully rewritten in original language and synthesized from current gameplay information, official Nintendo materials, and reputable U.S.-focused gaming guides. No source links or citation placeholders are included in the publishable HTML.