Table of Contents >> Show >> Hide
- Why a Tomato Cage Makes a Great Side Table Base
- Materials and Tools
- Step-by-Step: Tomato Cage Side Table DIY
- Step 1: Pick the Right Cage and Decide Your Table Height
- Step 2: Cut and Tame the Sharp Stuff
- Step 3: Check Stability (Before You Paint)
- Step 4: Prep the Metal for Paint That Actually Sticks
- Step 5: Prime and Paint the Base
- Step 6: Make (or Choose) Your Round Wood Tabletop
- Step 7: Attach the Top Securely (No Wobble Allowed)
- Step 8: Final Touches (The “Looks Expensive” Phase)
- Design Variations That Make It Look Custom
- Safety and “Don’t-Hate-Yourself-Later” Tips
- Wrap-Up: A Side Table With Garden-Glow-Up Energy
- Real-World Experiences and Lessons (So Yours Turns Out Better)
Somewhere in your yard (or the dark corner of your garage where garden stuff goes to retire), there’s probably a
tomato cage that’s seen better summers. Maybe it’s a little bent. Maybe it’s missing a ring. Maybe it’s been
“temporarily” leaning against the fence since 2019. Perfect. Because today, that humble wire plant cage is getting a
glow-up into a surprisingly stylish tomato cage side table DIY you’ll actually want in your living roomor on
your porch where it can silently judge your neighbors’ plastic patio chairs.
This project is budget-friendly, beginner-friendly, and doesn’t require advanced woodworking. The magic is in a few
smart choices: picking the right cage size, making the base stable, attaching a tabletop that won’t wobble, and
giving the metal a finish that looks intentional (not “accidentally abandoned in the rain”). Let’s turn garden
leftovers into a cute, functional DIY side table with real design vibes.
Why a Tomato Cage Makes a Great Side Table Base
Tomato cages are basically pre-made sculptural bases: lightweight, airy, and already shaped like modern wire-frame
furniture. Flip one upside down and you get a wider stance, which helps stability. Add a round top, and suddenly you
have a table that looks like it came from a boutique… if that boutique had a produce section.
Bonus points: this is an upcycled garden supplies project that keeps metal out of the trash, costs less than
most “accent tables,” and is easy to customize. Want modern? Go matte black. Want cottagecore? Go creamy white with a
wood slice top. Want “I found this in a fancy hotel lobby”? Try a faux marble or stone-look top.
Materials and Tools
Materials
- Tomato cage (wire or metal; sturdier is better)
- Round tabletop (about 14–20 inches wide): plywood circle, pine round, butcher-block round, or a thick wood slice
- Spray primer + spray paint (metal-friendly; choose indoor/outdoor if it’ll live outside)
- Sandpaper or sanding sponge (for scuffing the metal and smoothing the wood)
- Degreaser or rubbing alcohol + clean rags
- Small metal brackets/straps (or a mounting plate approach) for attaching the top
- Screws (short enough not to pop through the tabletopmeasure twice, panic never)
- Optional: rubber end caps/felt pads for the “legs,” wood sealer (polyurethane or spar urethane), epoxy for extra hold
Tools
- Wire cutters or bolt cutters (depending on cage thickness)
- Drill/driver + drill bits
- Gloves and eye protection (wire ends can be sharpno heroic sacrifice required)
- Measuring tape and pencil
Step-by-Step: Tomato Cage Side Table DIY
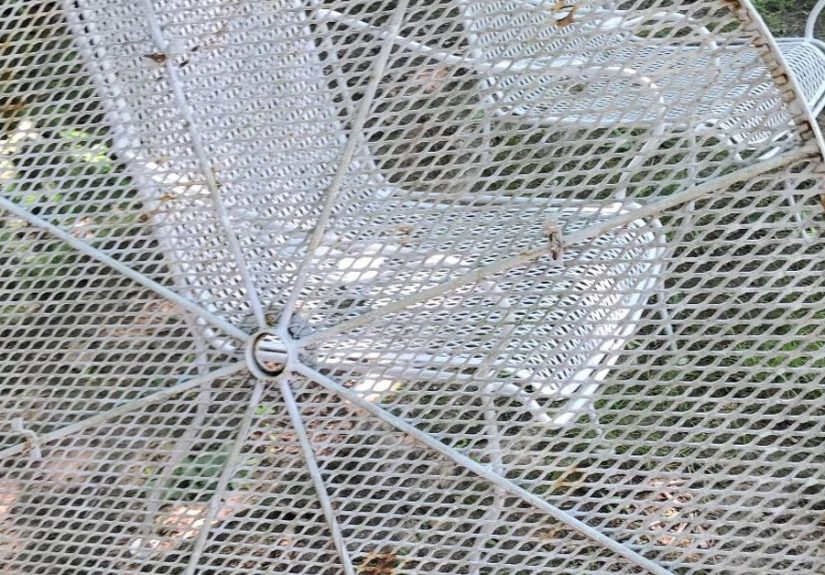
Step 1: Pick the Right Cage and Decide Your Table Height
Most side tables land around 18–24 inches tall. Tomato cages are often much taller, so you’ll likely trim.
Flip the cage upside down and stand it where you plan to use it. If the cage feels too tall, mark where you want to
cut. A good rule: keep enough of the “legs” so the base stays wide and stable, especially if your cage is on the
thinner side.
Step 2: Cut and Tame the Sharp Stuff
Put on gloves and eye protection. Use wire cutters/bolt cutters to trim the legs to your marked height. If the ends
are jagged, file them or bend them inward with pliers. For a cleaner finish (and happier floors), add rubber caps or
felt pads to the ends. This also helps prevent slipping, which is great because side tables shouldn’t do surprise
interpretive dance when you set down a drink.
Step 3: Check Stability (Before You Paint)
Set the cage on a flat surface and press gently from different angles. If it wobbles, adjust by bending legs
slightly until it sits evenly. If the cage feels flimsy, you can add a simple brace: twist wire around key joints or
use small metal ties to stiffen the frame. This “test-fit first” step saves you from painting a table base that later
behaves like a newborn deer.
Step 4: Prep the Metal for Paint That Actually Sticks
Paint loves clean, slightly rough surfaces. Wipe the cage down to remove dirt and oils, then scuff-sand it lightly.
If there’s rust, sand it down as much as possible so you’re painting stable metalnot flaky corrosion. Let it dry
fully. This is the difference between a finish that lasts and a finish that chips the first time someone looks at it
with judgment.
Step 5: Prime and Paint the Base
Spray primer first (especially if your cage is bare metal or previously rusty). Use light coats, keeping the can
moving. After it dries, spray paint in thin layers until coverage looks even. Let it cure fully before assembly.
Matte black, satin white, warm bronze, soft sagepick a color that matches your space. This is where your
tomato cage table stops looking like garden equipment and starts looking like decor.
Step 6: Make (or Choose) Your Round Wood Tabletop
If you’re cutting a plywood circle, sand the edges smooth. If you bought a pre-cut round, still sand lightly for a
clean finish. For an indoor table, a clear polyurethane is great. For outdoor use, choose a weather-resistant finish
and seal the edges well (edges and end grain soak up moisture like a sponge with a grudge). You can stain it, paint
it, or leave it naturaljust protect it so your table doesn’t become “rustic” in the sad way.
Step 7: Attach the Top Securely (No Wobble Allowed)
The simplest method is using metal brackets/straps: position the tabletop on the inverted cage, then attach
brackets from the underside of the top down to the cage’s upper ring. Pre-drill pilot holes in the wood to avoid
splitting, and use screws short enough not to poke through. If you want extra security, add a small dab of epoxy
where bracket meets metal. Aim for at least 3–4 attachment points spaced evenly around the circle.
Step 8: Final Touches (The “Looks Expensive” Phase)
Add felt pads under the legs, touch up paint where needed, and give the whole piece a gentle shake test. If it’s
living outdoors, consider a clear protective topcoat on the metal (as long as it’s compatible with your paint).
Finally, style it: a small lamp, a stack of books, a plant, a coaster that says “I’m hydrated,” and you’re done.
Design Variations That Make It Look Custom
Go Modern Minimal
Choose a thin, clean wood round (or paint the top a solid color), and spray the base matte black. Keep the styling
simple: one sculptural vase, one book, one candle. Pretend you meant to do it this way all along.
Try a Faux Marble or Tile Top
Want a “stone” look without stone weight? Use a round board and apply a marble-look finish (paint technique or
adhesive film), then seal it. Or use a round tile mosaic board if you’re feeling fancy. Pair with a gold or brass
painted base for instant glam.
Make It Outdoor-Ready
Use exterior-rated paint, and seal the top with an outdoor finish. Add rubber feet to protect decking and help keep
the base from sitting in puddles. Your outdoor side table will thank you by not falling apart mid-summer.
Safety and “Don’t-Hate-Yourself-Later” Tips
- Mind the sharp ends: cut wire can be razor-ish. File, bend, or cap the ends.
- Stability matters: if your cage is thin, keep the tabletop smaller and lighter to prevent tipping.
- Respect weight limits: this is great for drinks, books, and decornot for a 40-pound aquarium or your cousin who “just needs to sit for a second.”
- Let finishes cure: paint that feels dry can still be soft. Give it time so it won’t scratch easily.
Wrap-Up: A Side Table With Garden-Glow-Up Energy
A tomato cage side table DIY is the rare project that’s quick, affordable, and genuinely charming. With solid
prep, a stable base, and a properly attached round wood tabletop, you’ll end up with a piece that looks intentional,
not improvised. And the best part? Every time someone compliments it, you get to say, “Thanks. It used to hold
tomatoes.” Then smile like you just won a tiny, stylish trophy.
Real-World Experiences and Lessons (So Yours Turns Out Better)
People love this project because it’s forgivinguntil it isn’t. The most common “experience-based” lesson is that
not all tomato cages are created equal. Some are thick, welded, and sturdy; others are thin wire that can bend
if you stare at it too hard. If your cage feels lightweight, treat it like a delicate accent base: keep the tabletop
smaller (think 14–16 inches), keep the styling light, and use more attachment points. If you’re aiming for a bigger
top (18–20 inches), start with a heavier cage or reinforce the frame so it doesn’t twist when you move the table.
Another repeated “wish I’d done that first” moment: stability testing before paint. Many DIYers assemble, paint,
admire, and then realize the table rocks like a baby cradle. Metal can be adjusted, but it’s easier before you’ve
applied a perfect finish. Do the flat-surface test early, and don’t be afraid to gently bend legs until everything
sits evenly. Adding rubber feet or felt pads at the end can also fix tiny wobbles and protect floorsespecially if
you’re using this as a living room side table.
Paint experiences are where the drama lives. The “it peeled!” stories usually come down to skipping prep. Smooth
metal needs scuffing, and any dirt or oils can sabotage adhesion. A quick wipe-down and a light sanding step feels
boring, but it’s the difference between a table that stays pretty and a table that sheds paint like a snake with
commitment issues. Primer is another common upgrade: even if your spray paint claims it has primer, many makers still
get better durability with a dedicated primer coatespecially on bare metal or anything with surface rust.
Tabletop attachment is the other place experience really matters. The most successful builds use multiple connection
points (not just two screws and optimism). Brackets spaced evenly keep the top from shifting and prevent that slow,
annoying twist over time. Pre-drilling pilot holes is also worth the extra minute because wood can split when screws
go in too aggressively. If you want the table to feel more “solid,” people often add a thin secondary wood disk
underneath the tabletop (like a hidden reinforcement plate) so brackets have more surface to grab.
Finally, styling experiences: a tomato cage base looks best when you lean into its airy shape. If your room is heavy
with chunky furniture, this table adds visual lightness. If your space is already minimal, it becomes a subtle design
detail instead of a loud statement. One practical tip that shows up again and again: use coasters. No matter how
well you sealed the wood, condensation is relentless. And if you’re putting this outside, treat the tabletop edges
like a VIPseal them carefully. That’s the spot water tries to sneak in first.
The big takeaway from real builds is simple: the cutest tomato cage side tables aren’t complicatedthey’re just
thoughtful. A stable base, good prep, enough brackets, and a finish that matches the space. Do that, and your old
garden cage becomes the kind of upcycled project people ask you to make for them… which is flattering until you
realize you’ve become the neighborhood’s unofficial tomato cage furniture dealer.