Table of Contents >> Show >> Hide
- Why Threading a Kenmore 385 Correctly Matters
- First, Know Which 385 Bobbin System You Have
- Before You Thread: Set the Machine Up the Right Way
- How to Thread the Upper Thread on a 385 Kenmore Sewing Machine
- How to Wind the Bobbin on a Kenmore 385
- How to Insert the Bobbin: Front-Loading 385 Models
- How to Insert the Bobbin: Drop-In 385 Models
- How to Pick Up the Bobbin Thread
- Quick Threading Checklist for Better Stitches
- Common Threading Mistakes on a Kenmore 385
- Tips for Smooth Threading Every Time
- What Real Sewing Experience Teaches You About Threading a 385 Kenmore
- Conclusion
- SEO Tags
If your Kenmore 385 has been sitting quietly in a cabinet, staring at you like it knows you forgot something, the missing piece is probably the threading. The good news is that a 385 Kenmore sewing machine is not hard to thread once you understand the logic behind it. The better news is that most 385 models follow a very similar upper-thread path, so once you learn it, your hands will remember the routine faster than your brain can say, “Why is the thread nesting under my fabric again?”
This guide walks you through how to thread a 385 Kenmore sewing machine from spool to needle, how to wind and install the bobbin, and how to fix the most common mistakes that happen when the machine seems determined to sew modern art instead of a straight seam. Because the 385 line includes multiple models, I’ll also show you how to identify which bobbin setup you have, since that is where most confusion begins.
Why Threading a Kenmore 385 Correctly Matters
Threading is not just a “close enough” job on a sewing machine. On a Kenmore 385, the thread has to pass through the correct guides, seat properly in the tension area, move through the take-up lever, and reach the needle in the right direction. Miss one stop on that route and your machine may skip stitches, jam, bunch thread underneath the fabric, or snap the thread without warning.
In plain English: a properly threaded machine sounds calmer, sews smoother, and wastes a lot less of your patience. An improperly threaded one behaves like a tiny mechanical gremlin with a foot pedal.
First, Know Which 385 Bobbin System You Have
The phrase “Kenmore 385” does not refer to one single machine. It refers to a series. That means your exact model may look a little different from your neighbor’s, your aunt’s, or that one you found on a yard-sale table between a waffle iron and a ceramic goose. The upper threading path is usually very similar, but the bobbin area may be one of two common styles:
1. Front-Loading Bobbin Case
This style uses a removable metal bobbin case. You open the front or side shuttle area, place the bobbin into the case, pull the thread through the slot and under the tension spring, then insert the case into the shuttle by holding the little latch.
2. Top-Loading or Drop-In Bobbin Holder
This style has a cover plate on top of the machine bed near the needle plate. You drop the bobbin into the holder, pull the thread through marked slots, and replace or close the cover.
If you are not sure which one you have, open the bobbin area before doing anything else. If you see a separate metal case you can hold in your hand, it is front-loading. If the bobbin sits directly into a holder under a flat cover, it is drop-in.
Before You Thread: Set the Machine Up the Right Way
Before you guide a single inch of thread through your Kenmore 385, do these small but important prep steps:
- Turn the machine off for safety.
- Raise the needle to its highest position by turning the handwheel toward you.
- Raise the presser foot.
- Place your spool of thread on the spool pin so the thread feeds smoothly.
- Use a fresh, correctly inserted needle if you have any doubts about the old one.
That raised presser foot is a big deal. It opens the tension discs so the upper thread can settle where it belongs. Threading with the presser foot down is one of the fastest ways to create giant loops under the fabric and a dramatic speech about how “this machine hates me.” The machine does not hate you. It just wanted the presser foot up.
How to Thread the Upper Thread on a 385 Kenmore Sewing Machine
Most Kenmore 385 models follow a classic mechanical threading path. Once the needle and take-up lever are up and the presser foot is raised, follow this sequence.
Step 1: Place the Spool Correctly
Put the spool on the spool pin with the thread feeding smoothly off the spool. On many 385 manuals, the thread is shown coming off the back of the spool. If your machine uses a horizontal spool pin and cap, make sure the spool cap is snug enough to control the spool without pinching it.
Step 2: Bring the Thread Through the Top Thread Guide
Pull the thread to the first guide at the top of the machine. This is the opening move. Think of it as checking in at the front desk before the thread tours the rest of the building.
Step 3: Pull the Thread Down Into the Tension Area
Guide the thread down the threading channel and into the tension area. Keep a little tension on the thread with your fingers so it actually seats between the discs rather than floating nearby and pretending to help.
Step 4: Go Around the Check Spring Holder
After entering the tension area, the thread usually wraps around the check spring holder or spring wire. This part helps regulate thread flow as the machine forms stitches. Skip it, and your stitch quality often gets weird in a hurry.
Step 5: Bring the Thread Up Through the Take-Up Lever
Now bring the thread back up and pass it through the take-up lever. On many Kenmore 385 machines, this is done from right to left. The take-up lever is one of the most important stops on the path because it pulls the thread up during stitch formation. If the thread misses this lever, the machine cannot form balanced stitches properly.
Step 6: Guide the Thread Back Down
Bring the thread back down through the next guide or guides. Many 385 models have a thread guide on the faceplate area and another guide at the needle bar.
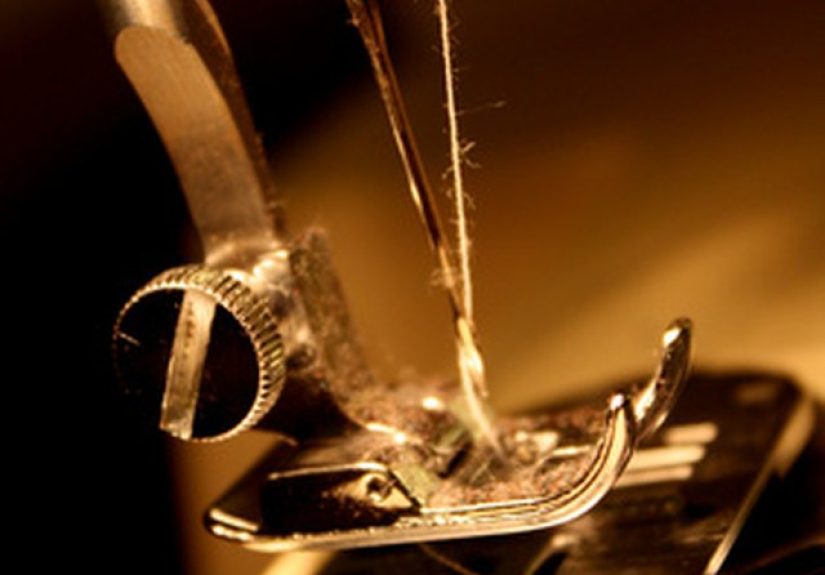
Step 7: Thread the Needle from Front to Back
Most Kenmore 385 manuals specify threading the needle from front to back. Cut the end of the thread cleanly with sharp scissors if it is fraying. A fuzzy thread tail and a tiny needle eye are not exactly best friends.
At this point, the upper threading should be complete. If it looks right but feels suspicious, gently pull the thread. With the presser foot up, it should move fairly easily. Lower the presser foot and pull again; you should feel more resistance. That little test is wonderfully boring and wonderfully useful.
How to Wind the Bobbin on a Kenmore 385
The bobbin winding process varies slightly by model, but the idea is always the same: guide the thread to the bobbin winder tension point, feed the thread through the bobbin, engage the bobbin winder, and wind evenly.
Basic Bobbin Winding Steps
- Place the spool of thread on the spool pin.
- Guide the thread through the bobbin winding tension guide or discs.
- Pass the thread through the hole in the bobbin, usually from the inside to the outside.
- Place the bobbin on the bobbin winding spindle.
- Move the bobbin winder spindle to the right, or disengage the clutch/handwheel if your model uses that system.
- Hold the thread tail, start the machine, and let it wind a few turns.
- Stop and trim the loose tail close to the bobbin.
- Continue winding until the bobbin is full or the machine stops automatically.
- Move the bobbin winder back to its resting position and re-engage the machine for sewing.
The key here is even winding. A sloppy, lumpy bobbin may still fit, but it can produce uneven tension, jerky feeding, and a lot of muttering. Wind it neatly now and enjoy fewer problems later.
How to Insert the Bobbin: Front-Loading 385 Models
If your Kenmore 385 uses a removable bobbin case, follow these steps:
- Place the wound bobbin into the metal bobbin case.
- Make sure the thread feeds in the correct direction, which is commonly clockwise on many front-loading 385 manuals.
- Pull the thread through the slot in the bobbin case.
- Slide the thread under the tension spring and through the opening.
- Hold the latch on the bobbin case open.
- Insert the bobbin case into the shuttle area and release the latch.
- Check that the case locks into place securely.
If the case is not seated correctly, the machine may refuse to cooperate in spectacular fashion. Do not force it. Remove it, line it up again, and try once more.
How to Insert the Bobbin: Drop-In 385 Models
If your Kenmore 385 has a top-loading bobbin holder, the steps are a little different:
- Open or remove the bobbin cover plate.
- Drop the bobbin into the holder.
- Make sure the thread feeds in the direction shown on your machine, commonly counterclockwise on many drop-in 385-style manuals.
- Pull the thread through the first tension slot.
- Continue pulling it through the second slot or guide toward the back.
- Leave a thread tail of several inches.
- Replace the hook cover plate if your machine uses one.
A lot of drop-in models print the thread path right near the bobbin area, which is the sewing machine equivalent of a helpful street sign. Follow those markings closely.
How to Pick Up the Bobbin Thread
After both upper and lower threads are in place, hold the needle thread loosely in your left hand. Turn the handwheel toward you one complete turn so the needle goes down and back up. Then pull the upper thread gently. This should draw the bobbin thread up through the needle plate.
Pull both thread tails under the presser foot and toward the back of the machine. Leave a few inches of thread behind the foot before you begin sewing. Starting with both tails controlled helps prevent the thread from pulling out of the needle during the first few stitches.
Quick Threading Checklist for Better Stitches
Before you sew, run through this short mental checklist:
- Needle all the way up? Yes.
- Presser foot up while threading? Yes.
- Thread fully seated in the tension area? Yes.
- Take-up lever threaded? Yes.
- Needle threaded front to back? Yes.
- Bobbin installed in the correct direction? Yes.
- Both threads pulled under the presser foot and to the back? Yes.
That is your pre-flight check. It is not glamorous, but neither is ripping out a bird’s nest of tangled thread from the underside of a pillowcase.
Common Threading Mistakes on a Kenmore 385
Thread Loops Under the Fabric
This usually points to an upper-thread problem, not a bobbin problem. The top thread may not be in the tension discs, the take-up lever may have been missed, or the machine may have been threaded with the presser foot down.
Thread Loops on Top of the Fabric
This often means the bobbin is inserted incorrectly or the bobbin thread is not under its tension spring or slot properly.
Thread Keeps Breaking
Rethread both top and bottom completely. Check for a bent or damaged needle, rough thread, burrs near the needle plate, or thread catching on the spool. Old thread can also misbehave like it has a grudge.
Skipped Stitches
Skipped stitches may come from incorrect threading, a bent needle, the wrong needle size, or a dull needle. When in doubt, replace the needle first. It is cheap, quick, and shockingly often the answer.
Machine Suddenly Started Sewing Badly
Do not immediately start turning random screws. First unthread and rethread the entire machine, top and bottom. Many manuals and sewing technicians recommend this because thread can slip out of place without making it obvious.
Tips for Smooth Threading Every Time
Use good-quality all-purpose thread when possible. Match the needle size to the fabric. Clean lint from the bobbin area regularly. Turn the handwheel toward you, not backward. And whenever the machine acts odd, start with the simplest fix: rethread the machine slowly and carefully.
Also, keep your exact model number handy. “Kenmore 385” gets you into the right neighborhood, but the full number gets you to the correct house.
What Real Sewing Experience Teaches You About Threading a 385 Kenmore
Here is the honest part that manuals do not always capture: learning to thread a 385 Kenmore is usually less about memorizing steps and more about developing feel. The first few times, everything seems oddly specific. Raise the take-up lever. Raise the presser foot. Turn the handwheel toward you. Feed the thread through this guide, then that spring, then the lever, then the needle bar guide. It can feel like the machine is giving you a secret handshake and refusing to sew until you get every finger movement exactly right.
Then something clicks. You realize the machine is not being fussy for fun. Each step has a job. The raised presser foot opens the tension discs. The take-up lever controls the flow of top thread during stitch formation. The bobbin spring creates resistance so the lower thread does not just spill out like spaghetti from a tipped pot. Once those jobs make sense, threading stops feeling random and starts feeling mechanical in the best possible way.
One very common experience with a Kenmore 385 is blaming the bobbin when the top threading is actually wrong. A sewer sees loops on the underside of the fabric and immediately thinks, “The bobbin is cursed.” Usually, it is not cursed. Usually, the upper thread missed the tension area because the presser foot was down or the thread never fully entered the discs. This is such a classic sewing moment that it might as well come with theme music.
Another real-world lesson is that old mechanical Kenmore machines are often more forgiving than beginners expect, but only after they are threaded correctly. Once the path is right, many 385 models sew with a steady, sturdy feel that makes them easy to trust. That is one reason these machines still have loyal fans. They do not need flashy screens or cheerful startup noises. They just need proper threading, a decent needle, and a little respect.
Beginners also tend to rush the bobbin, and the machine notices. If the bobbin is wound too loosely, wound unevenly, or inserted in the wrong direction, stitch quality goes downhill fast. But once a sewer gets used to winding a neat bobbin and checking the thread direction before inserting it, the whole machine becomes more predictable. Predictable is beautiful in sewing. Predictable means you spend more time making something and less time asking the machine why it chose chaos.
Perhaps the most useful experience of all is discovering that rethreading is not failure. It is normal maintenance. Even experienced sewers unthread and rethread when a machine starts acting strange. In fact, that habit is part of what makes them look experienced. They do not immediately assume the machine is broken. They assume something simple may have slipped, they reset the thread path, and nine times out of ten, the machine starts behaving again.
So if your 385 Kenmore seems temperamental today, take a breath and thread it again from the beginning. Slowly. Deliberately. With the presser foot up, the needle up, and both threads ending neatly behind the foot. That tiny ritual is where confidence begins. Pretty soon, threading the machine will feel less like solving a puzzle and more like opening the door to sewing.
Conclusion
If you want to thread a 385 Kenmore sewing machine successfully, remember the three rules that solve most problems: raise the presser foot before threading, make sure the thread passes through every guide and the take-up lever, and install the bobbin in the correct direction for your model. From there, pick up the bobbin thread, pull both tails to the back, and test on scrap fabric before starting your project.
Once you learn the rhythm, a Kenmore 385 becomes much less mysterious and a lot more enjoyable. And that is the sweet spot of sewing: fewer tangles, better stitches, and just enough confidence to say, “Yes, I absolutely meant for it to look this professional.”