Table of Contents >> Show >> Hide
- Why a Pizza Box Makes a Surprisingly Good DIY Canvas
- The Original Spark: A Personal, Budget-Friendly Reader Redesign
- Materials You Need for Pizza Box Wall Art
- Step-by-Step: How to Turn a Pizza Box Into Wall Art
- Design Ideas for Pizza Box Perfection
- Why This Project Works for Renter-Friendly Decorating
- Upcycling, Recycling, and the Pizza Box Question
- Food Packaging Is Changing, and Pizza Boxes Are Part of the Story
- Common Mistakes to Avoid
- Advanced Ideas for a More Professional Finish
- Experience Section: What Making Pizza Box Wall Art Actually Feels Like
- Conclusion: Small Budget, Big Personality, Zero Design Snobbery
Some home projects begin with a designer showroom, a measured floor plan, and a budget that makes your checking account whisper, “Please be gentle.” Others begin with dinner. Specifically, pizza. And not even the pizza itself, but the humble box left behind after the last slice has vanished and someone has politely pretended they are not saving the corner piece for breakfast.
Reader Readesign: Pizza Box Perfection is the kind of DIY idea that proves creativity does not require a giant craft room, a celebrity designer, or a gold-plated hot glue gun. Inspired by a clever reader project that transformed a clean pizza box into personalized wall art with printed paper and Mod Podge, this concept sits at the delightful intersection of upcycling, budget decorating, renter-friendly design, and “I can’t believe that used to hold pepperoni.”
At its heart, this project is about seeing potential where most people see recycling. A pizza box is lightweight, flat, surprisingly sturdy, and already shaped like a canvas. With the right preparation, a few printed graphics, a decoupage medium, and a little patience, it can become modern wall decor that looks intentional rather than accidental. In other words, it is trash-to-treasure without the tragic middle stage where your kitchen table looks like a raccoon hosted an art retreat.
Why a Pizza Box Makes a Surprisingly Good DIY Canvas
The modern pizza box is usually made from corrugated cardboard, which means it has a fluted inner layer sandwiched between flat outer layers. That structure gives it strength without much weight. For pizza delivery, that means stackability and insulation. For DIY wall art, it means a free, flat surface that can hold paper, paint, lightweight embellishments, and a hanging method without collapsing like a sad paper towel.
A clean pizza box also offers scale. Many budget DIY wall art projects fail because they are too small for the wall they are trying to decorate. A standard large pizza box can create a bold square artwork, while multiple boxes can form a gallery grid, oversized panel, or modular statement piece. The result can look graphic and modern, especially when the design uses typography, poetry, botanical prints, abstract shapes, vintage illustrations, or black-and-white photography.
The Big Rule: Use a Clean Box
Before anyone reaches for a cheese-glossed box and calls it “texture,” let us be clear: for wall art, the box should be clean, dry, and free of food residue. A little recycling conversation may tolerate minor grease in many communities, but your bedroom wall is not a paper mill. Grease can stain through paper, attract odors, and make adhesives behave badly. If the bottom of the box looks like it lost a wrestling match with mozzarella, use the clean lid or choose another box.
The Original Spark: A Personal, Budget-Friendly Reader Redesign
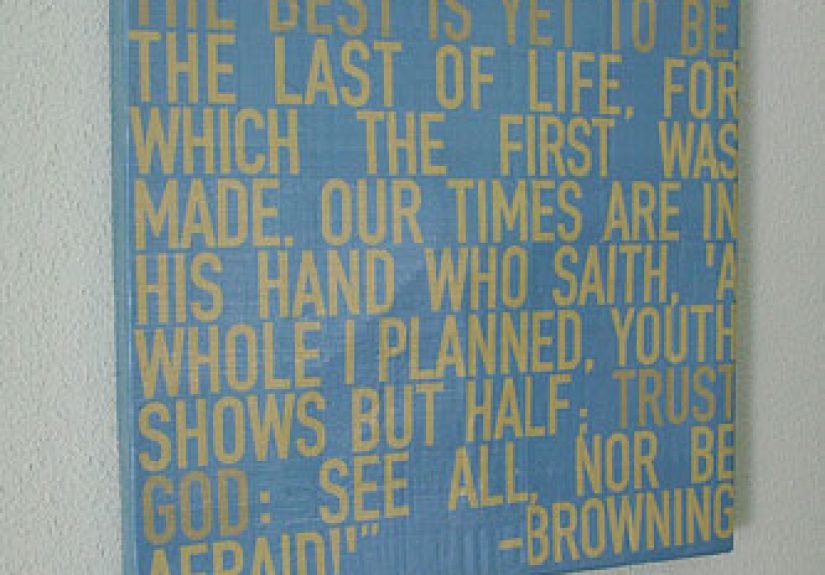
The charm of the original reader-inspired idea was not just that a pizza box became art. It was that the finished piece meant something. The maker used printed text connected to her personal life and turned an ordinary object into bedroom wall decor. That is the magic ingredient many DIY projects forget. Pretty is nice. Personal is better. Personal and nearly free? Now we are cooking.
This approach works beautifully for renters, students, newlyweds, first apartments, dorm rooms, and anyone living with walls that are either blank, beige, or aggressively mint green. When painting is not allowed, expensive framing is not practical, and your decorating budget is currently being eaten by groceries, pizza box wall art gives you a way to claim the room without fighting the landlord or your bank account.
Materials You Need for Pizza Box Wall Art
You do not need many supplies to create a polished pizza box art project. In fact, the short materials list is part of the appeal. The project is easy to customize, and most of the items are inexpensive or already hiding in a drawer, waiting for their big moment.
- A clean, dry pizza box or clean pizza box lid
- Printed artwork, laser prints, scrapbook paper, wrapping paper, old book pages, or decorative paper
- Mod Podge or another decoupage medium
- Foam brush or soft craft brush
- Scissors, craft knife, or paper trimmer
- Ruler or measuring tape
- Brayer, plastic card, or clean cloth for smoothing bubbles
- Wax paper or scrap paper to protect the work surface
- Optional: acrylic paint, washi tape, mat board, ribbon, hanging strips, or lightweight frame trim
Laser prints are often a safer choice for decoupage than fresh inkjet prints because inkjet ink can smear when wet adhesive touches it. If inkjet printing is your only option, test a small piece first or seal it lightly with a clear spray before applying the decoupage medium. Crafting is more fun when the ink stays where it belongs and does not melt into a dramatic watercolor crime scene.
Step-by-Step: How to Turn a Pizza Box Into Wall Art
1. Choose the Best Part of the Box
Open the pizza box and inspect it like a very serious cardboard detective. Look for the cleanest, flattest section. The lid is usually the best candidate because it avoids most direct contact with the pizza. If the logo side is bold or colorful, you can cover it with primer, paint, thick paper, or a base layer of white cardstock.
2. Flatten and Reinforce the Surface
Trim away the sides if you want a flat panel, or keep the folded shape if you like the depth of a shallow canvas. For a sturdier piece, glue an extra layer of cardboard inside the lid. This helps prevent warping when wet adhesive is applied. Place the cardboard under heavy books for a few hours if it has curves or bends. Dictionaries finally get to feel useful again.
3. Plan the Design Before Gluing
Lay out your printed paper, poem, quote, illustration, or pattern before opening the Mod Podge. This is the stage where you decide whether the piece will be minimalist, vintage, romantic, colorful, typographic, or delightfully weird. For a modern look, use large-scale lettering and plenty of white space. For a cozy cottage look, try botanical prints or layered book pages. For a kids’ room, use bright shapes, animals, maps, or comic-style graphics.
4. Apply a Thin, Even Adhesive Layer
Brush a thin coat of decoupage medium onto the pizza box surface and another light coat onto the back of the paper. Work quickly but calmly. This is not a fire drill; it is glue with ambition. Position the paper carefully, then smooth from the center outward using a brayer, plastic card, or clean cloth. The goal is to push out air bubbles and avoid wrinkles.
5. Seal the Top
Once the paper is down and mostly dry, add a thin sealing coat over the top. Let it dry fully, then add another coat if needed. Several thin coats usually look better than one gloopy layer. Choose a matte finish for a subtle gallery look or gloss for a more polished, crafty finish. If you want the piece to look less “school project” and more “small boutique that sells candles with mysterious names,” matte is often your friend.
6. Add Edges, Details, and Hanging Hardware
Finish the sides with paint, paper strips, ribbon, or washi tape. If the cardboard edge is visible, a clean black, white, gold, or kraft-paper border can make the whole piece feel intentional. Hang the finished artwork with removable picture-hanging strips if you are renting, or attach lightweight sawtooth hardware if the piece is reinforced and sturdy enough.
Design Ideas for Pizza Box Perfection
Personal Typography Art
Use a meaningful quote, wedding vow, favorite poem, song lyric snippet, family saying, or travel coordinates. Typography works especially well because it can cover the entire square surface with clean visual impact. Use one bold typeface and one simple accent font to avoid the dreaded “restaurant menu designed in 1998” effect.
Gallery Grid
Collect four clean pizza boxes and make a matching set. Each panel can feature one letter, one botanical print, one abstract shape, or one photo detail. Hang them in a square grid over a sofa, desk, bed, or dining nook. This is a smart way to create large-scale wall art without paying large-scale wall art prices.
Kids’ Room Art
Pizza box panels are lightweight, inexpensive, and easy to change as children’s interests evolve. Today dinosaurs, tomorrow planets, next week a very specific frog wearing sunglasses. Use removable strips and update the art whenever inspiration strikes.
Kitchen or Dining Room Decor
Lean into the origin story. Create art with vintage pizza illustrations, Italian food words, tomato-red accents, black-and-white checkerboard patterns, or playful phrases. A pizza box turned into kitchen art has a wink built in. It knows where it came from, and it is not ashamed.
Minimalist Abstract Panels
Paint the cardboard with a neutral base, then layer paper arcs, organic shapes, or textured scraps. The result can mimic the look of boutique abstract art. Keep the palette limited to three or four colors for a cleaner finish.
Why This Project Works for Renter-Friendly Decorating
Renter-friendly decorating is all about impact without damage. Pizza box wall art checks several boxes: it is lightweight, removable, inexpensive, customizable, and easy to replace. Since the finished piece weighs far less than framed glass, it can usually be hung with removable adhesive strips. That means you can decorate without drilling holes or having a tense move-out conversation about “wall integrity.”
It also solves a common rental problem: temporary homes can feel emotionally temporary. Personalized art helps a room feel lived-in, even when the lease says you may not paint, install shelves, or look at the walls too enthusiastically. A handmade piece adds warmth and story. Guests may compliment it, and you get the fun of saying, “Thanks, it used to be a pizza box,” which is a sentence that improves almost any dinner party.
Upcycling, Recycling, and the Pizza Box Question
Pizza boxes have long caused confusion in recycling conversations. Current guidance from major U.S. recycling and paper organizations increasingly supports recycling empty corrugated pizza boxes, even when they have typical grease marks, as long as leftover food is removed. Still, local rules can vary, so checking city or hauler guidelines remains smart.
For DIY purposes, the best pizza box is one that would otherwise be clean enough to recycle. If a box has heavy food residue, stuck cheese, pooled oil, or sauce stains that smell like last night’s decisions, skip it. Composting may be an option in some communities, but for art, cleanliness wins. Your wall deserves better than mystery marinara.
Upcycling adds another layer of value because it extends the life of the material before disposal. Even if the final artwork is not immortal, it delays waste, reduces the need for a store-bought canvas, and encourages a more creative relationship with everyday materials. That is the real win: not just making one cute project, but training your eye to ask, “Could this be useful?” before tossing something away.
Food Packaging Is Changing, and Pizza Boxes Are Part of the Story
The pizza box is no longer just a delivery container. It is part engineering, part branding, part sustainability challenge, and part dinner table furniture. Restaurants and packaging companies have explored recycled content, clearer recycling instructions, compostable materials, round box shapes, steam-control designs, and better ventilation. The goal is simple but tricky: keep the pizza hot without trapping so much steam that the crust becomes floppy and dramatic.
That same design thinking can inspire DIY makers. A good pizza box art project respects the material. Corrugated cardboard is strong, but it can warp with too much moisture. It is light, but it needs reinforcement for larger pieces. It is flat, but edges matter. Once you understand the box as designed material rather than disposable junk, your project becomes more refined.
Common Mistakes to Avoid
Using Too Much Glue
More adhesive does not mean better adhesion. It usually means wrinkles, bubbles, and a cardboard panel that curls like it just heard gossip. Use thin coats and allow proper drying time.
Skipping the Test Print
Always test ink and paper before committing. Some inks smear, some papers wrinkle, and some colors darken under sealant. A small test can prevent a big sigh.
Ignoring the Edges
Edges reveal whether a project looks finished. Paint them, wrap them, tape them, or intentionally leave them kraft brown. Just do not forget them.
Choosing a Greasy Box
Clean cardboard is essential. If the box smells like garlic butter, it is not ready for its gallery debut.
Advanced Ideas for a More Professional Finish
Once you master the basic pizza box wall art method, you can upgrade the look with simple design tricks. Add a mat effect by placing a smaller image centered on a painted border. Use metallic paint along the edges for a framed appearance. Create a diptych or triptych by spreading one large image across multiple boxes. Layer vellum over printed text for depth. Add texture with torn paper, fabric scraps, or lightweight plaster compound, but keep the material weight low.
You can also use the pizza box as a hidden support panel inside a thrifted frame. Remove the glass, cut the box to fit, decoupage the surface, and place it inside the frame like a traditional art board. This approach gives the finished piece more polish while still keeping costs low. It also lets you use damaged frames that might not work for photos anymore.
Experience Section: What Making Pizza Box Wall Art Actually Feels Like
The first time you make art from a pizza box, there is a funny little moment when you wonder whether you are being brilliant or simply avoiding taking out the recycling. That feeling is normal. It usually disappears around the time the first piece of paper smooths onto the cardboard and the box stops looking like dinner evidence. Suddenly, you can see the shape differently. The square becomes a panel. The fold becomes depth. The cardboard becomes a surface with possibilities.
The most satisfying part of this project is how forgiving it can be. Traditional canvas sometimes feels intimidating, as if every brushstroke must justify its price tag. A pizza box has no such ego. It invites experimentation. If a design goes wrong, you can peel, sand, paint, cover, or start again after next Friday’s takeout. That low-pressure quality makes the project especially good for beginners, kids, renters, and recovering perfectionists.
One practical lesson is that drying time matters more than enthusiasm. When you rush the sealing coats, the surface can become tacky or cloudy. When you let each thin coat dry, the finish becomes smoother and more durable. Another lesson is that paper choice changes everything. Thick scrapbook paper hides logos better. Thin book pages create a vintage layered look but wrinkle more easily. Laser-printed typography looks crisp and modern. Wrapping paper can be beautiful, but it may tear if handled roughly.
Hanging the finished piece is its own tiny celebration. Because the art is lightweight, you do not need heavy hardware. Removable strips usually do the job, and the lack of glass makes the piece feel casual and safe in busy spaces. In a bedroom, it can soften a blank wall. In a kitchen, it can add humor. In an entryway, it can become a conversation starter. People notice handmade objects because they carry a little human fingerprint, even when the material is humble.
The best experience, though, is the shift in mindset after making one. You start looking at packaging differently. A cereal box becomes a drawer divider. A shipping box becomes a template. A clean pizza box becomes future art. You become the person who says, “Don’t throw that away yet,” which may mildly concern your household but will eventually impress them when the wall looks fantastic.
That is the real perfection in Reader Readesign: Pizza Box Perfection. It is not about creating flawless museum-grade art from cardboard. It is about personality, resourcefulness, and the joy of making something charming from something ordinary. It proves that style does not always arrive in a shopping bag. Sometimes it arrives with extra cheese.
Conclusion: Small Budget, Big Personality, Zero Design Snobbery
Pizza box wall art is funny, frugal, and surprisingly stylish when handled with care. It combines the practicality of upcycling with the emotional payoff of personalized decor. Whether you create typographic bedroom art, a kitchen print, a kids’ room panel, or a full gallery grid, the project offers a low-cost way to make your space feel more like you.
The key is to treat the box like a real art surface: choose clean cardboard, reinforce it if needed, plan the layout, use thin adhesive coats, smooth carefully, finish the edges, and hang it with intention. Do that, and your former takeout container can become a piece of decor with a story. And honestly, any project that begins with pizza and ends with better walls deserves a round of applause.